
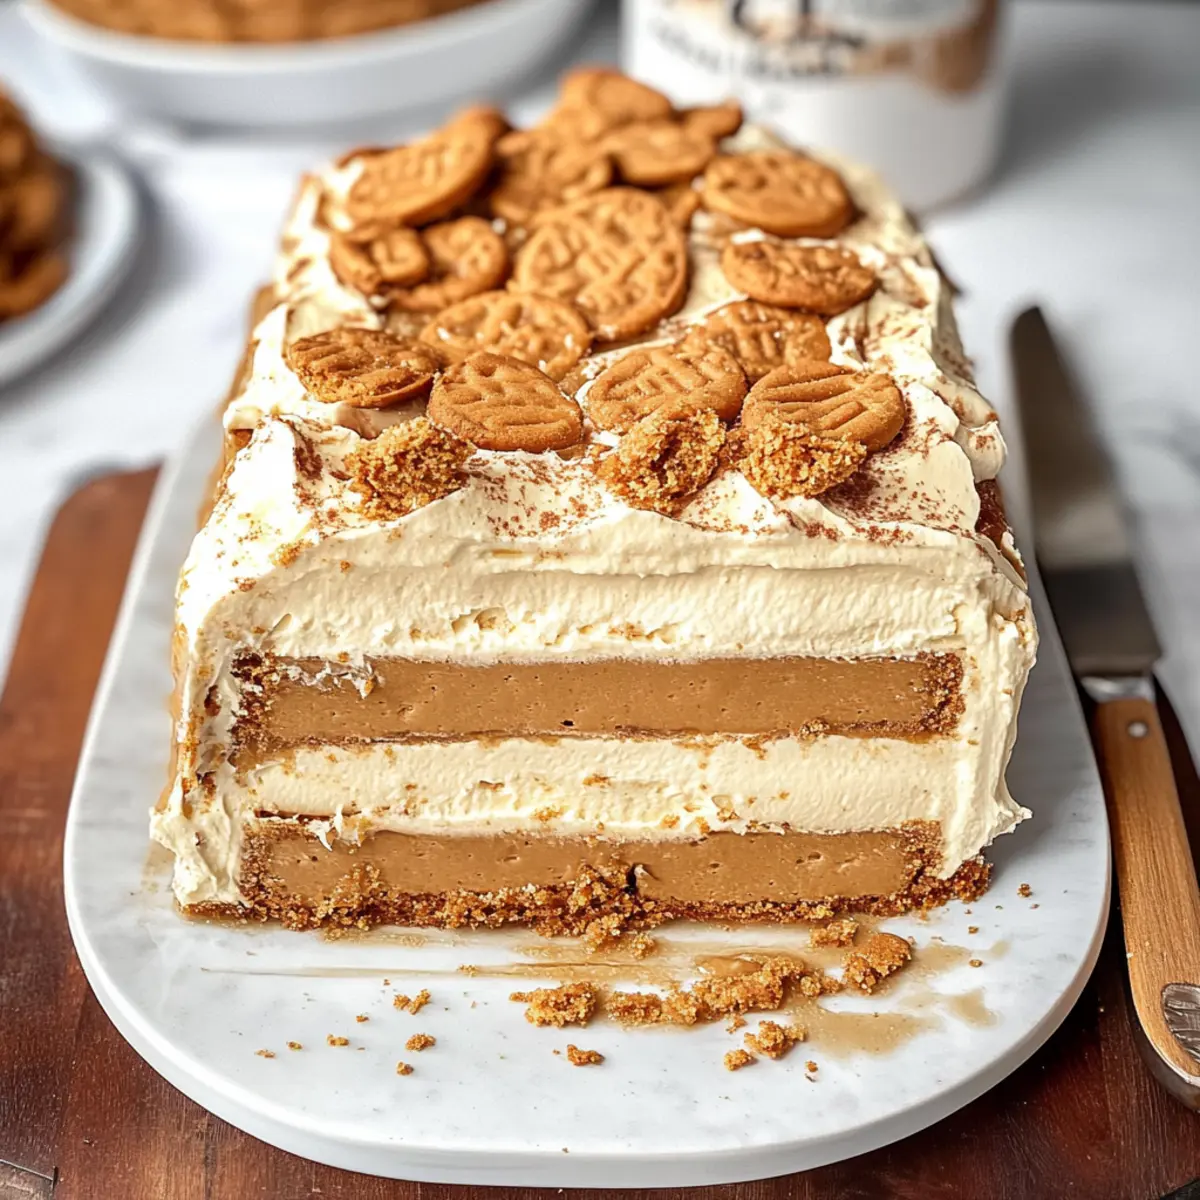
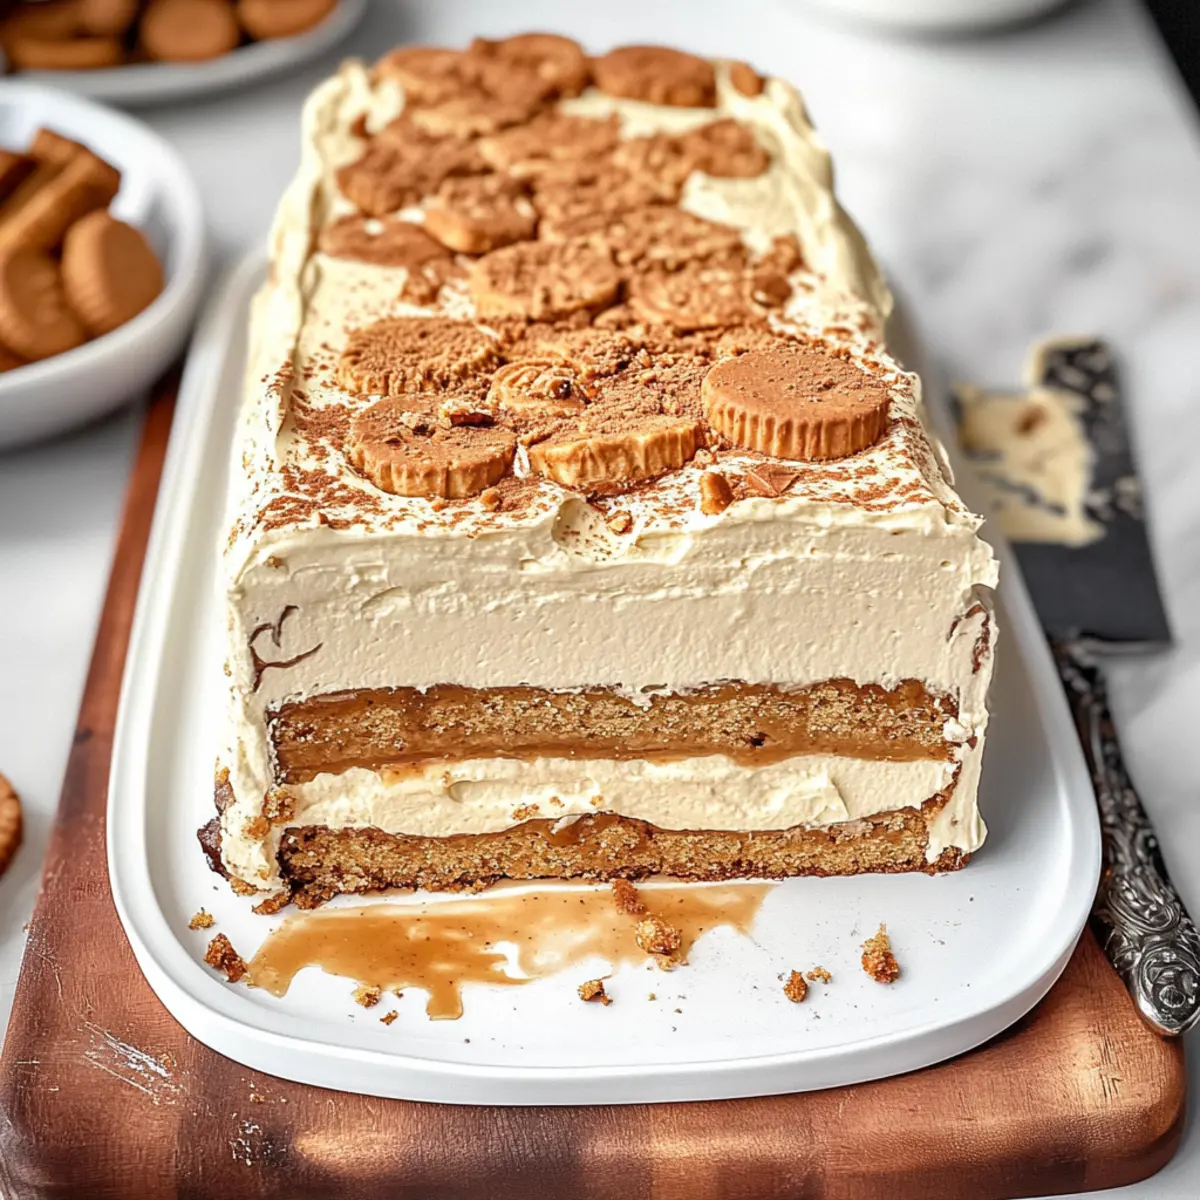
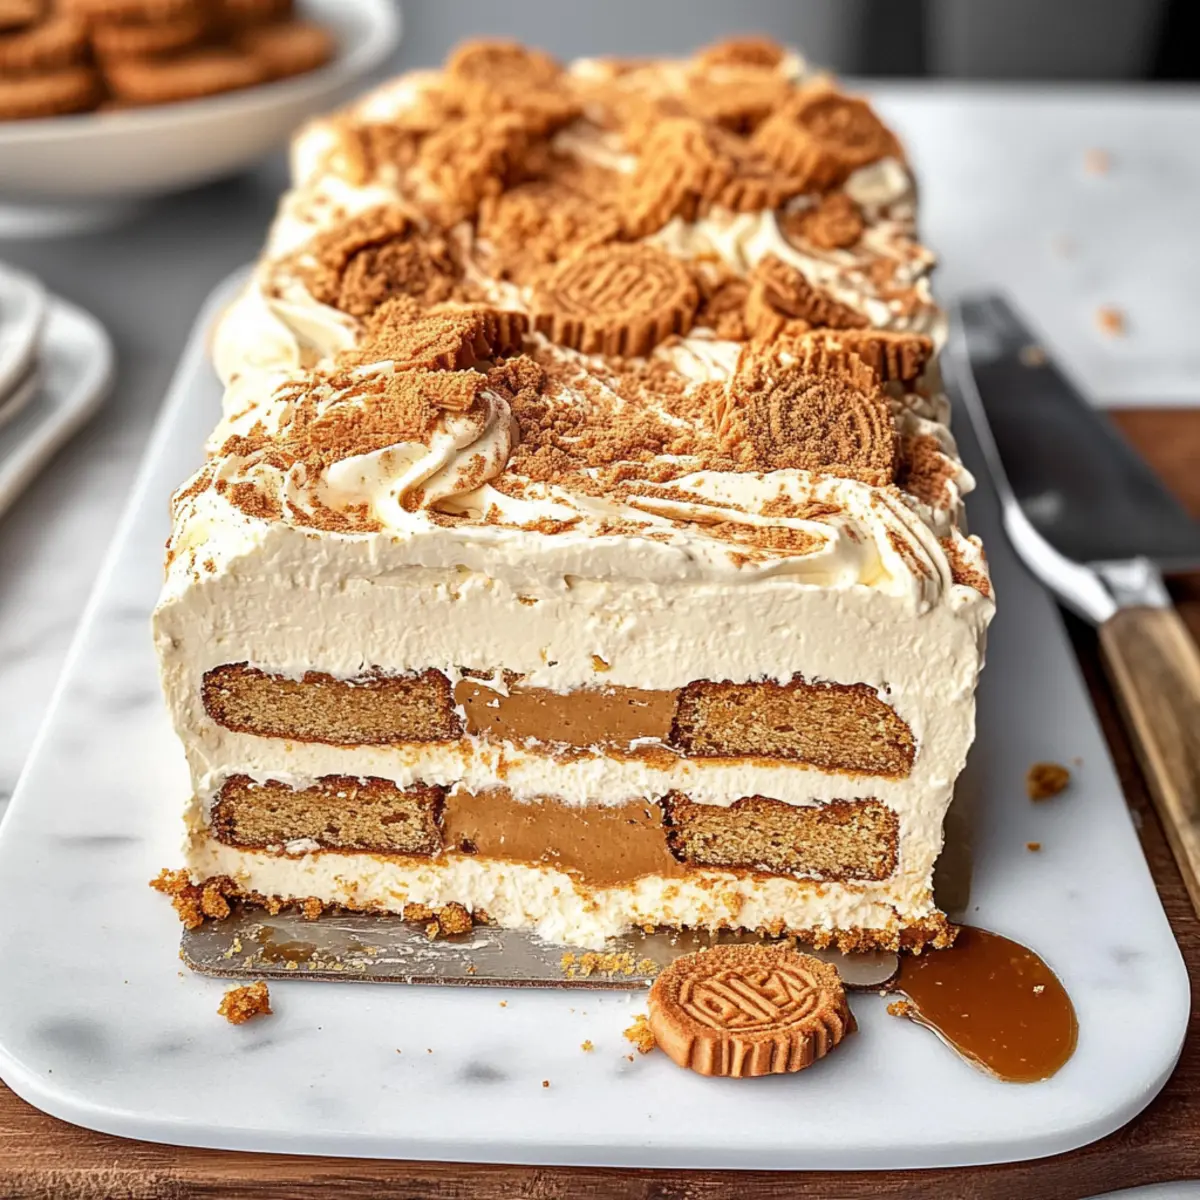
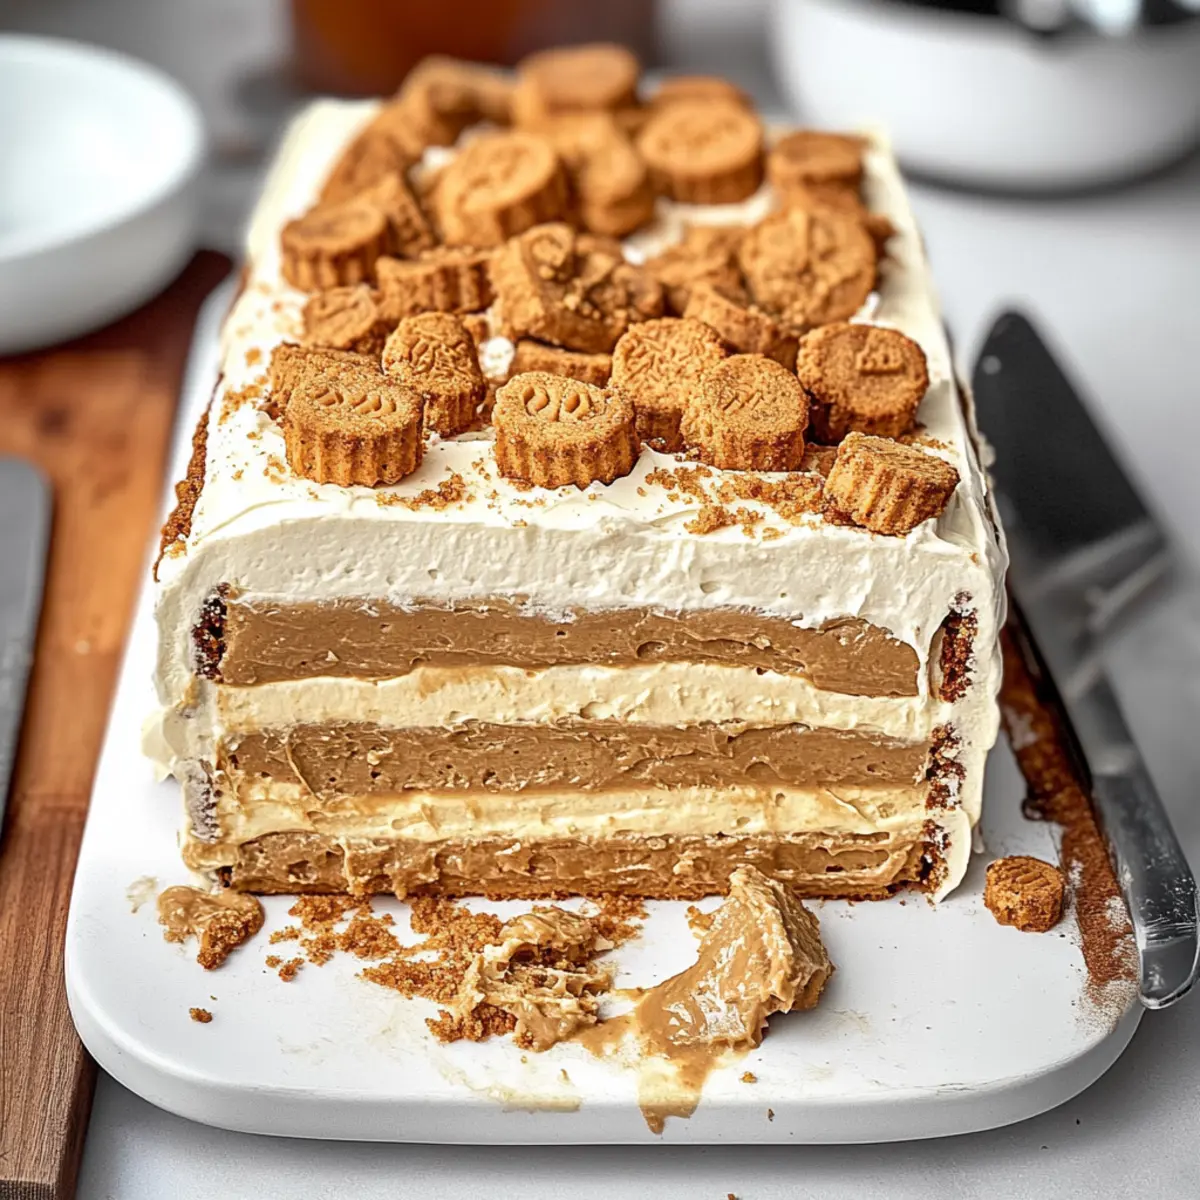
As I was experimenting in my kitchen today, I stumbled upon a delightful surprise that transformed my afternoon into something truly special. This 4-Ingredient Biscoff Icebox Cake is a game-changer for dessert lovers like us who crave something sweet but aren’t keen on the fuss of baking. With its creamy layers crafted from rich lotus cookie butter and a blissfully crunchy biscuit base, it’s a treat that promises both texture and flavor without the oven’s heat. The best part? This no-bake dessert is not only quick to prepare but also a fantastic make-ahead option, perfect for impressing guests or simply satisfying your own sweet tooth. Curiosity piqued? Let’s dive into how to whip up this indulgent delight!
Why is Biscoff Icebox Cake a Must-Try?
Simplicity, with just 4 accessible ingredients, making it perfect for any skill level, from novice bakers to seasoned chefs. Decadent flavor from the iconic Biscoff spread and cookies ensures every bite is a treat. Versatile options allow you to customize with different cookie butters or fresh fruits, creating a unique variation each time. Make-ahead convenience means you can prepare it in advance, saving time for gatherings or weeknight indulgence. Plus, it’s a crowd-pleaser, ideal for dinner parties or family celebrations, where everyone will be asking for seconds! If you love a good cake, you might also enjoy our delicious Cinnamon Apple Cake or the cozy Pumpkin Coffee Cake.
Biscoff Icebox Cake Ingredients
For the Cream Layer
• Heavy Cream (1 cup) – Make sure it’s cold for the best whipping results.
• Sweetened Condensed Milk (1/4 cup) – This adds sweetness and stability; you can substitute with powdered sugar if desired.
• Lotus Biscoff Spread (1/2 cup) – This delivers the rich signature flavor; you may swap it with any creamy cookie butter of your choice.
For the Base and Layers
• Lotus Biscoff Biscuits (20 pieces) – These provide a delicious crunchy texture for both the crust and layers; feel free to use any brand of speculoos cookies.
• Lotus Biscoff Spread (1/4 cup, for drizzling) – A delightful finishing touch that enhances the overall Biscoff Icebox Cake experience.
Step‑by‑Step Instructions for Biscoff Icebox Cake
Step 1: Whip the Cream
In a cold mixing bowl, add 1 cup of cold heavy cream and 1/4 cup of sweetened condensed milk. Using an electric mixer, whip the mixture on medium speed for about 3–5 minutes, or until stiff peaks form. The cream should hold its shape and have a light, fluffy texture. This step creates the delightful creamy base for your Biscoff Icebox Cake.
Step 2: Incorporate Biscoff Spread
Gently fold in 1/2 cup of Lotus Biscoff spread into the whipped cream mixture. Use a spatula and be careful not to deflate the cream as you mix until just combined. You should see beautiful swirls of the rich cookie butter throughout the cream. This will infuse the entire cake with that irresistible Biscoff flavor.
Step 3: Prepare Biscoff Drizzle
Microwave the remaining 1/4 cup of Biscoff spread for about 10–15 seconds until it becomes runny and easy to drizzle. This makes it simple to create beautiful patterns and layers in the cake. Set aside the warm spread while you prepare the pan; it will enhance the flavor with its gooey texture.
Step 4: Line the Loaf Pan
Take a 9×5 loaf pan and line it with plastic wrap, allowing the wrap to extend over the edges for easy removal later. This step ensures that your Biscoff Icebox Cake can be easily lifted out of the pan once frozen. Prepare for layering the creamy goodness and biscuits!
Step 5: Layer the Ingredients
Start by adding a thin layer of the Biscoff cream mixture at the bottom of the lined loaf pan. Follow this_layer with a single layer of Lotus Biscoff biscuits. Drizzle some of the warmed Biscoff spread over the biscuits, enhancing their flavor. This creates the delicious first layer of your Biscoff Icebox Cake.
Step 6: Repeat the Layers
Repeat the layers two more times—first with the Biscoff cream mixture, then the biscuits, and finish with a drizzle of warm Biscoff spread after each biscuit layer. Top it all off with a final layer of the Biscoff cream mixture, using a spatula to smooth it out. This creates a lovely multi-layered effect, ensuring every bite is packed with flavor.
Step 7: Freeze the Cake
Cover the loaf pan tightly with plastic wrap and place it in the freezer. Allow the Biscoff Icebox Cake to freeze for at least 2 hours, or overnight for optimal firmness. This step is crucial as it helps the cake set beautifully, making it easy to slice and serve later.
Step 8: Serve with Care
When ready to enjoy, remove the cake from the freezer and let it sit at room temperature for 15 minutes before slicing. This waiting time allows it to soften slightly, making the Biscoff Icebox Cake creamy and easier to cut. Serve it chilled and watch as everyone delights in this delicious no-bake dessert!
What to Serve with Biscoff Icebox Cake
Prepare for a delightful finish to your meal with these perfect pairings that enhance your dessert experience.
-
Fresh Berries: The tartness of raspberries or strawberries cuts through the sweetness of the cake, offering a refreshing contrast. Their vibrant colors also add a beautiful touch!
-
Whipped Cream: A dollop of lightly sweetened whipped cream provides an airy counterbalance to the creamy layers of the cake, inviting you to indulge.
-
Coffee: A warm cup of coffee complements the rich flavors of Biscoff, making each bite even more scrumptious. The bitterness of the coffee enhances the cake’s sweetness beautifully.
-
Chocolate Sauce: Drizzling a bit of chocolate sauce elevates the dessert with an extra layer of flavor while mingling well with the flavors of cookie butter.
-
Nutty Caramel Sauce: A drizzle of caramel adds a deliciously rich texture and flavor that pairs perfectly with the crunchy layers of Biscoff biscuits.
-
Coconut Sorbet: This light, tropical option refreshes the palate while harmonizing with the spices of the Biscoff spread. It’s a delightful twist to the dessert experience!
-
Chai Tea: The warm spices of chai tea echo the cinnamon notes in the Biscoff Icebox Cake, making for a comforting and aromatic experience.
Each of these suggestions rounds out your dessert menu, enhancing the experience of savoring this luscious cake while catering to a variety of tastes. Enjoy!
Make Ahead Options
The Biscoff Icebox Cake is an ideal make-ahead dessert for busy cooks looking to save time! You can prepare the layers of the cake up to 24 hours in advance. To do this, simply whip the cream, fold in the Biscoff spread, and assemble the layers with biscuits and drizzle as instructed. Cover the loaf pan tightly with plastic wrap and place it in the freezer for optimal firmness. When it’s time to serve, allow the cake to sit at room temperature for about 15 minutes for deliciously creamy slices. By preparing it ahead of time, you’ll enjoy this indulgent treat with minimal effort, leaving you free to savor the moment!
Expert Tips for the Best Biscoff Icebox Cake
-
Cold Ingredients: Always start with cold heavy cream and a chilled bowl. This helps achieve the perfect whipped cream texture, crucial for the Biscoff Icebox Cake.
-
Gentle Folding: When incorporating Biscoff spread into the cream, fold gently to maintain airiness. Avoid vigorous mixing, as it can deflate the whipped cream.
-
Layering Technique: For neat layers, ensure the biscuits are slightly dipped in the Biscoff spread before layering. This keeps them moist and flavorful.
-
Freezing Time: Don’t rush the freezing process! Allow the cake to set for at least 2 hours or overnight to ensure the best slicing experience.
-
Serving Tip: Let the cake sit at room temperature for about 15 minutes before serving. This enhances the creaminess of the Biscoff Icebox Cake, making it even more delightful!
How to Store and Freeze Biscoff Icebox Cake
Fridge: Store leftover Biscoff Icebox Cake in an airtight container in the fridge for up to 3 days. If you haven’t finished it all, be sure to cover it to avoid absorption of other refrigerator odors.
Freezer: Cover the cake tightly with plastic wrap or aluminum foil and freeze for up to two weeks. This no-bake dessert freezes beautifully, preserving its creamy texture and flavors.
Thawing: When ready to enjoy, transfer the Biscoff Icebox Cake from the freezer to the fridge to thaw overnight. For a quicker option, let it sit at room temperature for about 30 minutes before serving.
Reheating: There’s no need to reheat; serve the cake chilled for the best experience! Just cut into slices and enjoy the rich combination of textures.
Biscoff Icebox Cake Variations
Feel free to get creative and make this delightful dessert your own!
-
Nut-Free: Substitute Biscoff spread with a sunflower seed butter to maintain that creamy texture without any nuts.
-
Dairy-Free: Use coconut cream instead of heavy cream and almond milk condensed milk for a delightful dairy-free dessert. It adds a subtle hint of coconut flavor that complements Biscoff beautifully!
-
Chocolate Twist: Mix in some chocolate ganache between the layers for a luscious chocolatey bite. A layer of chocolate will enhance the richness and add a fun surprise to every slice.
-
Fruity Layer: Add sliced bananas or strawberries between the layers for a refreshing twist. The fruit’s natural sweetness balances out the richness of the Biscoff, creating a vibrant contrast.
-
Spicy Kick: Stir in a dash of cayenne pepper or cinnamon into the cream layer for a hint of warmth. This little spice can elevate the flavor profile, making each bite intriguing.
-
Vegan Option: Enjoy a fully vegan treat by using aquafaba instead of heavy cream and a plant-based condensed milk. It allows you to savor a lighter version without sacrificing flavor.
-
Cookie Mix: Experiment with crushed cookies like Oreos or Ginger Snaps instead of Biscoff biscuits for unique flavors. This swap offers a fun spin while maintaining that desirable crunch.
-
Topping Surprise: Finish with crushed nuts or a sprinkle of flaky sea salt on top before freezing for an added texture. It adds a satisfying crunch and an exciting salty contrast to the sweet layers.
If you’re in the mood for another delicious dessert, I highly recommend trying out our Cinnamon Apple Cake or the comforting Pumpkin Coffee Cake. Both will warm your heart and satisfy your sweet cravings!
Biscoff Icebox Cake Recipe FAQs
How do I choose the best heavy cream for my Biscoff Icebox Cake?
Absolutely! Look for heavy cream that has a fat content of at least 36%. This cream whips up beautifully and gives your cake that luscious, creamy texture we all love. Make sure your cream is cold when whipping; it’s the key to achieving those perfect, stiff peaks!
What’s the best way to store leftovers of the Biscoff Icebox Cake?
I recommend storing any leftover Biscoff Icebox Cake in an airtight container in the refrigerator, where it will stay fresh for up to 3 days. To keep it from absorbing unwanted odors, always cover it tightly. You can also keep the cake in the freezer for up to two weeks if you want to save it for later!
Can I freeze the Biscoff Icebox Cake? If so, how?
Yes, you can! To freeze your Biscoff Icebox Cake, wrap it tightly in plastic wrap or aluminum foil to prevent freezer burn. It will maintain its delicious flavor and creamy texture for up to two weeks. When you’re ready to enjoy it, let it thaw in the refrigerator overnight for the best results.
What if my heavy cream doesn’t whip to stiff peaks?
Very often, this can happen if the cream and bowl aren’t cold enough. To troubleshoot, ensure both are chilled and try whipping again. If it still doesn’t thicken up, it may not be fresh or has been over-whipped. When over-whipped, the cream might turn grainy and could eventually break—so watch it closely!
Are there any dietary considerations for making the Biscoff Icebox Cake?
Definitely! While this recipe is vegetarian, it does contain dairy, so those who are lactose intolerant should consider using lactose-free alternatives. Additionally, if you need gluten-free options, I suggest using gluten-free Biscoff biscuits or cookie alternatives to substitute the regular cookies in the recipe.
Irresistible Biscoff Icebox Cake: No-Bake Delight Awaiting
Ingredients
Equipment
Method
- In a cold mixing bowl, add 1 cup of cold heavy cream and 1/4 cup of sweetened condensed milk. Whip on medium speed for 3–5 minutes until stiff peaks form.
- Gently fold in 1/2 cup of Lotus Biscoff spread into the whipped cream, being careful not to deflate the cream.
- Microwave the remaining 1/4 cup of Biscoff spread for 10–15 seconds until runny and easy to drizzle.
- Line a 9x5 loaf pan with plastic wrap, extending the wrap over the edges.
- Add a thin layer of the Biscoff cream mixture in the lined loaf pan, followed by a layer of Lotus Biscoff biscuits and drizzle with warmed Biscoff spread.
- Repeat the layering two more times, topping with a final layer of the Biscoff cream mixture.
- Cover the loaf pan tightly with plastic wrap and freeze for at least 2 hours, or overnight.
- Remove the cake from the freezer and let it sit at room temperature for 15 minutes before slicing.
Leave a Reply