
There’s something magical about biting into a dessert that shatters with just a little pressure, revealing a delightful surprise inside. That’s exactly what you’ll experience with these irresistible Crispy Pavlova Bombs, a gluten-free treat that’s as fun to make as it is to eat! With a light and airy meringue shell encasing a luscious filling of lemon curd and tangy raspberry coulis, they’re perfect for impressing guests or indulging in a little self-care. Not only do these Pavlova Bombs make an eye-catching centerpiece for special occasions, but they also offer the convenience of being made ahead of time—allowing you to focus on what truly matters. Are you ready to bring a bit of whimsy to your dessert table? Let’s dive into the recipe and turn those cravings into a sweet reality!
Why are Crispy Pavlova Bombs a must-try?
Delightful Texture: Each Pavlova Bomb features a crispy outer shell that gives way to a soft, marshmallow-like interior, creating an unforgettable mouthfeel.
Customizable Goodness: With a variety of filling options, including lemon curd, raspberry coulis, or even salted caramel, you can tailor these treats to suit any craving or occasion.
Ideal for Entertaining: These stunning desserts are not just delicious; they also make a show-stopping centerpiece for your next gathering. Your guests will love the interactive experience of smashing them open!
Make-Ahead Friendly: Fit for busy schedules, these meringue shells can be made ahead and stored. Just fill them before serving for freshness and best texture.
Gluten-Free Indulgence: Enjoy a sweet treat that caters to dietary needs without skimping on flavor. These Crispy Pavlova Bombs are a guilt-free delight!
Dive into this delightful recipe and, if you’re in the mood for even more tasty ideas, check out our Mashed Potato Cheese and Chilli Beef for added culinary inspiration!
Crispy Pavlova Bombs Ingredients
Note: Get ready to create these gluten-free marvels!
For the Meringue Shell
- Egg Whites – Essential for structure; make sure they’re at room temperature for optimal volume.
- Caster Sugar – Provides sweetness and stability; granulated sugar works too, just requires more beating time.
- Cornstarch – Stabilizes the meringue, delivering that perfect chewy interior.
- White Vinegar – A secret ingredient that helps stabilize the egg whites for a superior texture.
For the Filling
- Lemon Curd – A zesty explosion of flavor that contrasts beautifully with the sweetness of the meringue; can be homemade or store-bought.
- Raspberry Coulis – A tangy, fruity sauce that brightens up the dish; feel free to swap for other berries as desired.
- Heavy Whipping Cream – Whipped to soft peaks, this adds a creamy touch that will seal your Pavlova Bombs to perfection.
With these Crispy Pavlova Bombs ingredients on hand, you are all set to embark on a delightful culinary adventure!
Step‑by‑Step Instructions for Crispy Pavlova Bombs
Step 1: Preheat the Oven
Begin by preheating your oven to 300°F (150°C). This initial temperature will help create a perfectly crisp outer shell for your meringue. While the oven heats, line a baking tray with parchment paper, ensuring it’s ready for the meringue once your egg whites are whipped.
Step 2: Whip Egg Whites
In a stand mixer bowl, add the egg whites and beat on high speed until soft peaks start to form, which will take about 2-3 minutes. Gradually sprinkle in the caster sugar, continuing to beat until the mixture appears thick and glossy, roughly 5-7 minutes. You’ll know it’s ready when it holds stiff peaks, forming a beautiful meringue for your Crispy Pavlova Bombs.
Step 3: Fold Ingredients
Gently fold in the cornstarch and white vinegar using a spatula. Be careful not to deflate the meringue; you want to maintain that airy structure. The vinegar will help stabilize the meringue, enhancing both the texture and flavor of your Pavlova Bombs. This step should take just a minute to ensure an even blend.
Step 4: Shape Meringues
Spoon or pipe the meringue mixture onto the prepared parchment paper to form tall domes, about 3 inches wide. Create a small well in the center of each dome, as this will be where your luscious fillings will go. Take your time to make them look beautiful, since presentation is key for these Crispy Pavlova Bombs!
Step 5: Bake
Once shaped, reduce the oven temperature to 225°F (110°C) and bake the meringues for 1.5 hours. This gentle baking will dry out the shells, giving them that signature crispness. Keep an eye on them; you want them to turn a light, delicate color instead of browning.
Step 6: Cool Gradually
After baking, turn off the oven and leave the Pavlova Bombs inside without opening the door for at least 3 hours or, preferably, overnight. This gradual cooling will prevent cracks from forming and maintain their airy texture.
Step 7: Prepare Filling Cavity
Once your meringues are cool, carefully take each Pavlova Bomb and cut a hole into the flat base. Use your fingers or a small spoon to hollow out a little space for the delicious filling. Remember, the meringue is delicate, so handle them with care to keep their lovely shape.
Step 8: Fill
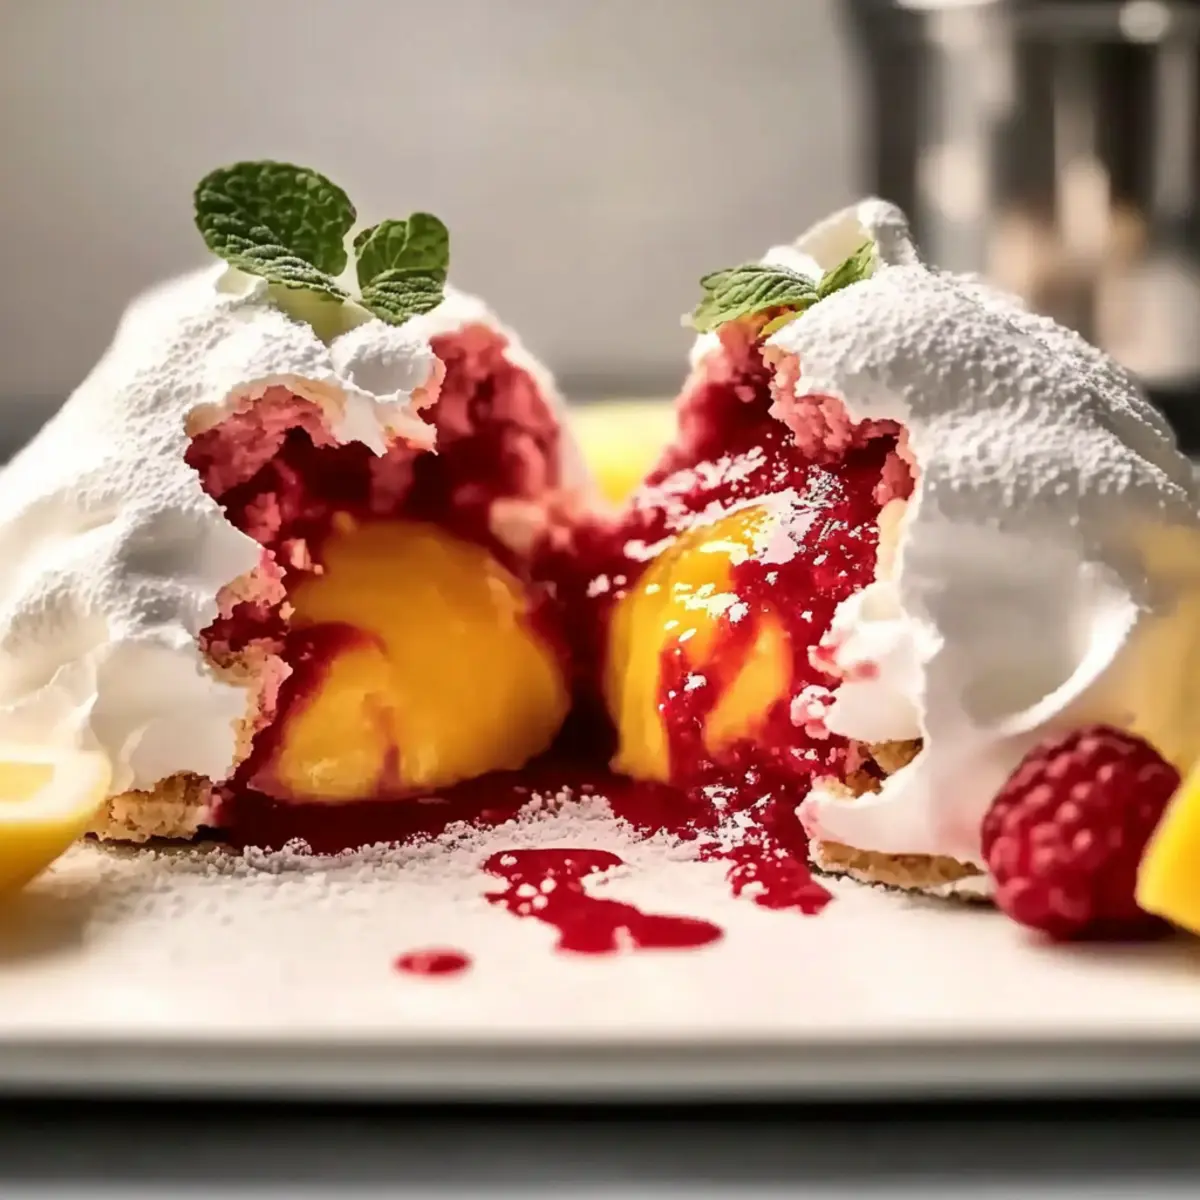
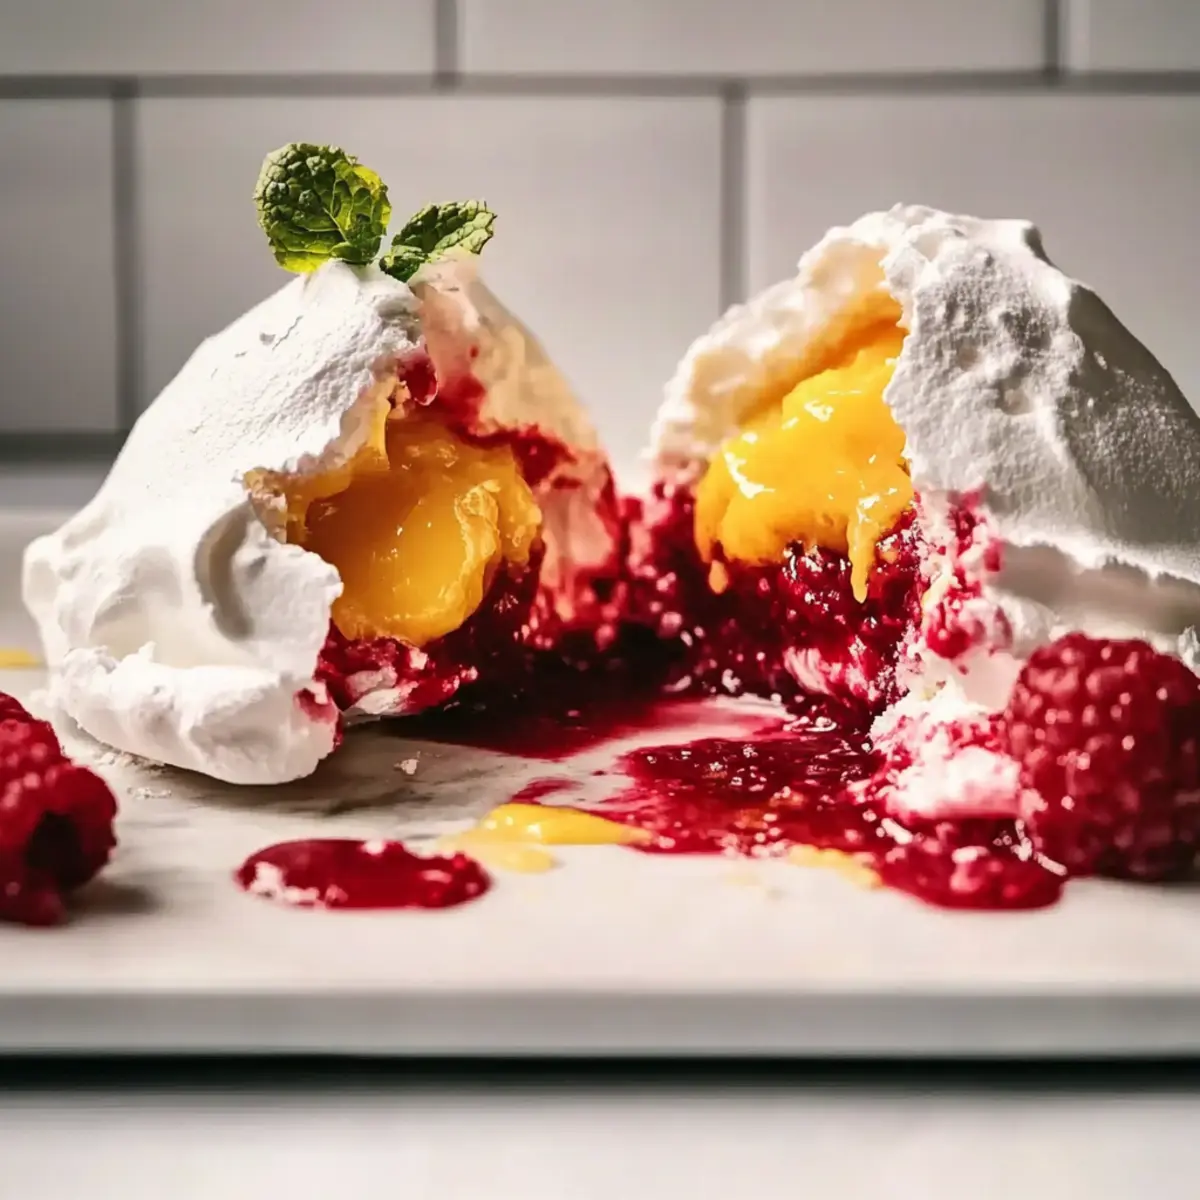
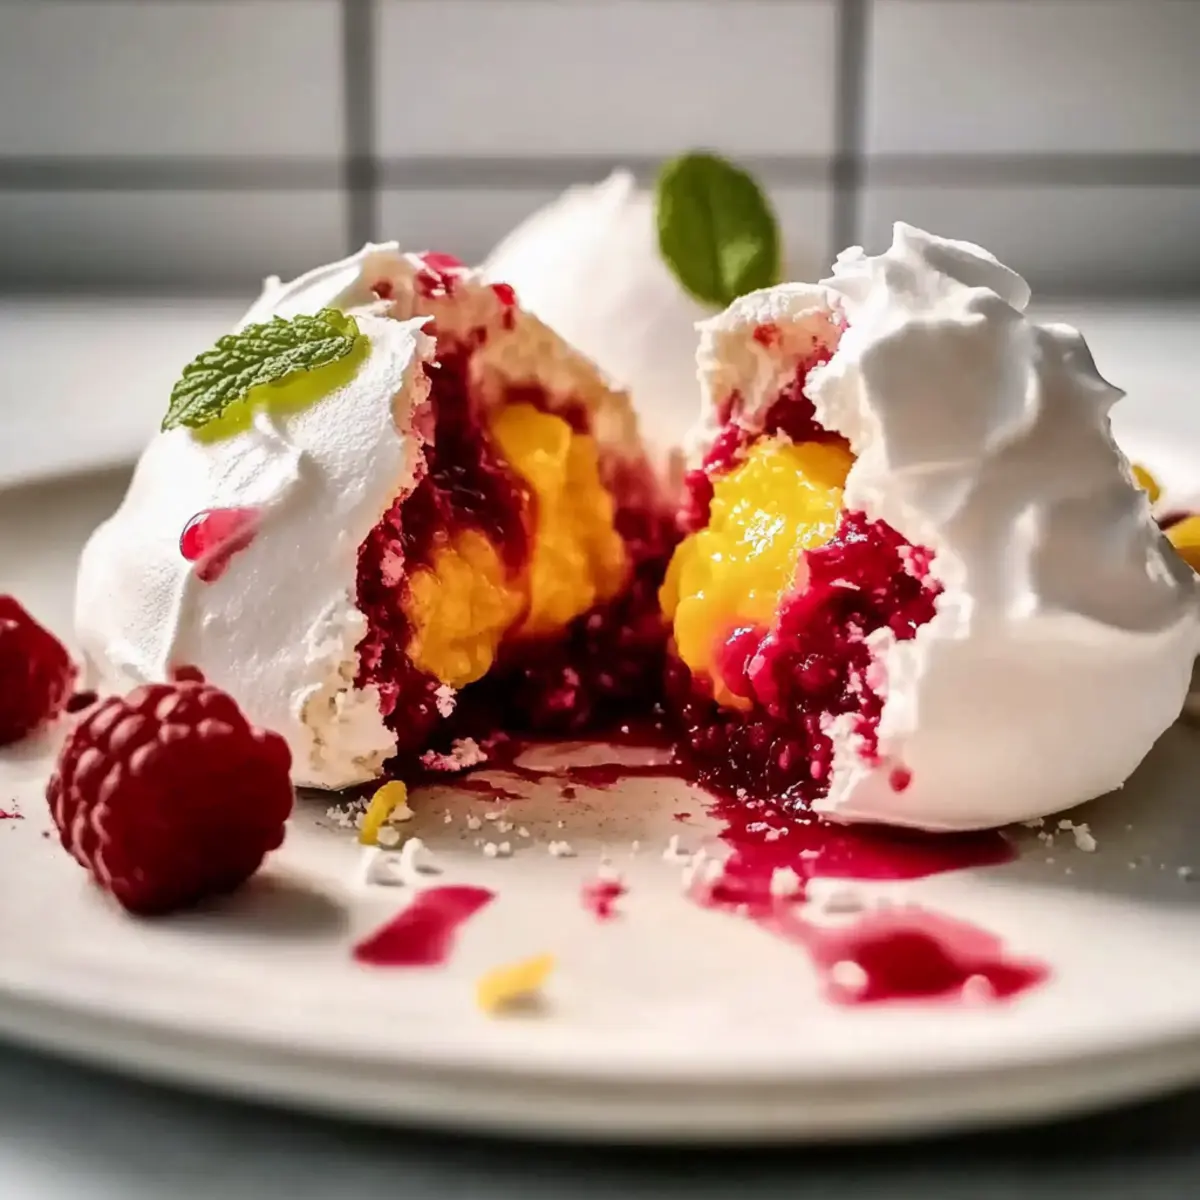
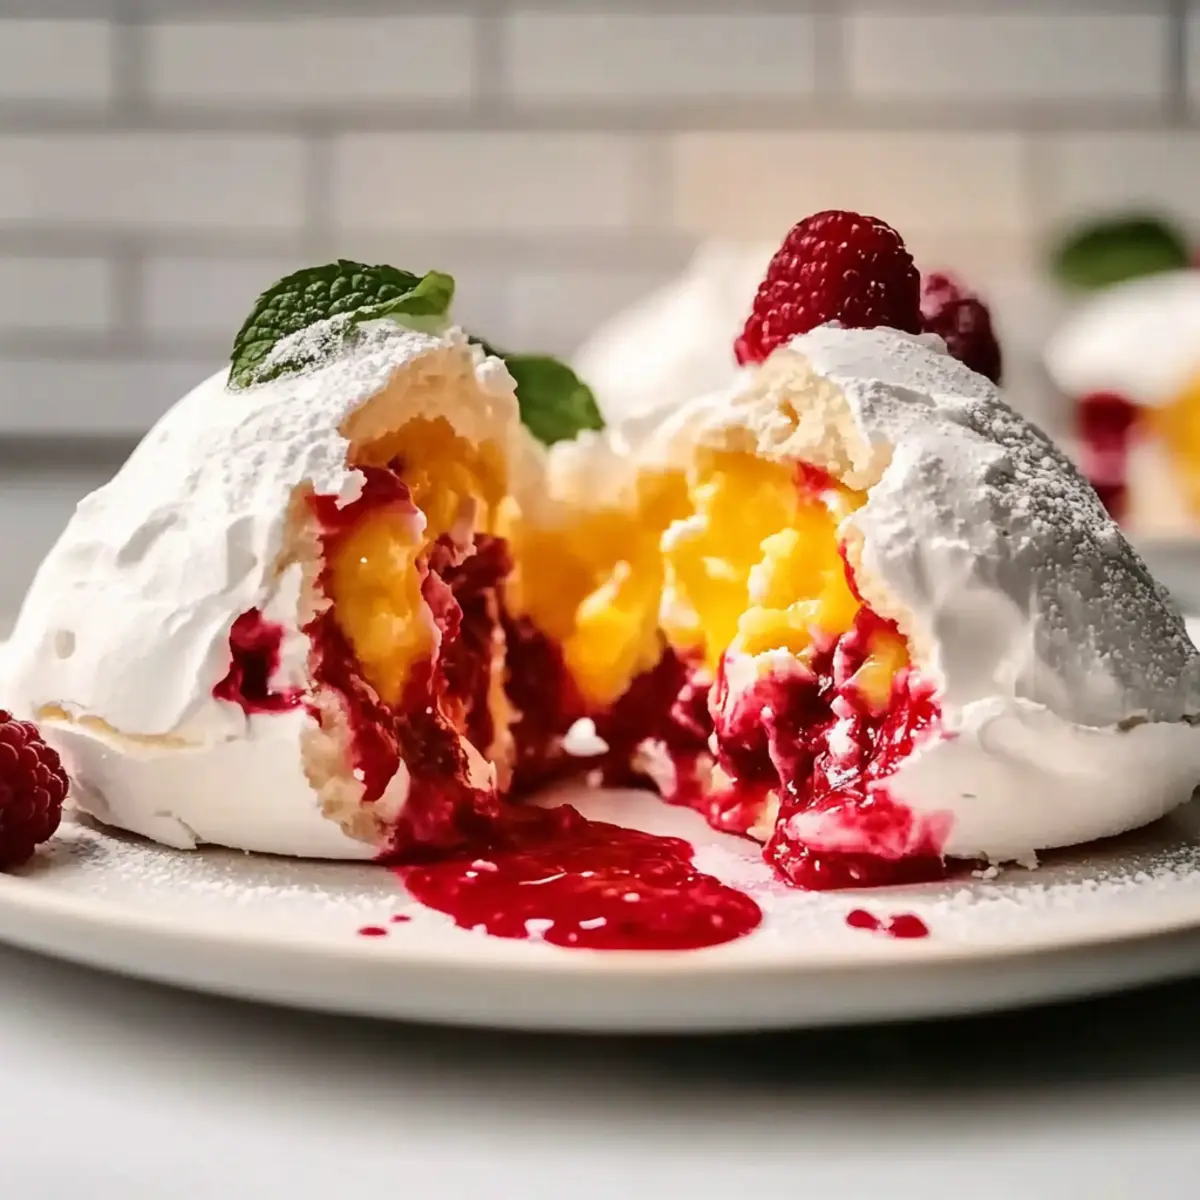
Now for the fun part! Pipe a generous layer of raspberry coulis into the hollow cavity, followed by a dollop of zesty lemon curd. Then, seal in all that goodness with a swirl of whipped cream on top. Each Crispy Pavlova Bomb should now be bursting with flavor and ready for a tasty reveal.
Step 9: Garnish & Serve
Finally, flip each filled Pavlova Bomb onto plates. Add a dollop of extra whipped cream, scatter fresh berries, sprinkle pistachios, and dust with powdered sugar for a show-stopping presentation. Encourage your guests to smash their Pavlova Bombs open and enjoy the delightful surprise inside!
Storage Tips for Crispy Pavlova Bombs
Room Temperature: Keep unfilled meringue shells in an airtight container at room temperature for up to 3 days to maintain their crispy texture.
Fridge: If you need to store filled Pavlova Bombs, they can be kept in the fridge for up to 1 day. However, this may soften the meringue slightly.
Freezer: For longer storage, freeze unfilled meringues in an airtight container for up to 1 month. Allow them to thaw at room temperature before adding your fillings.
Reheating: These meringue desserts are best enjoyed fresh; avoid reheating as it may compromise the texture of your Crispy Pavlova Bombs. Enjoy them straight from storage for the ultimate dessert experience!
Crispy Pavlova Bombs Variations
Feel free to let your creativity shine by customizing these delightful Pavlova Bombs with delicious surprises!
-
Passionfruit Delight: Substitute lemon curd with fresh passionfruit pulp for a tropical twist that brightens every bite.
-
Salted Caramel Dream: Use rich salted caramel as a filling for a sweet and salty contrast that will leave your taste buds dancing.
-
Berry Medley: Mix different types of berries in your coulis, like strawberries or blueberries, to create a stunning and fruity explosion of flavors.
-
Chocolate Swirl: Amp up the indulgence by folding in some cocoa powder into the meringue for a delicious chocolate twist.
-
Nutty Crunch: Top your filled Pavlova Bombs with crushed pistachios or almonds for an irresistible crunch that perfectly complements the soft interior.
-
Spiced Citrus: Add a pinch of cinnamon or nutmeg to your lemon curd for a cozy, spiced flavor that wraps around the tanginess of the lemon.
-
Decadent Whipped Cream: Infuse your whipped cream with vanilla or almond extract for an extra layer of flavor to this fluffy topping.
-
Meringue Texture Twist: Consider mixing in finely chopped nuts into your meringue for a delightful texture element akin to a chewy nougat.
These variations not only showcase your culinary flair but also ensure every gathering has a unique and memorable dining experience. And if you’re in the mood for more fun recipes, don’t forget to check out our Smashed Carrots Bites for a savory side that complements your sweet creations!
Make Ahead Options
These Crispy Pavlova Bombs are perfect for meal prep, allowing you to enjoy a delightful dessert without the last-minute rush. You can prepare the meringue shells up to 3 days in advance—simply store them in an airtight container at room temperature to maintain their crispness. For a twist, make your lemon curd and raspberry coulis ahead as well; they can be refrigerated for up to 5 days. When you’re ready to serve, hollow out the meringues and fill them with the prepared fillings, sealing with whipped cream for that fresh touch. This way, you save time in the kitchen while still presenting a stunning dessert!
Expert Tips for Crispy Pavlova Bombs
• Egg Whites Matter: Ensure egg whites are free of yolk; any fat will prevent them from whipping properly. Room temperature is best for volume.
• Cool Gradually: Leaving the pavlova in the turned-off oven prevents cracks. Patience is key for creating a smooth texture in your Crispy Pavlova Bombs.
• Watch the Oven: If your meringue browns, reduce the oven temperature by 15°F next time. A gentle bake maintains that classic white shell.
• Piping Precision: Use a piping bag for neat filling. If you don’t have one, a Ziploc bag with a snipped corner is a handy alternative for filling the pavlovas.
• Storage Savvy: Make the meringue shells ahead of time! Store them airtight for up to 3 days. Fill just before serving for the best texture and taste.
What to Serve with Crispy Pavlova Bombs
There’s nothing quite like crafting the perfect dessert spread to complement your stunning Pavlova Bombs, creating a feast for the eyes and palate.
-
Fresh Berries: Mixed berries add a burst of freshness and a tart contrast to the sweetness of the Pavlova. Their vibrant colors elevate the dessert visually. Consider serving strawberries, blueberries, or raspberries on the side to enhance that fruity flavor.
-
Lemon Sorbet: A tangy lemon sorbet offers a refreshing cleanse between bites, heightening the zesty experience of the lemon curd. Its icy texture beautifully contrasts the airy meringue, making each mouthful an adventure.
-
Chocolate Ganache: Drizzling a rich chocolate ganache over the Pavlova Bombs brings a luxurious touch. The smooth, decadent chocolate complements the lightness of the meringue and adds a delightful richness to the overall dessert experience.
-
Vanilla Ice Cream: A scoop of creamy vanilla ice cream harmonizes perfectly with the Pavlova’s texture. The indulgent creaminess balances the crispness of the meringue, creating a comforting finish to your dessert.
-
Mint Tea: Pairing your Crispy Pavlova Bombs with soothing mint tea creates a delightful conclusion to a meal. Its light, aromatic essence refreshes the palate and pairs beautifully with the tangy lemon and berry flavors.
-
Whipped Cream Topping: While your Pavlova Bombs are filled with whipped cream, serving a side of extra whipped cream allows guests to customize their treat! Easy to make, this creamy addition offers that dreamy indulgence everyone loves.
-
Pistachio Crumble: A sprinkle of toasted pistachios on top adds an earthy crunch and a pop of color, enhancing the aesthetics and texture of the dessert. Their slight saltiness also brings out the sweet flavors in the Pavlova.
-
Raspberry Lemonade: A refreshing glass of homemade raspberry lemonade adds a fruity sparkle that elevates the overall dessert experience. The citrus notes play wonderfully with the Pavlova’s fillings, making it a delightful match.
Elevate your dessert table with these thoughtful pairings that bring balance, flavor, and an unforgettable experience alongside your Crispy Pavlova Bombs!
Crispy Pavlova Bombs Recipe FAQs
How can I tell if my egg whites are fresh enough to use?
Absolutely! Fresh egg whites are essential for achieving the right volume when whipping. Look for eggs that are at least a week old for optimal results. To check freshness, immerse them in water: fresh eggs will sink, while older eggs will float or stand upright.
What’s the best way to store unfilled Pavlova Bombs?
The more the merrier! Store unfilled meringue shells in an airtight container at room temperature for up to 3 days. This will help keep them wonderfully crispy. Be sure to keep them away from humidity to prevent them from losing that delightful crunch.
How do I freeze my Pavlova Bombs for later use?
Fantastic idea! To freeze unfilled meringue shells, carefully place them in an airtight container separated by layers of parchment paper to avoid sticking. They can be frozen for up to 1 month. When ready to use, allow them to thaw at room temperature for about 30 minutes before filling.
Can I fill and refrigerate Pavlova Bombs?
Of course! Filled Pavlova Bombs can be refrigerated for up to 1 day. However, be aware that refrigeration might soften the meringue slightly. For best texture, fill them just before serving when possible. If you need to prepare in advance, consider filling half of the batch ahead and filling the rest just before serving.
What should I do if my meringue is too runny?
Oh dear! If your meringue isn’t achieving those stiff peaks, make sure that your mixing bowl is completely clean and free from any grease. Even a tiny bit of egg yolk can cause issues. If you find your meringue still runs, you can try adding a pinch of cornstarch to help stabilize it, but remember that achieving the perfect consistency can take practice!
Are there any dietary considerations to keep in mind?
Absolutely! These Crispy Pavlova Bombs are a gluten-free delight, making them suitable for those with gluten intolerances. Just be mindful of any additional fillings or toppings; for instance, if using store-bought lemon curd or coulis, check the labels for allergens, especially if serving guests with dietary restrictions.
Crispy Pavlova Bombs with Zesty Lemon and Berry Bliss
Ingredients
Equipment
Method
- Preheat your oven to 300°F (150°C) and line a baking tray with parchment paper.
- In a stand mixer bowl, beat the egg whites on high speed until soft peaks form (about 2-3 minutes). Gradually add the caster sugar, beating until thick and glossy (roughly 5-7 minutes).
- Gently fold in the cornstarch and white vinegar with a spatula. Be careful not to deflate the meringue.
- Spoon or pipe the meringue mixture onto the prepared parchment paper, forming tall domes about 3 inches wide and creating a small well in the center.
- Reduce oven temperature to 225°F (110°C) and bake meringues for 1.5 hours until they dry out without browning.
- Turn off the oven and leave the Pavlova Bombs inside for 3 hours or overnight to cool gradually.
- Once cool, cut a hole into the flat base of each Pavlova Bomb to create a cavity for filling.
- Pipe raspberry coulis into the cavity, followed by lemon curd, and seal with whipped cream.
- Flip filled Pavlova Bombs onto plates, adding extra whipped cream, fresh berries, pistachios, and powdered sugar to serve.
Leave a Reply