
As I prepped for summer gatherings, the nostalgia of orange popsicles danced in my mind, leading me to create a show-stopping dessert that encapsulates the season—the No-Bake Orange Creamsicle Cheesecake. This irresistible treat combines a refreshingly creamy texture with the bright zest of oranges, making it a delightful centerpiece for any occasion. Plus, it’s incredibly simple to prepare, perfect for those of us who cherish homemade flavors but need to keep things stress-free. With gluten-free options and versatility to suit your taste, this cheesecake is not just a sweet indulgence; it’s a way to bring sunshine to your table. Ready to dive into a summer dessert that will impress friends and family alike? Let’s get started!

Why is this cheesecake the perfect dessert?
Nostalgic Flavor: The vibrant taste of orange will transport you back to carefree summer days and childhood treats.
No-Bake Convenience: This recipe is a breeze—no oven required—making it a perfect choice for warmer weather.
Versatile Options: Feel free to personalize it! Substitute citrus juices and toppings to create your own unique twist.
Gluten-Free Friendly: Easily adapt this velvety dessert with gluten-free options, ensuring everyone can indulge.
Crowd-Pleasing Delight: Its light and creamy texture makes this cheesecake an instant hit at parties, leaving guests asking for seconds!
Orange Creamsicle Cheesecake Ingredients
For the Crust
- Graham Cracker Crumbs – Provides the base structure and crunch; substitute with gluten-free crumbs for a gluten-free version.
- Unsalted Butter – Binds crust ingredients for a rich flavor; cannot be substituted for optimal taste.
For the Filling
- Cream Cheese – The main component for a creamy filling; use high-quality cream cheese for the best flavor.
- Powdered Sugar – Sweetens the filling and creates a smooth texture; allows for adjustments based on sweetness preference.
- Heavy Cream – Adds richness and helps stabilize the filling; whipped cream can substitute for a lighter option.
- Orange Juice – Provides the signature citrus flavor; can be swapped with lemon or lime juice for a tangy variation.
- Zest of 1 Orange – Intensifies the orange flavor and aroma; more zest can be added for a stronger flavor.
- Vanilla Extract – Enhances the flavor profile; can be omitted for a more pronounced citrus taste.
Now that you have all the essential elements for creating your delectable Orange Creamsicle Cheesecake, let’s move on to whipping up this delightful dessert that will surely brighten up your summer gatherings!
Step‑by‑Step Instructions for Orange Creamsicle Cheesecake
Step 1: Prepare the Crust
In a medium bowl, mix together graham cracker crumbs and melted unsalted butter until well combined. Press this mixture firmly into the base of a 9-inch springform pan, ensuring an even layer. You want the crust to hold its shape, so compact it well. Bake at 350°F (175°C) for 8-10 minutes until lightly toasted, then let it cool completely.
Step 2: Make the Filling
In a large mixing bowl, use an electric mixer to beat together softened cream cheese and powdered sugar until smooth and creamy, about 2-3 minutes. Gradually pour in the heavy cream, fresh orange juice, orange zest, and vanilla extract, continuing to mix until the filling is thick and fluffy, roughly another 3-4 minutes. The bright notes of the orange will truly bring the Orange Creamsicle Cheesecake to life.
Step 3: Assemble the Cheesecake
Once the crust has cooled and the filling is ready, gently pour the creamy mixture over the crust. Use a spatula to spread the filling evenly, ensuring it reaches the edges. Tap the pan gently on the countertop to settle the filling and eliminate any air bubbles. This step is crucial for a smooth surface on your Orange Creamsicle Cheesecake.
Step 4: Chill Until Set
Cover the assembled cheesecake with plastic wrap and refrigerate for at least 4 hours, though overnight is ideal for the best texture. The filling will firm up as it chills, resulting in a beautiful sliceable cake. You’ll know it’s ready when the surface is set and slightly firm to the touch.
Step 5: Serve and Enjoy
Once your Orange Creamsicle Cheesecake is thoroughly chilled, carefully remove it from the springform pan. Slice it into wedges, and consider garnishing each piece with extra orange zest or fresh berries for a vibrant touch. Serve chilled, and delight in the creamy, citrusy flavors of summer captured in every bite!

Storage Tips for Orange Creamsicle Cheesecake
Fridge: Store any leftover cheesecake in an airtight container for up to 5 days, keeping it fresh and creamy.
Freezer: For longer storage, wrap the cheesecake tightly in plastic wrap, then in foil, and freeze for up to 2 months. Thaw in the refrigerator before serving.
Reheating: This no-bake dessert is best served chilled; simply remove it from the fridge or freezer and let it sit for a few moments to soften before slicing.
Serving Suggestions: Optional toppings like extra orange zest or fresh berries can be added right before serving for extra freshness and aesthetics.
Make Ahead Options
Making the No-Bake Orange Creamsicle Cheesecake ahead of time is a fantastic way to save precious moments during a busy week! You can prepare the crust and filling up to 24 hours in advance. Simply mix the graham cracker crumbs with melted butter and press it into the springform pan. Refrigerate it until you’re ready to add the filling, which can also be made up to 24 hours prior and stored in an airtight container. This method ensures the cheesecake stays just as delicious and creamy when you’re ready to serve. On the day of serving, assemble the cheesecake by pouring the filling over the crust, chill for about 4 hours (or overnight), and enjoy the delightful flavors that are perfect for summer gatherings!
Orange Creamsicle Cheesecake Variations
Customize your Orange Creamsicle Cheesecake to suit your taste, making it even more delightful!
-
Dairy-Free: Swap cream cheese for vegan cream cheese and use coconut cream instead of heavy cream for a rich texture.
-
Gluten-Free: Use crushed gluten-free cookies or almond flour mixed with coconut oil for the crust to make it suitable for gluten-sensitive guests.
-
Tangy Twist: Replace orange juice with lemon or lime juice for a zesty kick, bringing a refreshing tartness to every bite.
-
Flavor Infusion: Add a teaspoon of almond extract for a touch of nuttiness that complements the refreshing orange flavor beautifully.
-
Creamy Texture Boost: Fold in whipped coconut cream into the filling for an ultra-fluffy texture that still captures that creamy essence.
-
Chocolate Drizzle: Drizzle melted dark chocolate over the top before serving for a decadent twist that pairs perfectly with the citrusy flavor.
-
Fruit Toppings: Garnish with fresh berries or segments of orange to enhance both the flavor and the presentation of your cheesecake.
-
Spice it Up: Mix in a hint of cinnamon or nutmeg into the filling for a warm spice contrast that gives depth to the citrus notes.
Feel free to explore these variations and create a personalized version of this no-bake dessert. If you want to enhance your cheesecake even more, a serving of whipped cream on top makes for a lovely addition, balancing out the richness beautifully!
What to Serve with Orange Creamsicle Cheesecake?
Indulge in a complete summer experience by pairing this delightful cheesecake with complementary sides and drinks that elevate its vibrant flavors.
-
Light Fruit Salad: A mix of seasonal fruits adds freshness, enhancing the citrusy notes of the cheesecake while providing a burst of flavor in every bite. The colors and textures create a visually appealing contrast, perfect for summer gatherings.
-
Herbal Iced Tea: Chilled, infused herbal tea offers a refreshing counterpoint to the sweetness of the cheesecake. Opt for mint or chamomile to cleanse the palate and balance the dessert’s richness.
-
Whipped Cream: A dollop of lightly sweetened whipped cream adds extra creaminess and a soft texture that pairs beautifully with the smooth cheesecake. Sprinkle on some orange zest for a bit of flair!
-
Orange Infused Sparkling Water: Light and bubbly, this drink refreshes your palate while enhancing the orange flavors found in the cheesecake. Plus, it’s an adorable nod to the dessert itself!
-
Chocolate-Dipped Strawberries: The sweet, juicy strawberries draped in rich chocolate will contrast delightfully with the creamy orange layers, bringing an indulgent twist to your dessert spread.
-
Mini Vanilla Cupcakes: These charming little treats can complement your cheesecake perfectly. Their fluffy vanilla flavor will harmonize with the orange without overpowering it, creating a delightful dessert duo.
Each pairing aims to create a symphony of flavors and textures that will light up your summer gatherings!
Expert Tips for No-Bake Cheesecake
-
Room Temperature Cream Cheese: Ensure your cream cheese is at room temperature to achieve a smooth filling and avoid lumps in your Orange Creamsicle Cheesecake.
-
Chill Thoroughly: Allow the cheesecake to chill for at least 4 hours, preferably overnight, for the best texture. Rushing chilling can lead to a wobbly filling.
-
Adjust Sweetness: Taste the filling before pouring it into the crust. You can adjust the powdered sugar based on your sweetness preference for your perfect Orange Creamsicle Cheesecake.
-
Genuine Flavor Boost: Consider adding a splash of orange extract or using freshly squeezed juice for a more vibrant orange flavor that brightens up your dessert.
-
Decorative Finishing Touches: Garnish with extra orange zest, whipped cream, or fresh berries before serving to elevate your cheesecake’s appeal and flavor.

Orange Creamsicle Cheesecake Recipe FAQs
What kind of orange juice should I use?
For the freshest flavor, I recommend using freshly squeezed orange juice. However, if you’re short on time, store-bought juice works fine too! Just ensure it’s 100% juice without any added sugars for the best results.
How do I know if my cream cheese is at room temperature?
Room temperature cream cheese should be soft enough to spread easily. When you press a finger into it, it should leave a slight indentation without any resistance. This ensures a smooth filling for your Orange Creamsicle Cheesecake.
How should I store leftover cheesecake?
To keep your cheesecake fresh, store it in an airtight container in the refrigerator for up to 5 days. If you need to keep it longer, wrap it tightly in plastic wrap and foil, then freeze it for up to 2 months. Just remember to allow it to thaw in the refrigerator before serving!
Can I freeze this cheesecake?
Absolutely! To freeze your Orange Creamsicle Cheesecake, wrap it tightly in plastic wrap followed by aluminum foil to prevent freezer burn. When you’re ready to enjoy it, simply move it to the fridge for an overnight thaw before serving.
What should I do if my cheesecake doesn’t set properly?
If your cheesecake doesn’t set as expected, it may need more chilling time or the cream cheese wasn’t adequately mixed. Ensure that you mix the filling until it’s fluffy and thick. If it still feels too soft after chilling, you could try adding a bit of extra whipped cream or powdered sugar to stabilize it, then chill it for a longer time.
Can I make any substitutions to accommodate allergies?
Of course! If you have a gluten allergy, use gluten-free graham cracker crumbs for the crust. For dairy-free needs, you can substitute cream cheese with a vegan cream cheese alternative and use coconut cream in place of heavy cream. Always double-check labels to ensure all ingredients meet dietary requirements!
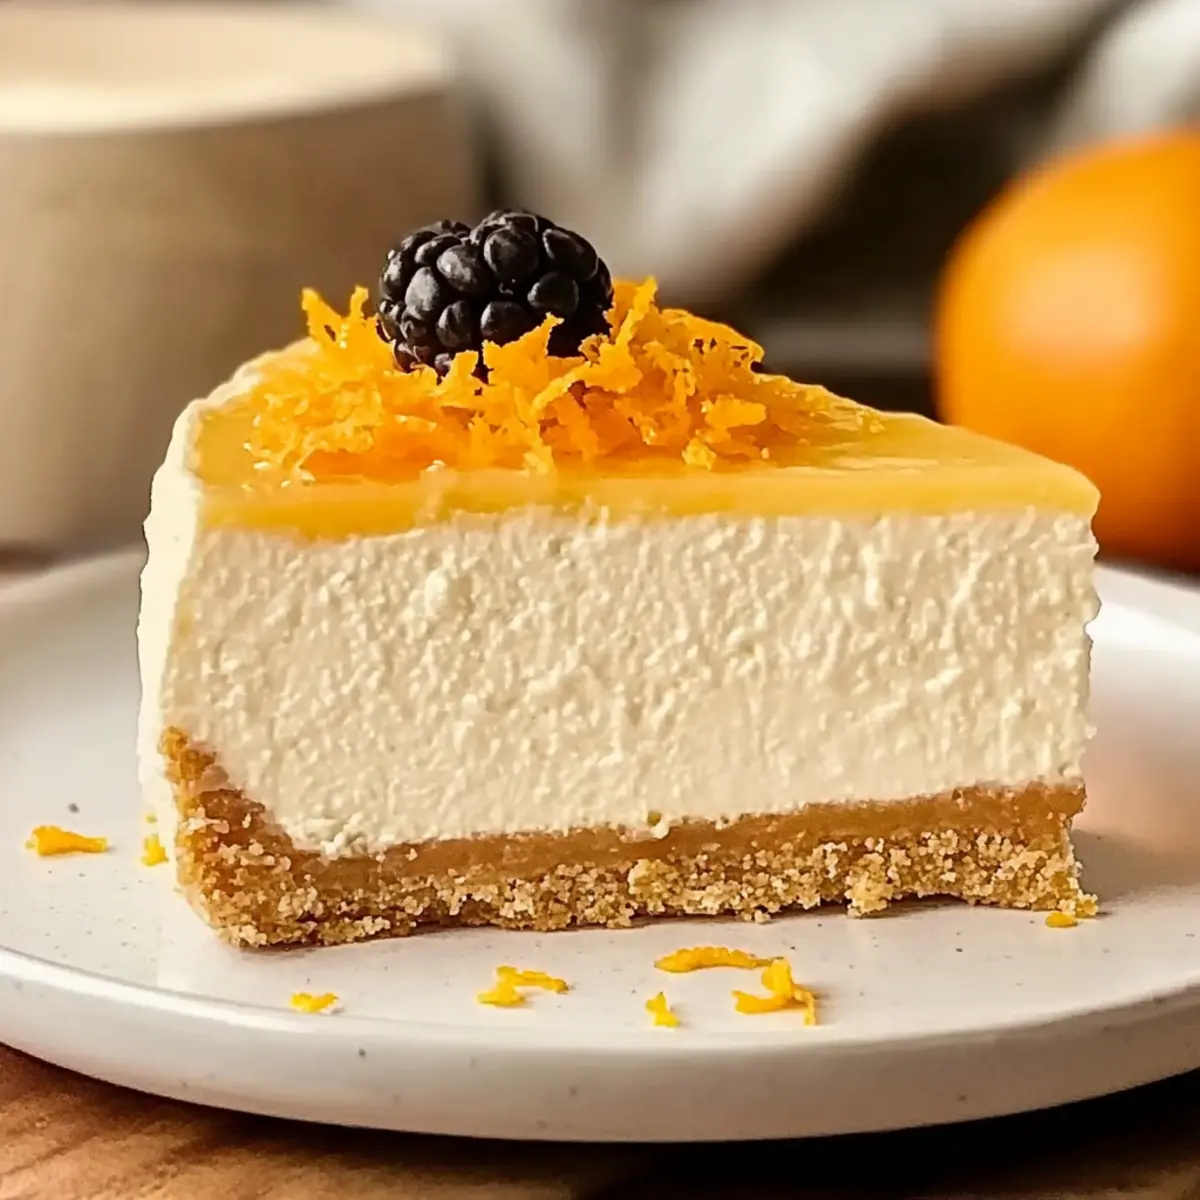
Delightful Orange Creamsicle Cheesecake for Summer Bliss
Ingredients
Equipment
Method
- In a medium bowl, mix together graham cracker crumbs and melted unsalted butter until well combined. Press this mixture firmly into the base of a 9-inch springform pan, ensuring an even layer. Bake at 350°F (175°C) for 8-10 minutes until lightly toasted, then let it cool completely.
- In a large mixing bowl, use an electric mixer to beat together softened cream cheese and powdered sugar until smooth and creamy, about 2-3 minutes. Gradually pour in the heavy cream, fresh orange juice, orange zest, and vanilla extract, continuing to mix until the filling is thick and fluffy, roughly another 3-4 minutes.
- Once the crust has cooled and the filling is ready, gently pour the creamy mixture over the crust. Use a spatula to spread the filling evenly. Tap the pan gently on the countertop to settle the filling and eliminate any air bubbles.
- Cover the assembled cheesecake with plastic wrap and refrigerate for at least 4 hours, though overnight is ideal for the best texture.
- Once chilled, carefully remove it from the springform pan. Slice it into wedges, and garnish with extra orange zest or fresh berries if desired. Serve chilled.
Leave a Reply