
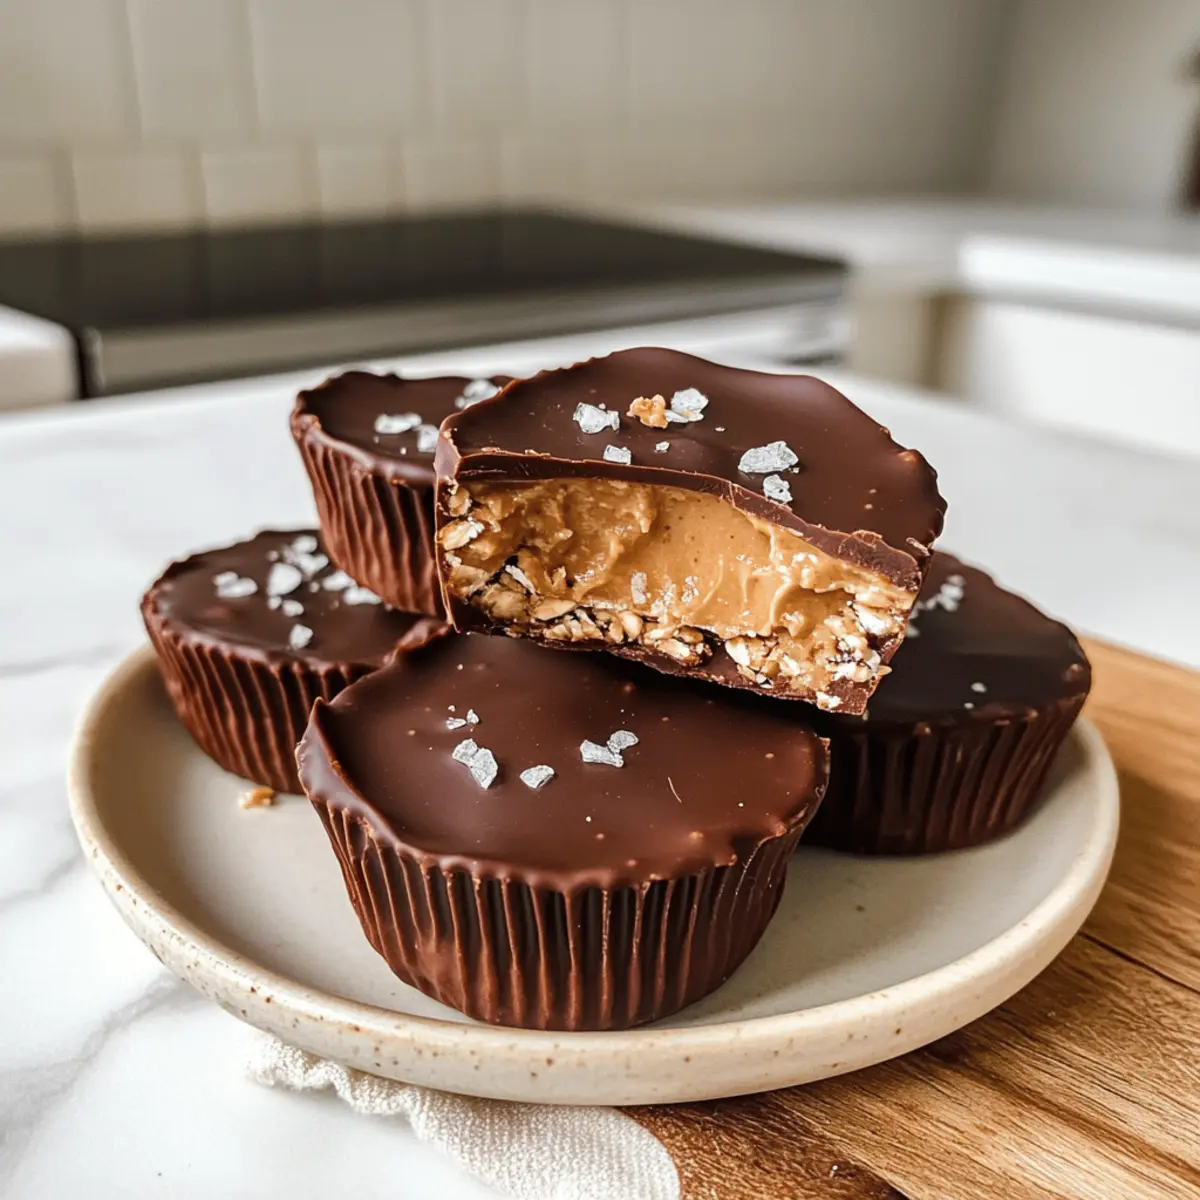
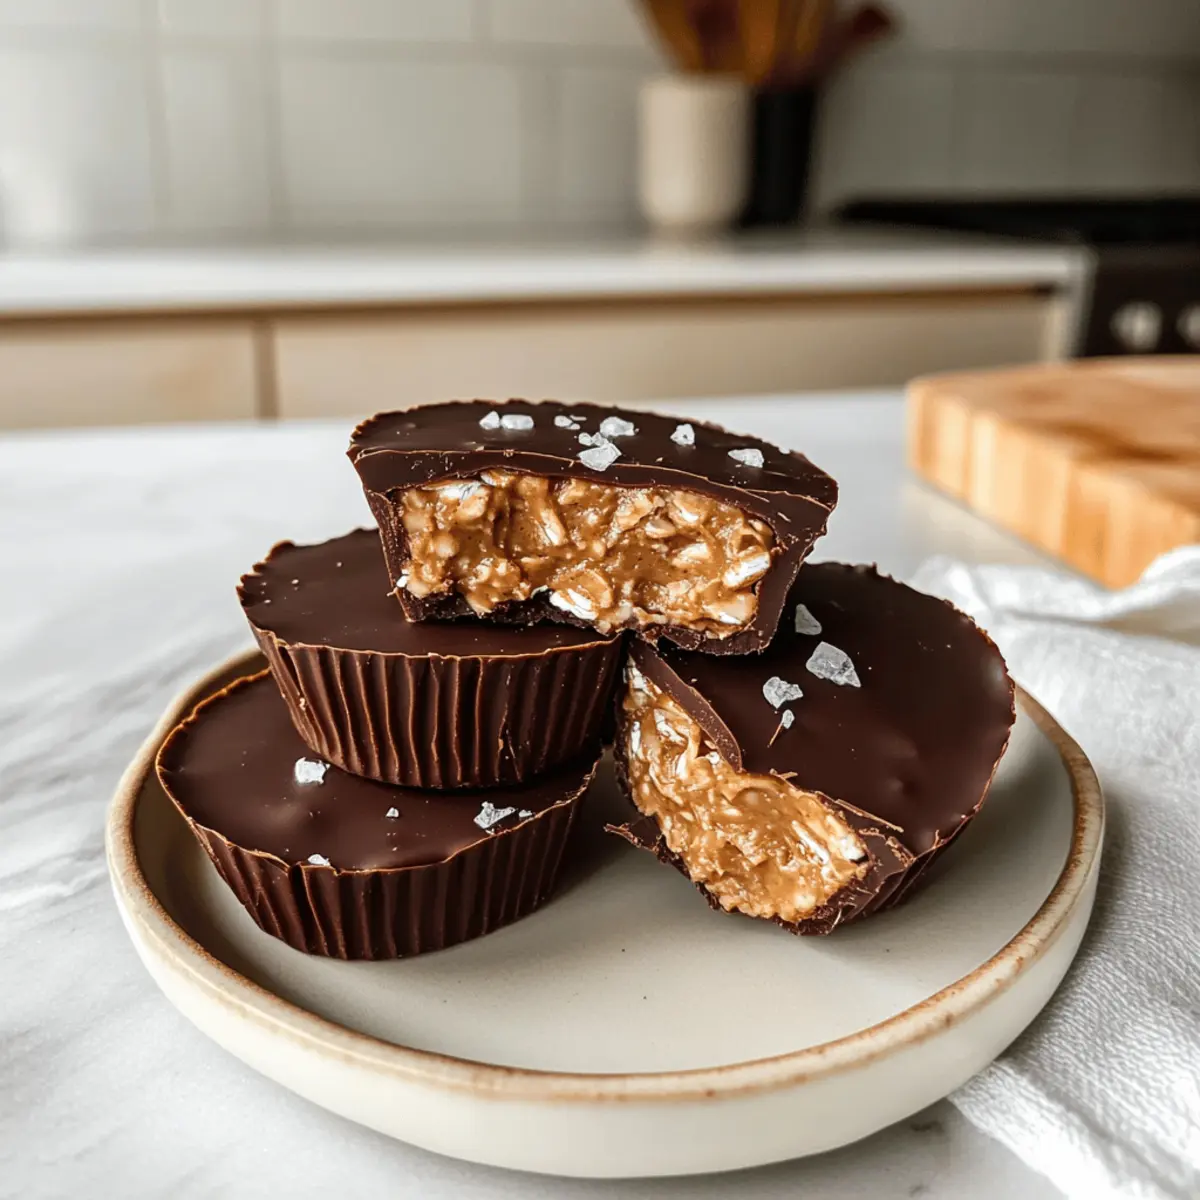
As I rummaged through my pantry on a hot summer afternoon, I stumbled upon the perfect combination of ingredients for a quick treat: Peanut Butter Oat Cups. Within just 20 minutes, I transformed simple rolled oats and creamy peanut butter into delightful little morsels, crowned with a drizzle of melted dark chocolate. These no-bake snacks are a game changer—gluten-free, vegan, and freezer-friendly, they satisfy the sweet tooth without the guilt! Each bite brings a comforting taste reminiscent of my favorite childhood treats, but with a healthier spin. Whether you’re looking for an easy dessert or a midday pick-me-up, these Peanut Butter Oat Cups have you covered. What’s your favorite twist on classic snacks? Let’s dive into this delicious adventure!

Why Are These Peanut Butter Oat Cups Irresistible?
Quick and Easy: In just 20 minutes, you can whip up these delightful treats without ever turning on your oven!
Healthy Indulgence: Savor the rich flavors of peanut butter and dark chocolate, all while staying gluten-free, dairy-free, and vegan.
Freezer-Friendly: Make a batch and store them for later—perfect for busy days when you crave a snack!
Endless Customization: Swap in your favorite nut butter or mix in chia seeds for an extra health boost.
Crowd-Pleasing Snack: Whether for kids, dinner parties, or your next movie night, these cups are sure to impress everyone!
For more delicious snack ideas, check out my Crockpot Garlic Butter Beef Bites or try these Garlic Butter Brazilian bites for a savory treat!
Peanut Butter Oat Cups Ingredients
For the Cups
• Peanut Butter – Provides richness and creaminess; substitute with any nut or seed butter for a nut-free option.
• Rolled Oats – Acts as the base for the cups; quick oats can be used but may alter the texture.
• Maple Syrup – Adds natural sweetness; alternatives include honey or agave syrup.
For the Topping
• Chocolate Chips – Melt to create a delightful chocolate coating; feel free to swap with your favorite type of chocolate (milk or white).
• Flakey Sea Salt – Optional but enhances flavor; sprinkle lightly on top for a gourmet touch.
These Peanut Butter Oat Cups not only satisfy your cravings but also keep things healthy and enjoyable!
Step‑by‑Step Instructions for Peanut Butter Oat Cups
Step 1: Mix the Base
In a medium-sized mixing bowl, combine 1 cup of creamy peanut butter and 1/4 cup of maple syrup. Use a spatula to stir the mixture until it’s well blended and smooth, about 2 minutes. The color should be uniform, indicating that the ingredients are thoroughly combined. This rich and creamy mixture will form the delicious base of your Peanut Butter Oat Cups.
Step 2: Incorporate the Oats
Next, add in 2 cups of rolled oats to the peanut butter mixture. Stir gently for about 1-2 minutes until the oats are evenly coated with the peanut butter and syrup, forming a sticky yet cohesive mixture. You’ll want to see the oats fully incorporated—no dry spots should be visible for the best texture in your cups.
Step 3: Form the Cups
Prepare a silicone mold or mini muffin tin by lightly greasing it if necessary. Using about 2 tablespoons of the oat mixture for each cup, press the mixture firmly into the molds. Ensure that each cup is evenly packed and shaped well, creating a sturdy base for your Peanut Butter Oat Cups. The pressed mixture should have a cohesive appearance and hold together nicely.
Step 4: Freeze for Firmness
Place the filled molds in the freezer for 20 minutes. This duration allows the cups to settle and firm up, making them easier to handle later. When the time is up, check to ensure the mixture is set; it should feel firm to the touch but still hold a slight give, ready for the next delicious step in creating your Peanut Butter Oat Cups.
Step 5: Melt the Chocolate
While your oat cups are freezing, melt 1 cup of chocolate chips and 1 tablespoon of coconut oil in a microwave-safe bowl. Heat in 30-second increments, stirring between each session until the chocolate is completely melted and smooth—this should take about 1-2 minutes total. The mixture should be glossy and ready for drizzling over the cups.
Step 6: Drizzle the Chocolate
Once the oat cups have firmed in the freezer, remove them and drizzle the melted chocolate over the top of each cup. Use a spoon or a piping bag for a more controlled drizzle, ensuring that each cup is generously coated. The glossy chocolate will give a beautiful finish to your Peanut Butter Oat Cups.
Step 7: Final Freeze
After drizzling, return the Peanut Butter Oat Cups to the freezer for an additional 20 minutes. This final chilling will allow the chocolate to solidify and create a rich topping. After the time has elapsed, the chocolate should feel firm and set, ensuring a delightful contrast of textures in every bite.
Step 8: Serve and Enjoy
Carefully remove the Peanut Butter Oat Cups from the silicone mold or muffin tin. If desired, sprinkle lightly with flakey sea salt for an added touch of flavor. Serve the cups chilled or let them sit at room temperature for a few minutes for a softer bite. These treats are now ready to be enjoyed—deliciously healthy and oh so satisfying!
Peanut Butter Oat Cups Variations
Feel free to get creative and customize these Peanut Butter Oat Cups to suit your taste!
-
Nut-Free: Swap peanut butter for sunflower seed butter to create a nut-free version that everyone can enjoy! The flavor is a delightful twist, perfect for school lunches or nut-free gatherings.
-
Extra Protein: Mix in a scoop of your favorite protein powder into the base. This addition keeps you feeling full longer and adds a nutritious punch!
-
Different Sweeteners: If you prefer a different flavor profile, replace maple syrup with agave nectar or coconut nectar for a unique sweetness. Each option brings its own distinct taste, elevating your oat cups!
-
Texture Twists: For added crunch, fold in some chopped nuts, such as almonds or walnuts, or even some crispy rice cereal. This twist will create a delightful contrast of textures in every bite.
-
Decadent Toppings: Experiment with toppings! Use flaky coconut or a drizzle of caramel sauce before freezing for a lush experience. The extra texture and flavor will take your cups to the next level.
-
Fruit Fusion: Add dried fruits like cranberries or raisins into the oat mixture. This not only imparts flavor but also adds a lovely hint of sweetness, making each cup feel like a wholesome treat.
-
Chocolate Variations: Play around with different chocolate types! Use white chocolate for a sweeter touch or try dark chocolate chips for a rich contrast. Each chocolate offers a new taste adventure!
For more delightful meal ideas, you might enjoy my Crockpot Garlic Butter Beef Bites or the deliciously creamy One Pot Garlic Butter Shrimp Pasta. Enjoy your culinary journey!
Make Ahead Options
These Peanut Butter Oat Cups are a dream for busy home cooks who want to save time during the week! You can prepare the oat mixture up to 24 hours in advance by mixing the peanut butter, maple syrup, and rolled oats, then pressing it into molds. Just refrigerate the prepared cups (to maintain quality) overnight, ensuring they remain fresh and ready for chocolate drizzling when you’re set to serve. When you’re ready to enjoy them, simply melt the chocolate and drizzle it on top, then freeze for another 20 minutes. This way, you’ll have delicious, guilt-free snacks at your fingertips, perfect for quick treats or wholesome desserts!
How to Store and Freeze Peanut Butter Oat Cups
Room Temperature: Store the Peanut Butter Oat Cups in an airtight container for up to 3 days if you’re enjoying them immediately. They’re best when chilled but can be kept out for short periods.
Fridge: For a softer texture, place the cups in the refrigerator. They last up to 1 week in a sealed container, making them perfect for quick, healthy snacks throughout the week.
Freezer: Freeze the cups in an airtight container or freezer bag for up to 3 months. When you’re ready to enjoy, let them thaw in the fridge or at room temperature for a delicious treat.
Reheating: These cups are best enjoyed chilled. Simply allow them to sit at room temperature for a few minutes to soften slightly before indulging.
Expert Tips for Peanut Butter Oat Cups
-
Silicon Molds: Using silicone molds makes it easy to pop out the cups after freezing. Avoid using metal tins, which may stick.
-
Peanut Butter Consistency: For best results, use creamy peanut butter that’s not too runny. A runnier peanut butter will increase freezing time.
-
Mix-Ins Galore: Feel free to add extras like chia seeds or dried fruit for an added nutritional boost. Just remember not to overload the mixture.
-
Storage Secrets: Keep your Peanut Butter Oat Cups in an airtight container. Refrigerating offers a softer texture while freezing maintains firmness.
-
Chill Before Serving: Allow the cups to sit at room temperature for a few minutes before enjoying. This enhances the flavor and makes for a softer bite.
What to Serve with Peanut Butter Oat Cups?
Discover delightful pairings that elevate your Peanut Butter Oat Cups to a complete meal experience!
-
Fresh Fruit Salad: A vibrant mix of seasonal fruits adds a refreshing and nutritious balance to the rich flavors of the oat cups. Consider a zesty citrus or berry medley to enhance the sweetness.
-
Coconut Yogurt: This creamy, dairy-free option complements the nutty taste beautifully, providing a smooth and delicious contrast. Top with a sprinkle of granola for crunch!
-
Iced Coffee: A chilled brew pairs perfectly with the indulgent nature of the oat cups, creating a robust flavor duo that’s ideal for warm days on the patio.
-
Dark Chocolate Dipped Pretzels: Introduce a salty-sweet component to your snack time. The crunch of the pretzel contrasts nicely with the soft cups while echoed by the chocolate topping.
-
Nut Butter Smoothie: Blend banana, almond milk, and a touch of your favorite nut butter to create a creamy beverage that complements the oat cups’ texture and flavors.
-
Almond Milk Hot Chocolate: For a cozy treat, serve this decadent beverage alongside your oat cups. The warmth from the cocoa plays beautifully with the cold, creamy treats.
Each of these pairings not only complements the Peanut Butter Oat Cups but also creates a balance of flavors and textures that will please everyone at the table!

Peanut Butter Oat Cups Recipe FAQs
What kind of peanut butter should I use?
Absolutely! For the best results, use creamy peanut butter that isn’t too runny. If you need a nut-free option, any seed butter, like sunflower seed butter, works wonderfully as a substitute.
How should I store Peanut Butter Oat Cups?
To keep them fresh, store your Peanut Butter Oat Cups in an airtight container. They’ll stay good at room temperature for up to 3 days. For a softer texture, refrigerate them, where they can last up to 1 week.
Can I freeze these Peanut Butter Oat Cups?
Yes! Freeze the Peanut Butter Oat Cups in an airtight container or a freezer bag for up to 3 months. When you’re ready to enjoy them, simply thaw them in the refrigerator or at room temperature for a tasty treat.
What if my mixture is too runny?
If your peanut butter mixture seems too runny, try adding a few extra oats until it reaches a thicker consistency. This will help the cups to hold their shape when frozen. Press the mixture firmly into the molds for best results.
Are these safe for people with allergies?
While these Peanut Butter Oat Cups are naturally gluten-free and vegan, make sure to check all ingredient labels for specific allergens—especially with nut butters and chocolate chips. Those with nut allergies should substitute peanut butter with a safe seed butter.
How do I make the texture firmer?
For a firmer texture, make sure to freeze the cups for the full 20 minutes after drizzling with chocolate. If you prefer an even firmer bite, you can extend the freezing time to an additional 10 minutes. This solidifies the chocolate perfectly, balancing the soft and chewy oats.
Easy Peanut Butter Oat Cups for a Guilt-Free Snack Delight
Ingredients
Equipment
Method
- In a medium-sized mixing bowl, combine 1 cup of creamy peanut butter and 1/4 cup of maple syrup. Stir until well blended and smooth, about 2 minutes.
- Add in 2 cups of rolled oats to the mixture and stir gently for 1-2 minutes until the oats are fully coated.
- Prepare a silicone mold or mini muffin tin and press about 2 tablespoons of the mixture into each cup.
- Place the filled molds in the freezer for 20 minutes.
- Melt 1 cup of chocolate chips and 1 tablespoon of coconut oil in a microwave-safe bowl, heating in 30-second increments until smooth.
- Drizzle the melted chocolate over the top of each oat cup.
- Return the cups to the freezer for an additional 20 minutes to solidify the chocolate.
- Remove the cups from the molds and sprinkle lightly with flakey sea salt if desired.
Leave a Reply