
The smell of peanut butter and chocolate is enough to whisk me back to my childhood—those afternoons of making delightful treats with friends, laughing and waiting for them to set before devouring. That’s exactly what inspired these no-bake Peanut Butter Balls with Rice Krispies. Super easy to whip up and needing only five ingredients, these little gems bring joy without the chaos of an oven. Whether you’re hosting a festive gathering or simply craving a sweet snack, they’re a guaranteed crowd-pleaser. Plus, the combination of creamy peanut butter, rich chocolate, and the crunch from Rice Krispies makes every bite an adventure! Are you ready to create some nostalgic sweetness in your kitchen? Let’s dive in!
Why are these Peanut Butter Balls irresistible?
Simplicity reigns supreme: With just five ingredients and no baking, you can whip up these treats in no time!
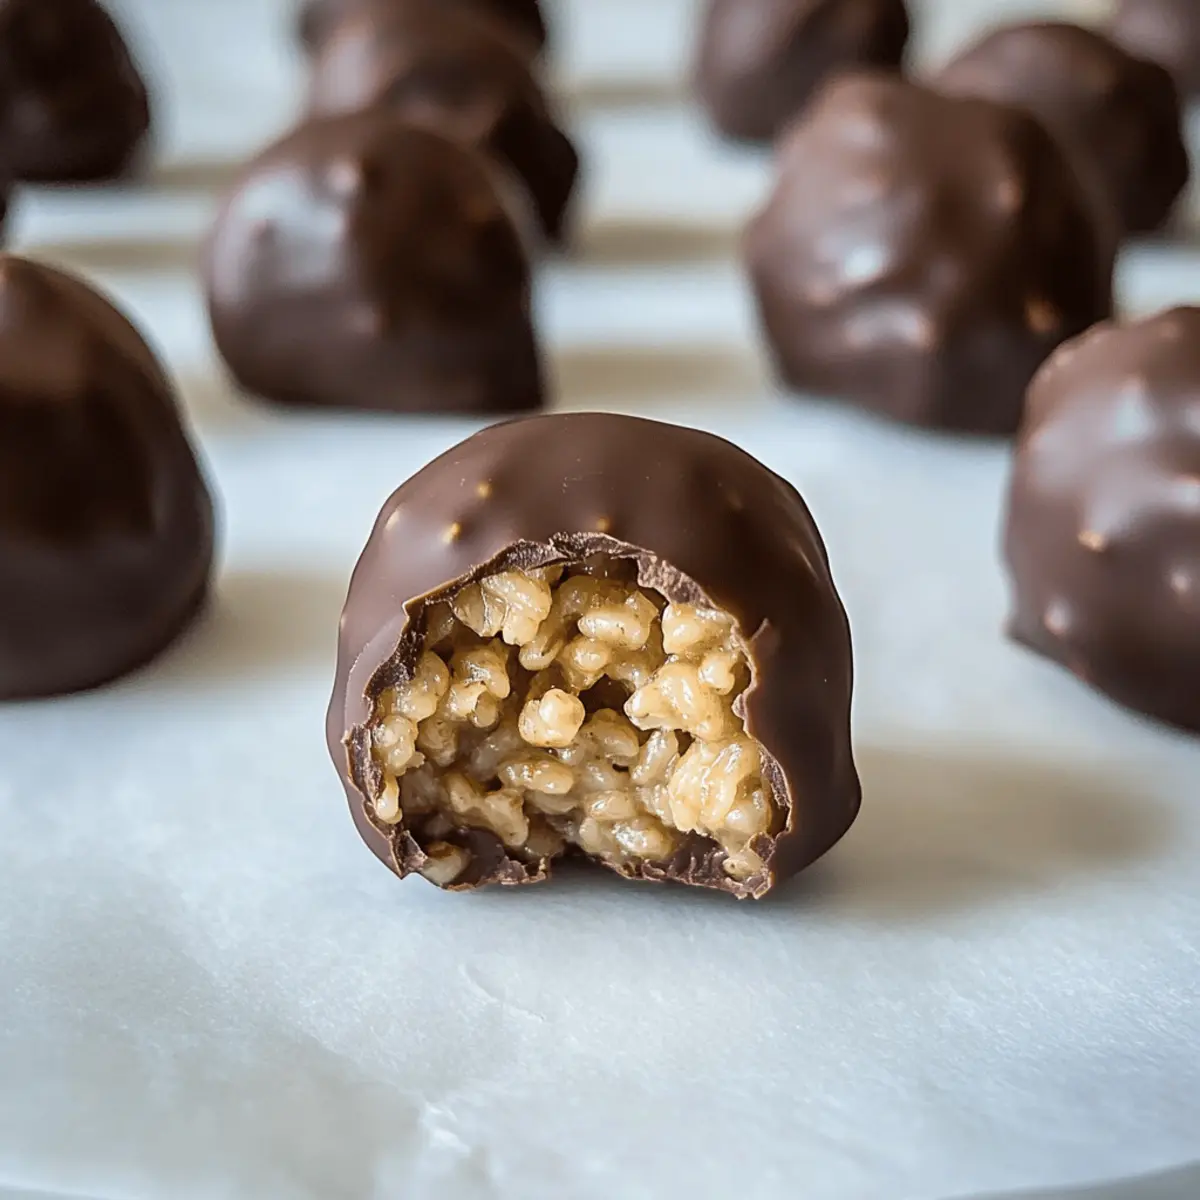
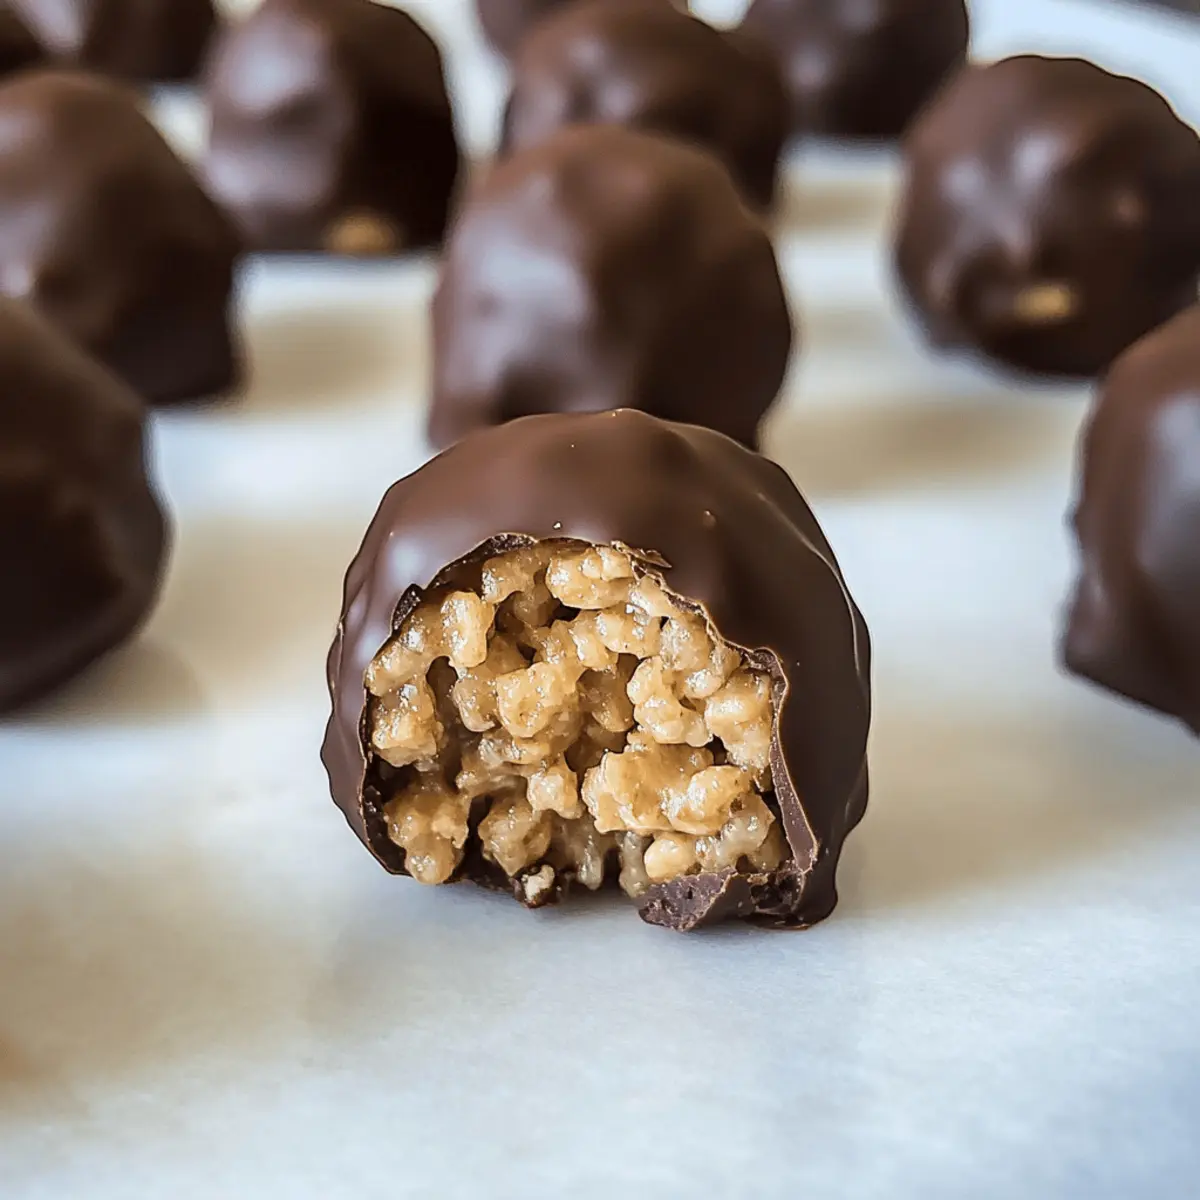
Delectable crunch: The Cocoa Rice Krispies provide a delightful texture that enhances each bite, perfectly balancing the creamy peanut butter and smooth chocolate.
Versatile variations: Feel free to mix things up! Use crunchy peanut butter for an added bite, or experiment with different types of chocolate for a unique spin.
Perfect for sharing: These no-bake delights are ideal for holiday parties, cookie exchanges, or just a fun family treat—everyone will be asking for the recipe!
Quick energy boost: At about 125 calories per ball, they make for a delicious snack that satisfies sweet cravings while giving you a little pick-me-up. So why not serve them with a nice glass of milk or even alongside a cozy hot cocoa to warm up those chilly evenings? For more delightful treats like these, check out my Crockpot Garlic Butter Beef Bites with Potatoes or explore other wonderful options like Texas Roadhouse Butter Chicken Skillet.
Peanut Butter Balls with Rice Krispies Ingredients
• Whip up these delightful Peanut Butter Balls with Rice Krispies using just five simple ingredients!
For the Mixture
- Cocoa Rice Krispies – Provide a crispy texture and enhance the chocolatey flavor; feel free to substitute with regular Rice Krispies if needed.
- Peanut Butter – The star ingredient that not only delivers flavor but also binds the mixture together; use creamy for a smooth texture or crunchy for some extra character.
- Butter – Adds richness to each bite; make sure to use softened unsalted butter for best results—avoid melting it!
- Powdered Sugar – Sweetens the mixture and thickens the texture; about 1 pound or 3¾ cups is ideal for this recipe.
For the Coating
- Chocolate Melting Wafers – Create a luscious outer layer; choose high-quality melting chocolate for a smooth finish, which is preferable over standard chocolate chips.
Step‑by‑Step Instructions for Peanut Butter Balls with Rice Krispies
Step 1: Prepare the Peanut Butter Mixture
Start by softening the unsalted butter. In a large mixing bowl, combine the softened butter and creamy or crunchy peanut butter using a stand mixer or hand mixer on medium speed until the mixture is smooth and well-blended, about 2 minutes. This forms the flavorful base for your Peanut Butter Balls with Rice Krispies.
Step 2: Incorporate the Sweetness
Gradually add in the powdered sugar while mixing on low speed to prevent a sugary cloud from forming. Continue to mix until the powdered sugar is fully incorporated and the mixture looks thick and cohesive, about 3 minutes. This step sweetens your peanut butter base and helps create the dense texture of the balls.
Step 3: Add the Crunch
Gently fold in the Cocoa Rice Krispies, using a spatula, until the cereal is evenly coated and the mixture is well combined. Avoid overmixing, as you want to maintain the crunchiness of the Rice Krispies. The mixture should start forming a sticky dough that holds together nicely, making it ready for shaping.
Step 4: Shape the Balls
Wash your hands in cold water to prevent stickiness, then scoop out about a tablespoon of the mixture and roll it between your palms to create 1-inch balls. Continue this process until all the mixture is formed into balls. Place the shaped Peanut Butter Balls on a parchment-lined baking sheet, leaving some space between each ball.
Step 5: Chill to Firm Up
Refrigerate the Peanut Butter Balls for at least 1 hour or freeze them for 20 minutes to firm them up. This chilling step ensures that the balls hold their shape when you later dip them in chocolate. They should be firm to the touch but not hard, making them ready for coating.
Step 6: Melt the Chocolate
While the balls chill, melt the chocolate wafers. You can do this by placing them in a microwave-safe bowl and microwaving in 30-second increments, stirring in between until smooth, or use a double boiler for even melting. Ensure the chocolate is completely melted without any lumps for a perfect coating on your Peanut Butter Balls.
Step 7: Dip and Decorate
Once the chocolate is melted and smooth, use a fork to dip each chilled peanut butter ball into the chocolate, ensuring it is fully coated. Gently tap the fork on the side of the bowl to remove excess chocolate, then place the coated balls back on the parchment-lined baking sheet. This will create an even and beautiful chocolate shell around each Peanut Butter Ball with Rice Krispies.
Step 8: Let It Set
Allow the chocolate-coated Peanut Butter Balls to sit at room temperature or refrigerate for about 30 minutes, giving the confection a chance to harden. Once firm, they are ready to enjoy! You’ll love the combination of flavors and textures in each delicious bite.
Peanut Butter Balls with Rice Krispies Variations
Feel free to get creative with these delightful Peanut Butter Balls—there’s so much room for personal touches!
- Nut-Free: Substitute peanut butter with sunflower seed butter for a safe, nut-free alternative that still packs a punch of flavor.
- Crunchy Twist: Use crunchy peanut butter instead of creamy for an added texture that makes each bite even more satisfying!
- Chocolate Variety: Experiment with white, milk, or dark chocolate melting wafers for different flavor profiles. Each variety brings its own unique sweetness that pairs beautifully with the peanut butter.
- Add a Spice Kick: Mix in a dash of cinnamon or a hint of cayenne pepper for a delicious twist that enhances the depth of flavor. It gives those familiar flavors a surprising kick!
- Texture Booster: Fold in mini marshmallows or chopped nuts into the mixture for extra fun and delightful texture in every bite. Each addition creates a different experience that keeps things exciting.
- Colorful Sprinkles: After coating in chocolate, roll the balls in colorful sprinkles for a festive touch, making them perfect for birthdays or celebrations. They’ll catch everyone’s eye!
- Flavor Infusion: Try adding a bit of vanilla extract or a spoonful of maple syrup to the mixture for a delightful depth of flavor—so warm and inviting!
- Drizzle Extra Chocolate: Melt a contrasting chocolate and drizzle it over the set peanut butter balls for an appealing finish and added sophistication. A visual treat that tastes just as fabulous!
For more exciting twists on classic recipes, don’t miss out on my Crockpot Garlic Butter Beef Bites with Potatoes or indulge in the rich flavors of my Cowboy Butter Chicken Linguine. Happy cooking!
Tips for the Best Peanut Butter Balls
-
Smooth is Best: Use smooth peanut butter for a creamier texture; if using crunchy, ensure it’s fully mixed to prevent uneven consistency.
-
Watch the Stickiness: If the mixture is too sticky when rolling, wet your hands with cold water or add a bit more powdered sugar to help.
-
Chocolate Seizing: Avoid water contact with melting chocolate, as even a drop can cause it to seize—keep utensils and bowls dry!
-
Chill Properly: Make sure to chill the Peanut Butter Balls adequately to firm them up; this step is crucial for easy handling and coating.
-
Coating Consistency: Dip quickly and gently tap off excess chocolate to avoid creating a thick, uneven layer on your Peanut Butter Balls.
What to Serve with No-Bake Chocolate Peanut Butter Balls with Rice Krispies
Indulging in these delightful bites is best enjoyed with the perfect accompaniments, creating a well-rounded experience full of flavor and fun!
- Creamy Hot Cocoa: The warmth and richness of hot cocoa beautifully complement the chocolatey goodness of the peanut butter balls, creating a cozy dessert moment.
- Fresh Fruit Salad: Bright, juicy fruits bring a refreshing contrast to the richness, adding vibrant colors and a burst of cheer to your dessert table.
- Classic Milk: A glass of cold milk enhances the nostalgia of childhood treats, balancing the sweetness of the peanut butter balls and making every bite more enjoyable.
- Vanilla Ice Cream: Serve a scoop of creamy vanilla ice cream alongside the balls for a delightful contrast of temperatures and textures—pure bliss!
- Peanut Butter Cup Milkshake: For the adventurous, blend together a milkshake using peanut butter cups to amplify the flavors and create a fun, indulgent drink to serve.
- Chocolate-Dipped Pretzels: The salty crunch of pretzels dipped in chocolate can provide a delightful savory-sweet pairing and add a satisfying crunch to each mouthful.
- Nutty Trail Mix: Create a snack platter featuring a mix of nuts and dried fruits to pair with the dessert for a balanced treat that keeps the energy going.
- Caramel Sauce: A drizzle of warm caramel over the peanut butter balls enhances the sweetness and adds a luscious layer of flavor that beautifully ties everything together.
- Coffee or Espresso: Enjoying a rich cup of coffee or a shot of espresso alongside the sweet treats creates a delightful contrast and perfect pick-me-up combination.
- Chocoflan: For an exotic twist, serving delicious chocoflan can take your dessert experience to a whole new level with its rich caramel and chocolate layers.
How to Store and Freeze Peanut Butter Balls with Rice Krispies
Room Temperature: Keep the Peanut Butter Balls in an airtight container at room temperature for up to 2 weeks. They’ll be soft yet delightful, perfect for quick snacks!
Fridge: For a firmer texture, store them in the refrigerator. They can last up to 3 weeks chilled and are a refreshing treat on warmer days.
Freezer: If you’d like to save some for later, freeze the peanut butter balls in a single layer until hardened, then transfer them to a zip-top bag for up to 4-6 months.
Reheating: There’s no need to reheat! Just take them out of the freezer and let them sit at room temperature for a few minutes before indulging in the creamy, crunchy goodness.
Make Ahead Options
These No-Bake Chocolate Peanut Butter Balls with Rice Krispies are perfect for busy home cooks looking to save time! You can prepare the peanut butter mixture and roll them into balls up to 24 hours in advance; just store them in an airtight container in the refrigerator to maintain their freshness. If you’re pressed for time, you can also freeze the balls after shaping them and keep them for up to 3 months—simply thaw in the refrigerator overnight before coating. When ready to serve, melt the chocolate wafers and dip the chilled or thawed balls just before having your guests over, ensuring they’ll taste just as delicious as when freshly made. Enjoy the convenience of these mouthwatering treats!

Peanut Butter Balls with Rice Krispies Recipe FAQs
How do I select the best peanut butter for this recipe?
Absolutely! For the best results, opt for a smooth, creamy peanut butter that spreads easily. Make sure to mix it well if using natural peanut butters, as the oil can separate. If you’re looking for a crunchier texture, feel free to use crunchy peanut butter instead, but ensure it’s mixed well to maintain a uniform consistency.
How should I store Peanut Butter Balls with Rice Krispies?
These treats are quite forgiving! Store the Peanut Butter Balls in an airtight container at room temperature for up to 2 weeks. This way, they stay soft and delicious. If you want to keep them fresh for longer, refrigerate them for up to 3 weeks. Just note that they may firm up slightly in the fridge!
Can I freeze Peanut Butter Balls with Rice Krispies?
Yes, you can! To freeze your Peanut Butter Balls, place them in a single layer on a baking sheet and freeze until firm, about 30 minutes. Then, transfer them to a zip-top bag or airtight container and store in the freezer for up to 4-6 months. When you’re ready to enjoy them, just let them sit at room temperature for a few minutes before indulging!
I’m having trouble with my chocolate coating. What should I do?
Very common! If your chocolate starts to seize or clump, it’s often due to moisture. Ensure all utensils and bowls are completely dry when melting chocolate. If the mixture is too thick to dip your Peanut Butter Balls, you can thin it out by adding a little bit of coconut oil or vegetable oil, which will help achieve a smoother coating.
Can these Peanut Butter Balls be made allergy-friendly?
Absolutely! For a nut-free version, substitute peanut butter with sun butter or a similar seed butter. Just remember to check that the chocolate melting wafers are free of common allergens if you’re accommodating dietary restrictions. Always read labels to ensure they’re safe for everyone involved!
What should I do if my mixture is too sticky or crumbly?
Great question! If your mixture feels too sticky while rolling into balls, you can wet your hands slightly with cold water to make the process easier. Alternatively, if it’s crumbly, add a little bit of vegetable oil (1 teaspoon at a time) to help bind it together until you reach a moldable consistency. Adjust incrementally to avoid making it too oily!

Delicious Peanut Butter Balls with Rice Krispies You’ll Love
Ingredients
Equipment
Method
- Start by softening the unsalted butter. In a large mixing bowl, combine the softened butter and creamy or crunchy peanut butter using a stand mixer or hand mixer on medium speed until the mixture is smooth and well-blended, about 2 minutes.
- Gradually add in the powdered sugar while mixing on low speed to prevent a sugary cloud from forming. Continue to mix until the powdered sugar is fully incorporated and the mixture looks thick and cohesive, about 3 minutes.
- Gently fold in the Cocoa Rice Krispies using a spatula until the cereal is evenly coated and the mixture is well combined.
- Wash your hands in cold water, scoop out about a tablespoon of the mixture, and roll it between your palms to create 1-inch balls, then place them on a parchment-lined baking sheet.
- Refrigerate the Peanut Butter Balls for at least 1 hour or freeze for 20 minutes to firm up.
- Melt the chocolate wafers in a microwave-safe bowl, microwaving in 30-second intervals until smooth.
- Dip each chilled peanut butter ball into the melted chocolate using a fork, ensuring it is fully coated, then tap the fork on the side of the bowl to remove excess chocolate.
- Allow the chocolate-coated Peanut Butter Balls to sit at room temperature or refrigerate for about 30 minutes until firm.
Leave a Reply