
The vibrant clink of M&M’s and the crunch of pretzels remind me why I love holiday baking. Enter my chewy Christmas Kitchen Sink Cookies, where every bite is a delightful dance between sweet and salty. These festive treats are not only quick to prepare—coming together in just 30 minutes—but they also offer a creative way to use up holiday snacks you might have on hand. Just imagine how your kitchen will smell as they bake, filling the air with a warmth that invites everyone to gather. With rich white chocolate chips and colorful sprinkles, these cookies turn any cookie platter into a cheerful centerpiece. Are you ready to embrace the joy of baking and create delicious memories?
Why Are These Cookies a Must-Make?
Irresistible flavor combinations: The mix of sweet M&M’s and salty pretzels creates a deliciously unique taste experience.
Quick prep time: Ready in just 30 minutes, you can whip these festive cookies up even on the busiest holiday days.
Family fun: Get the kids involved in the creative process of mixing in their favorite snacks, making memories to cherish.
Versatile ingredients: With options to swap mix-ins, you can tailor these cookies to everyone’s tastes, from nuts to butterscotch chips.
Textural delight: The chewy centers combined with crunchy edges ensure each bite is a perfect balance of soft and crispy.
Crowd-pleaser: From holiday parties to cookie exchanges, these Christmas Kitchen Sink Cookies are bound to impress your family and friends!
Christmas Kitchen Sink Cookies Ingredients
For the Cookie Dough
- Salted Butter – Adds richness and a creamy texture. Substitution: Unsalted butter can be used; add a pinch of salt.
- Light Brown Sugar – Provides moisture and warm caramel notes. Substitution: Dark brown sugar for a deeper flavor.
- Granulated White Sugar – Sweetens and helps achieve the perfect cookie texture.
- Egg Yolks – Contributes to moisture and gives a chewy texture. Note: Use at room temperature for better incorporation.
- Vanilla Bean Paste or Extract – Elevates the overall flavor depth. Substitution: Use pure vanilla extract if paste isn’t available.
- All-Purpose Flour – Provides the main structure of the cookies. Note: Measure correctly to avoid dense cookies.
- Baking Powder and Baking Soda – Essential leavening agents for lift and softness.
- Salt – Balances sweetness and enhances overall flavors.
For the Mix-Ins
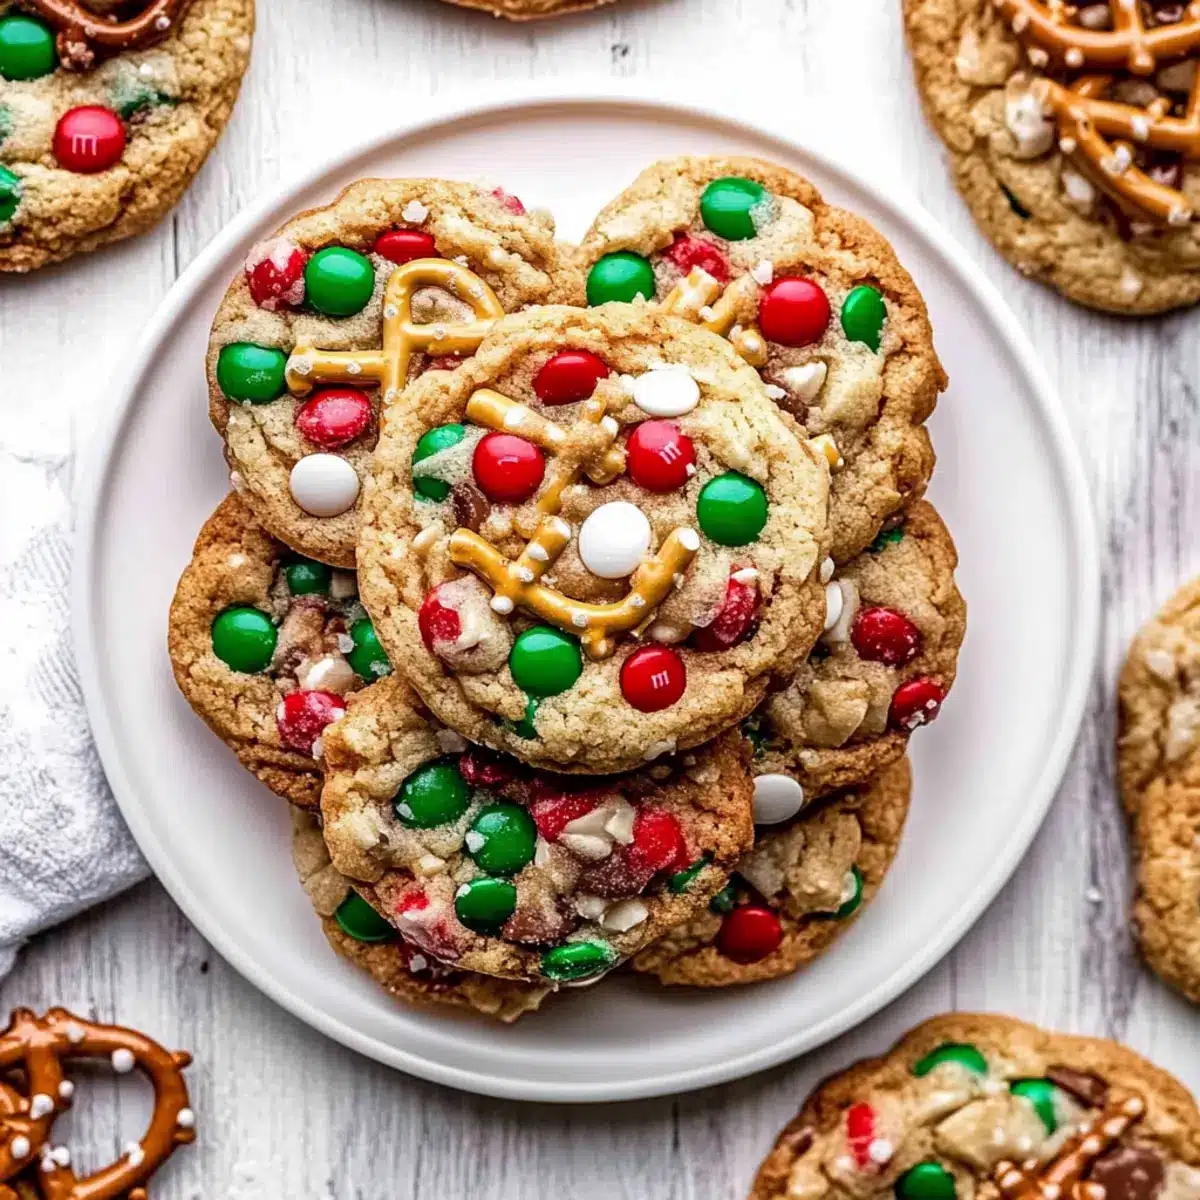
- Red and Green M&M’s – Adds sweetness and festive colors to each bite.
- White Chocolate Chips – Offers creaminess and extra sweetness that pairs beautifully with M&M’s.
- Pretzel Pieces – Introduces a salty crunch that contrasts perfectly with sweetness.
- Potato Chip Pieces – Adds a unique salty flavor and delightful crunch.
- Red and Green Jimmies – Decorative sprinkles for that extra festive touch.
Feel free to get creative with these ingredients, making your Christmas Kitchen Sink Cookies a personalized holiday treat the whole family will love!
Step‑by‑Step Instructions for Christmas Kitchen Sink Cookies
Step 1: Preheat the Oven
Begin by preheating your oven to 350°F (175°C). As the oven warms up, prepare your baking sheets by lining them with parchment paper. This ensures that your delicious Christmas Kitchen Sink Cookies don’t stick and spread evenly as they bake, achieving that perfect golden edge.
Step 2: Cream Butter and Sugars
In a large mixing bowl, combine the softened salted butter, light brown sugar, and granulated white sugar. Using an electric mixer, beat them together on medium speed for about 2 minutes until the mixture is light and fluffy. This step creates a lovely base, adding richness to your cookies.
Step 3: Incorporate Eggs and Vanilla
Next, add in the egg yolks and vanilla bean paste (or extract) to the creamed mixture. Mix on medium speed for another 2 minutes until the batter is fluffy and a pale color. The egg yolks help achieve the chewy texture that makes these Christmas Kitchen Sink Cookies special.
Step 4: Mix Dry Ingredients
In a separate bowl, whisk together the all-purpose flour, baking powder, baking soda, and salt. Once well mixed, gradually add the dry ingredients to the wet mixture, mixing until just combined. Be careful not to overmix—this is key to keeping the cookies light yet chewy!
Step 5: Fold in Add-Ins
Gently fold in the colorful M&M’s, white chocolate chips, pretzel pieces, potato chip pieces, and festive jimmies. Use a spatula to ensure even distribution without overworking the dough. The combination of sweet and salty ingredients is what makes these Christmas Kitchen Sink Cookies a delightful treat.
Step 6: Shape Cookies
Using a cookie scoop, portion out the dough into 20 balls, placing them 2 inches apart on your prepared baking sheets. For a decorative touch, you can top each ball with a few extra mix-ins before baking. This helps enhance the vibrant appearance of your Christmas Kitchen Sink Cookies.
Step 7: Bake
Slide the baking sheets into the preheated oven and bake for 10-12 minutes. For chewy centers, aim for 10 minutes; for crisper edges, go for about 12 minutes. Keep an eye out for the cookies turning golden at the edges while remaining soft in the center.
Step 8: Cool
After baking, let the cookies cool on the baking sheet for about 5 minutes. This allows them to set properly before transferring to a wire rack. Enjoy the warm aroma wafting through your kitchen as you prepare to share these irresistible Christmas Kitchen Sink Cookies!

Christmas Kitchen Sink Cookies Variations
Feel free to get creative and put your spin on these delightful cookies for a festive treat!
-
Nutty Delight: Add a handful of chopped pecans or walnuts for a toasty crunch that pairs wonderfully with sweet ingredients. Nuts bring a heartiness that compliments the chewiness perfectly.
-
Dairy-Free: Use coconut oil instead of butter and dairy-free chocolate chips to make a deliciously creamy batch without the dairy. This swap doesn’t compromise on flavor; you’ll be amazed by how rich they still taste.
-
Spicy Kick: Add a dash of cayenne pepper or cinnamon to the dry ingredients for a surprising warmth. This twist elevates the flavor profile and gives your cookies a unique holiday flair.
-
Gluten-Free: Substitute all-purpose flour with a gluten-free flour blend for a cookie everyone can enjoy. Just make sure the blend has xanthan gum for the best texture and structure.
-
Caramel Bliss: Incorporate chopped caramel candies to the mix for a gooey surprise in every bite. The melty caramel combines beautifully with the salty crunch, taking your cookies to the next level.
-
Chocolate Overload: Swap in dark chocolate chips for a richer taste that balances beautifully with the salty pretzels. It gives a delightful depth of flavor, making each bite even more indulgent.
-
Minty Fresh: Add peppermint extract instead of vanilla for a seasonal twist that will get everyone in the holiday spirit. You can also mix in crushed candy canes for a festive crunch!
If you enjoy experimenting with flavors, you might want to check out my other recipes like these Pumpkin Smores Cookies for a twist on your holiday baking or the delicious Chewy Pumpkin Cookies which play nicely with the seasonal spirit!
What to Serve with Christmas Kitchen Sink Cookies
Baking these delightful cookies is just the beginning; let’s create a cozy holiday spread that brings your loved ones together!
-
Tall Glass of Cold Milk: Perfectly complements the sweet and salty flavors, enhancing the cookie experience with creamy richness. The cold milk provides a luscious contrast to the warm cookies right out of the oven.
-
Hot Cocoa with Marshmallows: This warm drink adds an extra layer of sweetness. The light, fluffy marshmallows melting into the cocoa pair beautifully with the chewy texture of the cookies, making each sip exciting.
-
Festive Fruit Salad: The fresh burst of seasonal fruits offers a refreshing balance to the richness of the cookies, creating a lovely contrast of flavors and colors on your holiday table.
-
Spiced Apple Cider: Warm spiced cider fills your home with comforting aromas while perfectly contrasting the sweetness in the cookies. It’s a seasonal favorite that everyone will enjoy!
-
Chewy Caramel Brownies: Indulge your guests with these rich brownies for double the dessert joy. Their fudgy texture and deep chocolate flavor harmonize beautifully with the playful taste of the cookies.
-
Nutty Chex Mix: This savory snack adds a delightful crunch. The contrast of sweet cookies and salty mix creates an enticing flavor journey, perfect for mingling and snacking during holiday gatherings.
How to Store and Freeze Christmas Kitchen Sink Cookies
Room Temperature: Store cookies in an airtight container at room temperature for up to 3 days to maintain freshness and chewiness.
Fridge: For longer storage, place cookies in the refrigerator in a sealed container, where they’ll last up to a week. Just allow them to come to room temperature before enjoying.
Freezer: To freeze, layer cookies between sheets of wax paper in an airtight container or freezer bag, and freeze for up to 3 months. Thaw at room temperature for best texture.
Reheating: To revive your cookies, warm them in the microwave for 10-15 seconds, just until soft, ensuring the delightful flavors of your Christmas Kitchen Sink Cookies shine through!
Expert Tips for Christmas Kitchen Sink Cookies
-
Measure Flour Correctly: Ensure you measure flour using the spoon-and-level method; over-measuring can lead to dense cookies rather than the chewy texture you desire.
-
Room Temperature Eggs: Use egg yolks at room temperature for better incorporation into the batter, resulting in a smoother dough that’s easy to mix.
-
Don’t Overmix: When combining wet and dry ingredients, mix until just combined. Overmixing can toughen the cookies, compromising their delightful chewiness.
-
Customize Add-Ins: Feel free to swap mix-ins to suit your taste, like using butterscotch chips or different chocolate types—this makes your Christmas Kitchen Sink Cookies uniquely yours!
-
Monitor Baking Time: Bake for 10-12 minutes based on your preference for chewy or crisp edges; remember, cookies will continue to firm up during cooling.
-
Storing Leftovers: Keep any leftover cookies in an airtight container for up to 3 days to preserve their freshness, ensuring you can savor the festive taste longer!
Make Ahead Options
These Christmas Kitchen Sink Cookies are perfect for busy home cooks looking to save time during the hectic holiday season! You can prepare the cookie dough up to 3 days in advance by mixing all the ingredients and then refrigerating it in an airtight container. This helps to maintain freshness and allows the flavors to meld beautifully. For longer storage, freeze the cookie dough for up to 2 weeks; just scoop the dough into balls, place them on a baking sheet to freeze them individually, then transfer to a freezer bag. When you’re ready to bake, simply let the dough balls sit at room temperature for about 15 minutes, then bake according to the instructions for warm, delicious Christmas Kitchen Sink Cookies that are just as delightful as if they’d been made fresh!

Christmas Kitchen Sink Cookies Recipe FAQs
What is the best way to select ripe ingredients for these cookies?
Absolutely! For the best results, ensure your butter is softened to room temperature, which allows for better creaming with sugars. The egg yolks should also be at room temperature for smooth incorporation into the dough. When using M&M’s, look for vibrant colors with no signs of fading, and always check that your baking powder and baking soda aren’t expired to ensure proper rising.
How should I store my Christmas Kitchen Sink Cookies?
To keep these cookies fresh and chewy, store them in an airtight container at room temperature for up to 3 days. If you prefer a longer shelf life, you can refrigerate them for up to a week, allowing them to reach room temperature before enjoying.
Can I freeze the cookie dough for Christmas Kitchen Sink Cookies?
Yes, you absolutely can! To freeze the cookie dough, scoop the portions into balls and place them on a baking sheet. Freeze them for about 2 hours, until solid, then transfer them to an airtight container or freezer bag. They can be stored in the freezer for up to 3 months! When you’re ready to bake, allow the dough balls to thaw at room temperature for about 30 minutes before baking as per the recipe.
What should I do if my cookies turn out too chewy or dense?
If you find your cookies are too chewy or dense, it may be due to over-measuring the flour or overmixing the dough. For the correct flour measurement, use the spoon-and-level method: scoop the flour into your measuring cup and level off the top without packing it down. Additionally, mix the wet and dry ingredients until just combined to maintain that delightful chewiness without compromising texture.
Can I make these cookies peanut-free or nut-free for allergies?
Certainly! To make these Christmas Kitchen Sink Cookies nut-free, simply omit any nut-based ingredients or candies and use nut-free substitutes for any chocolate chips. If someone has severe allergies, always check labels to ensure all ingredients are nut-free and prepared in a space free of cross-contamination.
What can I substitute for M&M’s if I want different flavors?
The more the merrier! If you’re looking to mix things up, try using chocolate chips—including dark, milk, or even butterscotch chips—in place of M&M’s. You can also experiment with dried fruits or candies like crushed peppermint or caramel bits to create your unique flavor combinations while keeping the festive spirit alive!

Irresistible Christmas Kitchen Sink Cookies for Holiday Joy
Ingredients
Equipment
Method
- Preheat your oven to 350°F (175°C) and line baking sheets with parchment paper.
- In a large mixing bowl, cream together the salted butter, light brown sugar, and white sugar using an electric mixer on medium speed until light and fluffy (about 2 minutes).
- Add the egg yolks and vanilla paste (or extract) to the mixture and mix on medium speed for another 2 minutes until fluffy.
- In a separate bowl, whisk together the flour, baking powder, baking soda, and salt. Gradually add this to the wet mixture, mixing until just combined.
- Fold in the M&M's, white chocolate chips, pretzel pieces, potato chip pieces, and jimmies, ensuring even distribution.
- Using a cookie scoop, portion out 20 balls of dough, placing them 2 inches apart on the prepared baking sheets.
- Bake in the preheated oven for 10-12 minutes, aiming for chewy centers (10 minutes) or crisper edges (12 minutes).
- Let cookies cool on the baking sheet for about 5 minutes before transferring to a wire rack.
Leave a Reply