
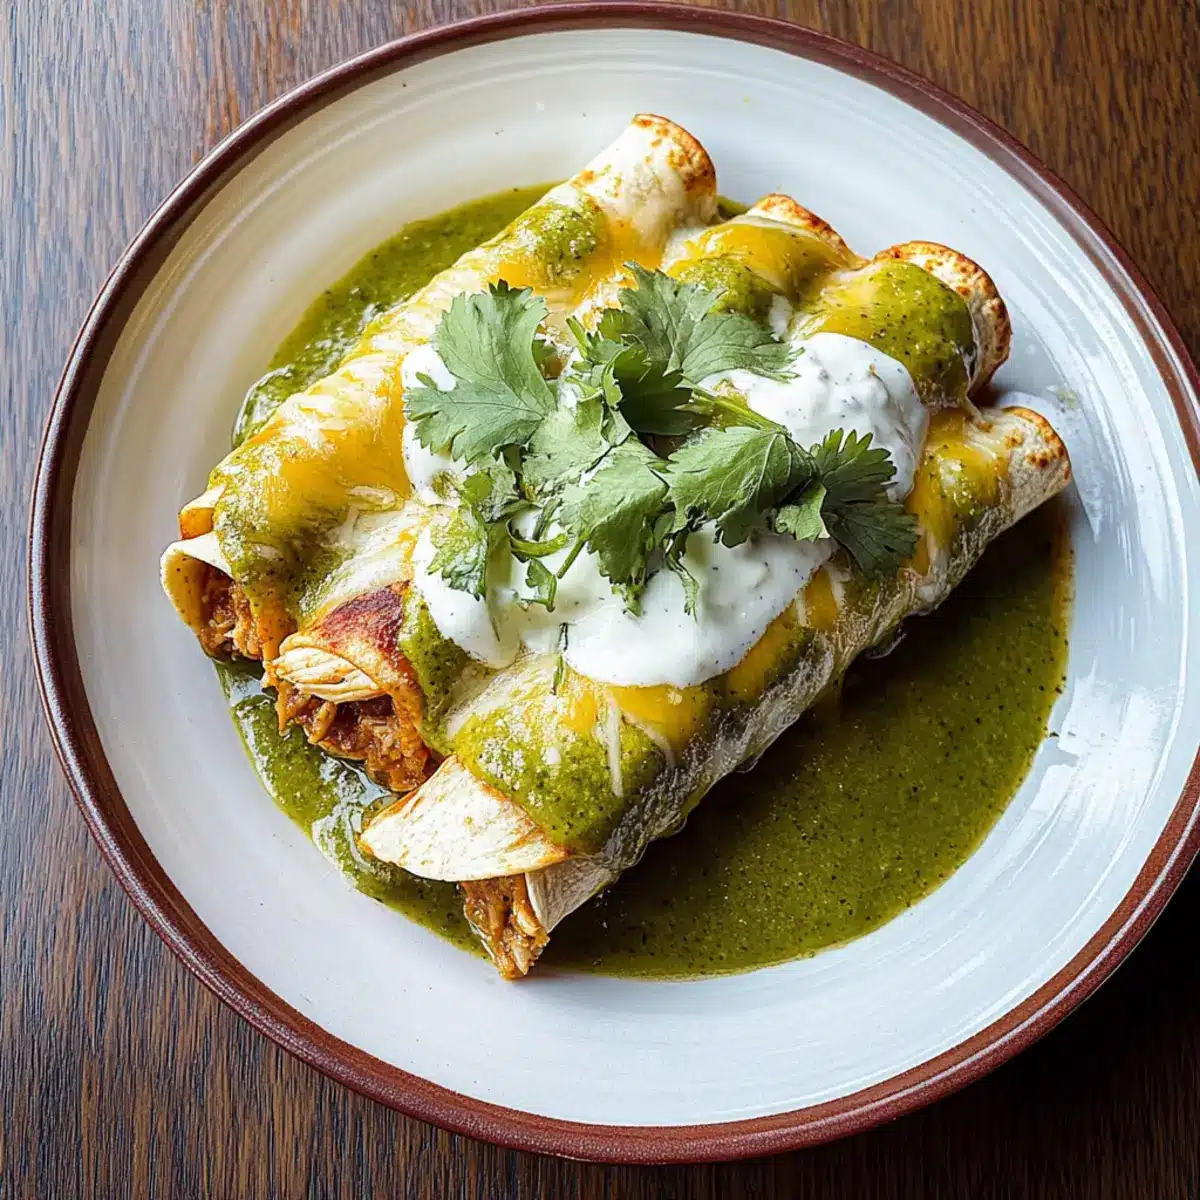
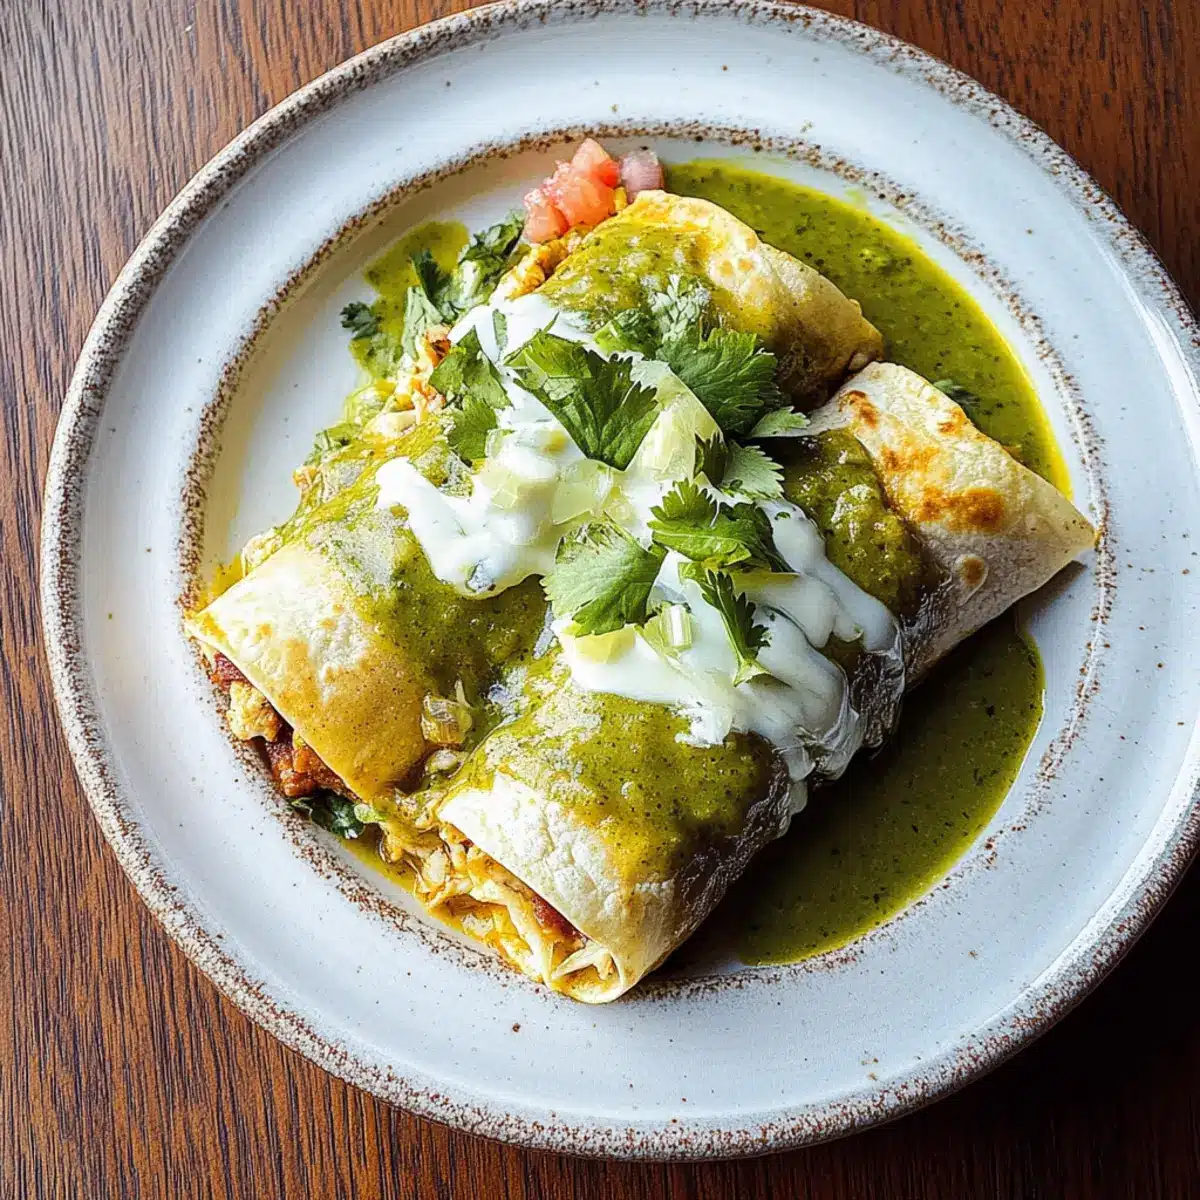
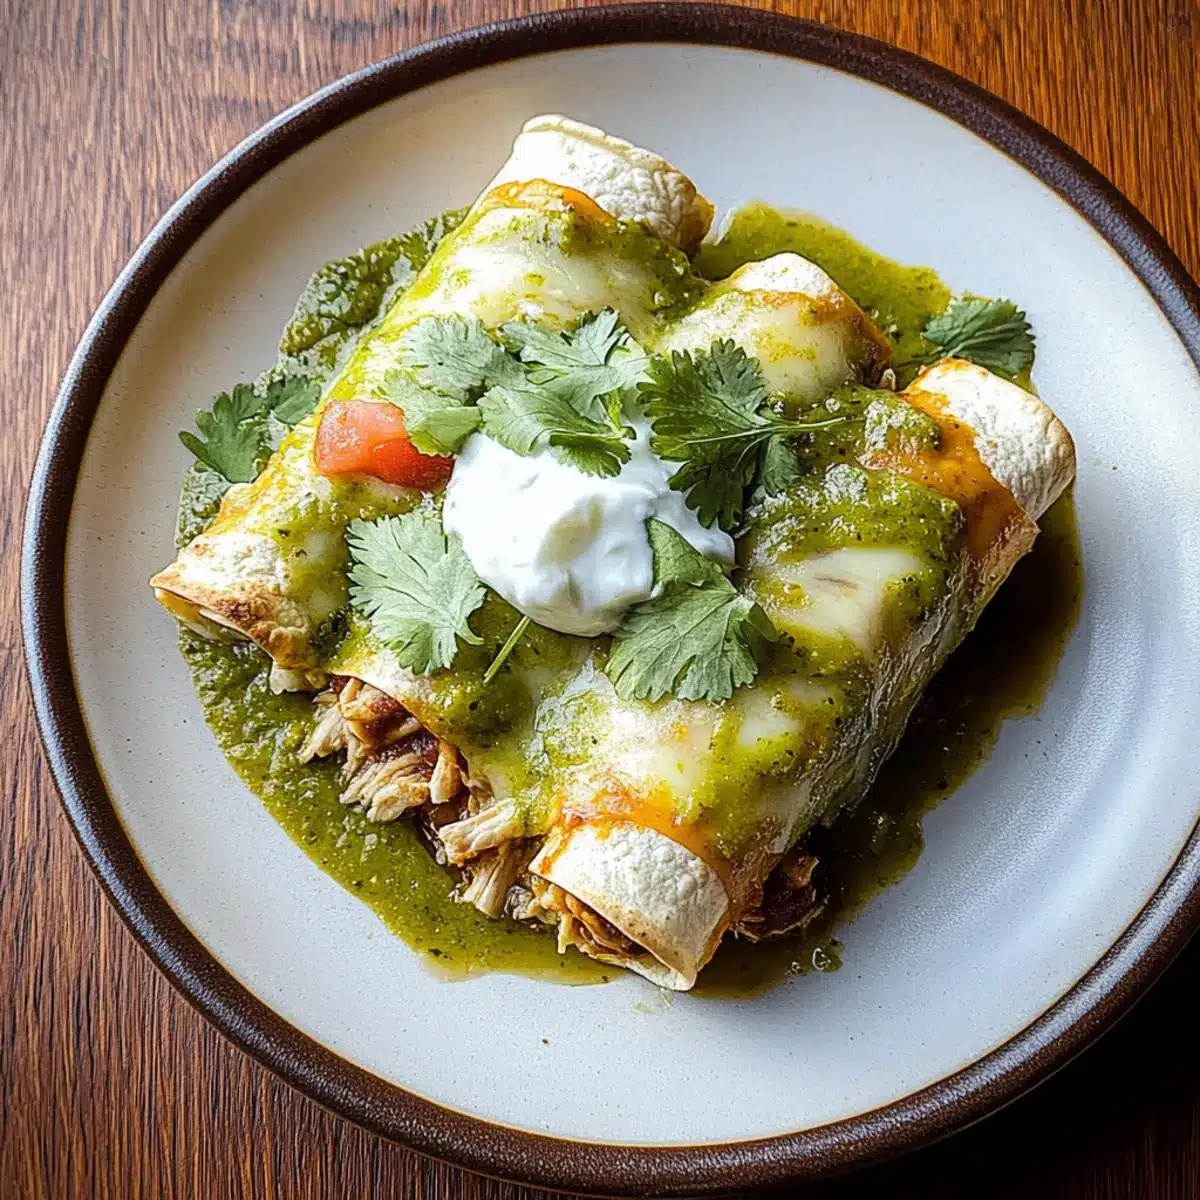
As I stood by the stove, the tantalizing aroma of sautéing onions and garlic filled my kitchen, whisking me away to a bustling Mexican market. There’s just something soul-soothing about making Enchiladas Suizas—soft tortillas hugging creamy green sauce and tender shredded chicken, topped with melted cheese that beckons to be savored. This dish isn’t just a meal; it’s comfort food that warms the heart, perfect for weeknight dinners or cozy gatherings with loved ones. The best part? It’s incredibly versatile—you can easily customize it to suit your taste with different proteins or even a meatless twist. Plus, these enchiladas can be made in advance, making it a hassle-free choice for any busy home chef. Are you ready to dive into this creamy delight?
Why Are Enchiladas Suizas So Irresistible?
Comforting, Creamy Layers: The combination of creamy green sauce and shredded chicken creates a rich, flavorful experience that is both indulgent and comforting.
Versatile Delight: Whether you’re in the mood for chicken, beef, or a veggie option, this recipe easily adapts to fit your preference, ensuring everyone can enjoy a personalized plate.
Make-Ahead Magic: Perfect for busy weeknights, these enchiladas can be assembled in advance and baked just before serving, saving you precious time in the kitchen.
Mouthwatering Cheese: Topped with melted Monterey Jack or a zesty Mexican blend, the cheese adds the perfect finishing touch, enticing family and friends alike to come back for seconds.
Authentic Flavor: Elevate your dining experience by incorporating fresh cilantro and lime, providing a bright twist that complements the heartfelt flavors beautifully. Pair with some sides like Chicken Enchiladas Savory for a full meal!
Enchiladas Suizas Ingredients
For the Enchiladas
• Corn Tortillas – These are the base of your enchiladas; lightly frying them prevents sogginess.
• Olive Oil – Essential for sautéing onions and garlic; you can substitute with vegetable or canola oil.
• Cooked Shredded Chicken – This is your main protein; rotisserie chicken works great for convenience.
• Sour Cream – Adds creaminess and richness; Greek yogurt is a fantastic lighter substitute.
• Green Enchilada Sauce – Provides that tangy flavor; feel free to use homemade or store-bought salsa verde.
• Chicken Broth – This adds moisture and flavor to the filling; it enhances the dish’s overall taste.
• Shredded Cheese (Monterey Jack or Mexican Blend) – Melty goodness on top; cheddar or queso fresco are excellent alternatives.
• Onion – Enhances the flavor of the filling; you can use yellow or sweet onions for a milder taste.
• Garlic – This aromatic enhances the dish wonderfully; freshly minced garlic is best for a vibrant flavor.
• Fresh Cilantro – Adds a refreshing finish; omit if you’re not a fan, but it’s worth trying!
• Salt and Pepper – Essential for balancing the flavors throughout the dish.
For the Topping
• Sour Cream Mixture – Mixing sour cream with enchilada sauce adds a delightful creamy drizzle on top.
• Fresh Cilantro – Chopped cilantro sprinkled just before serving elevates the presentation and adds freshness.
Step‑by‑Step Instructions for Enchiladas Suizas
Step 1: Preheat the Oven
Begin by preheating your oven to 375°F (190°C). This ensures a perfectly cooked and bubbling finish for your Enchiladas Suizas. While the oven heats up, prepare your ingredients and allow them to be ready for a smooth assembly process later on.
Step 2: Sauté Aromatics
In a skillet, add a splash of olive oil over medium heat. Once the oil shimmers, add diced onions and minced garlic. Sauté for about 3-4 minutes until the onions turn translucent and the garlic becomes fragrant, filling your kitchen with delicious aromas that set the stage for tasty enchiladas.
Step 3: Combine the Filling
Next, stir in the cooked shredded chicken, chicken broth, and green enchilada sauce into the skillet with the onion and garlic mixture. Allow everything to simmer for about 5 minutes. Stir occasionally, letting the flavors meld while seasoning with salt and pepper to taste, ensuring the filling is both savory and satisfying.
Step 4: Prepare the Tortillas
In a separate pan, heat a tad bit of olive oil over medium heat. With a soft, pliable tortilla in hand, lightly fry each one for about 30 seconds on each side. This step prevents the tortillas from cracking during rolling and adds a delightful golden hue, enhancing the overall texture of your Enchiladas Suizas.
Step 5: Mix the Topping
In a small bowl, combine sour cream with a tablespoon of the green enchilada sauce. This mixture will bring added creaminess and richness to your dish. Set aside, as this will be drizzled over the enchiladas once they emerge from the oven, creating a beautiful presentation.
Step 6: Assemble the Enchiladas
Spread a thin layer of the chicken mixture on the bottom of a baking dish to prevent sticking. Take a tortilla, spoon some chicken filling onto it, roll it tightly, and place the seam-side down in the dish. Repeat this process until all tortillas are filled, snugly fitting them side by side in the baking dish.
Step 7: Add Sauce and Cheese
Once all the tortillas are nestled in the dish, pour the remaining chicken mixture evenly over the top. Sprinkle a generous amount of shredded cheese over the enchiladas, ensuring that every bite will be warm and melty. This layer of cheese adds a delightful gooey texture perfect for a comforting meal.
Step 8: Bake the Enchiladas
Place your assembled dish in the preheated oven and bake for 20-25 minutes. Keep an eye on it, and look for that beautiful bubbling cheese and golden top, signaling that your Enchiladas Suizas are ready to be enjoyed, emanating warmth and comfort.
Step 9: Garnish and Serve
Once baked, remove the enchiladas from the oven and let them rest for a couple of minutes. Drizzle the prepared sour cream mixture on top and sprinkle with chopped fresh cilantro for a burst of color and flavor. Serve warm, and savor every delightful bite of your homemade enchiladas!
Expert Tips for Enchiladas Suizas
-
Tortilla Technique: Ensure tortillas are warmed through; this prevents cracking when rolling. Light frying also enhances their flavor and texture.
-
Flavor Adjustment: Taste your filling and adjust seasoning before baking. A dash of lime juice or a pinch of salt can elevate the overall taste of your Enchiladas Suizas.
-
Chicken Options: If using rotisserie chicken, shred it when still warm for easier handling. For a healthier twist, consider substituting with cooked quinoa or black beans in a vegetarian version.
-
Make-Ahead Convenience: To save time, assemble the enchiladas beforehand and cover tightly. Store in the refrigerator and bake the next day for fresh, melty goodness!
-
Garnish Delight: Experiment with toppings! Add sliced avocados, radishes, or even a sprinkle of crisp tortilla chips for a delightful crunch over your finished enchiladas.
Enchiladas Suizas Variations & Substitutions
Feel free to create your own twist on these delightful enchiladas, transforming them with flavors and ingredients that speak to your heart.
-
Vegetarian Option: Swap shredded chicken for black beans or sautéed vegetables (zucchini, bell peppers) for a satisfying meatless dish. This variation is not just an alternative; it invites the vibrant colors and textures of fresh produce to shine through.
-
Spicy Kick: Add diced jalapeños or a dash of crushed red pepper flakes to the filling for an extra heat level that warms the soul. Those who crave spice can elevate their experience by using a hotter salsa verde.
-
Cheese Swap: Try different cheeses like sharp cheddar or queso blanco in place of Monterey Jack for a unique flavor profile. Each cheese brings its own character, creating delightful surprises in every bite.
-
Creamy Alternative: Substitute sour cream with creamy avocado puree for a fresher, lighter topping that complements the enchiladas beautifully. It adds a luxurious texture, bringing a delightful richness to your dish.
-
Herb Infusion: Experiment with other herbs like parsley or basil if cilantro isn’t your favorite. They provide a fresh and aromatic nuance that pairs perfectly with the creamy sauce.
-
Flavorful Sauces: Use a homemade tomatillo sauce or roasted red pepper sauce instead of green enchilada sauce for a different taste experience. Both options can add a robust kick, enhancing the overall flavor of your Enchiladas Suizas.
-
Crunchy Toppings: Garnish with crumbled tortilla chips or toasted pumpkin seeds for an added texture that delights the palate. The crunch adds an unexpected layer that takes the dish to new heights.
For more ideas, consider pairing your customized enchiladas with a vibrant side like Chicken Enchiladas Savory or a refreshing salad, balancing flavors that will leave everyone wanting more!
Storage Tips for Enchiladas Suizas
Room Temperature: Enchiladas Suizas can be kept at room temperature for up to 2 hours before harmful bacteria may develop. Avoid leaving them out longer to ensure food safety.
Fridge: Store leftovers in an airtight container for up to 3 days to maintain freshness. If possible, cover with foil or plastic wrap before sealing to prevent moisture loss.
Freezer: For longer storage, you can freeze assembled but unbaked enchiladas for up to 3 months. Wrap tightly in plastic wrap followed by foil to prevent freezer burn.
Reheating: To reheat, bake frozen enchiladas in a preheated oven at 375°F (190°C) for 35-40 minutes covered with foil, then remove the foil for the last 10 minutes. Enjoy your creamy Enchiladas Suizas like they were just made!
What to Serve with Creamy Enchiladas Suizas?
Build the perfect meal around these comforting enchiladas by pairing them with delightful sides that enhance their flavors.
- Mexican Rice: Fluffy and well-seasoned, this dish complements the creamy enchiladas beautifully, soaking up the savory sauce.
- Zesty Green Salad: A crisp salad with lime vinaigrette adds a refreshing contrast to the richness of the enchiladas.
- Refried Beans: Creamy and hearty, refried beans lend a satisfying texture while providing an extra dose of protein to your meal.
- Guacamole: This creamy avocado dip brings a fresh kick that pairs perfectly with the enchiladas, balancing the flavors with its coolness.
- Pickled Jalapeños: A bit of spice and tang, these vibrant pickled peppers offer an exciting punch against the creamy backdrop of the dish.
- Corn Elote: Grilled corn drizzled with lime and topped with cheese provides a sweet and zesty flavor that complements the enchiladas wonderfully.
- Margaritas: A refreshing drink with a hint of lime enhances the festive feeling of your meal, making every bite of Enchiladas Suizas even more enjoyable.
Make Ahead Options
These Enchiladas Suizas are a fantastic choice for meal prep, allowing you to savor the taste of homemade comfort food with minimal effort when it’s time to eat. You can prepare the enchiladas up to 24 hours in advance by assembling them completely, then covering the baking dish tightly with plastic wrap or aluminum foil and refrigerating. To maintain quality, it’s best to hold off on adding the cheese until just before baking. When you’re ready to enjoy them, simply preheat your oven, add the shredded cheese on top, and bake for about 20-25 minutes until bubbly and golden. Cooking with prep in mind not only saves time, but it also keeps your weeknight meals delicious and stress-free!
Enchiladas Suizas Recipe FAQs
How do I choose ripe avocados for garnish?
Absolutely! Look for avocados that yield slightly when pressed, indicating ripeness. Avoid those with dark spots or excessive softness, as they may be overripe. Using fresh, perfectly ripe avocados elevates your Enchiladas Suizas and adds a creamy, luscious finish.
Can I store leftover enchiladas, and for how long?
Yes, you can definitely store leftover enchiladas! Keep them in an airtight container in the fridge for up to 3 days. If you’re concerned about moisture, cover them with foil before sealing. This way, they’ll retain their delicious flavor and texture even after a day or two in the fridge.
Can I freeze Enchiladas Suizas, and how do I do it?
Absolutely! To freeze your enchiladas, assemble them in a dish but don’t bake them first. Wrap the entire dish tightly in plastic wrap followed by aluminum foil to prevent freezer burn. They can be frozen for up to 3 months. When you’re ready to enjoy them, bake from frozen at 375°F (190°C) for 35-40 minutes covered, removing the foil for the last 10 minutes to achieve that golden cheese finish.
What if my enchiladas are too saucy or dry?
Very common! If your enchiladas turn out too saucy, next time try using less sauce in the filling or ensure tortillas are lightly fried. If they’re too dry, consider adding a bit more sauce before baking or serving extra on the side. This way, you’ll elevate the moisture and rich creaminess of the dish consistently.
Are there any dietary considerations for allergies?
Absolutely! Be mindful of common allergens when preparing Enchiladas Suizas. For instance, use gluten-free tortillas if gluten is a concern, and check the ingredients of your salsa verde and chicken broth for hidden allergens. If you’re unsure, opting for homemade sauces allows you to control every ingredient, ensuring a delicious, allergen-free meal for everyone.

Creamy Enchiladas Suizas: Your New Comfort Food Delight
Ingredients
Equipment
Method
- Preheat your oven to 375°F (190°C).
- In a skillet, heat olive oil over medium heat, add diced onions and minced garlic, sauté for 3-4 minutes until translucent.
- Stir in cooked shredded chicken, chicken broth, and green enchilada sauce, simmer for 5 minutes, season with salt and pepper.
- In a separate pan, lightly fry each corn tortilla for about 30 seconds on each side.
- In a small bowl, mix sour cream with a tablespoon of green enchilada sauce.
- Spread a thin layer of chicken mixture on the bottom of a baking dish, fill tortillas with the mixture, roll tightly, and place seam-side down.
- Pour remaining chicken mixture over the stuffed tortillas, sprinkle shredded cheese on top.
- Bake in the preheated oven for 20-25 minutes until bubbly and golden.
- Remove from the oven, drizzle with sour cream mixture, and garnish with cilantro before serving.
Leave a Reply