
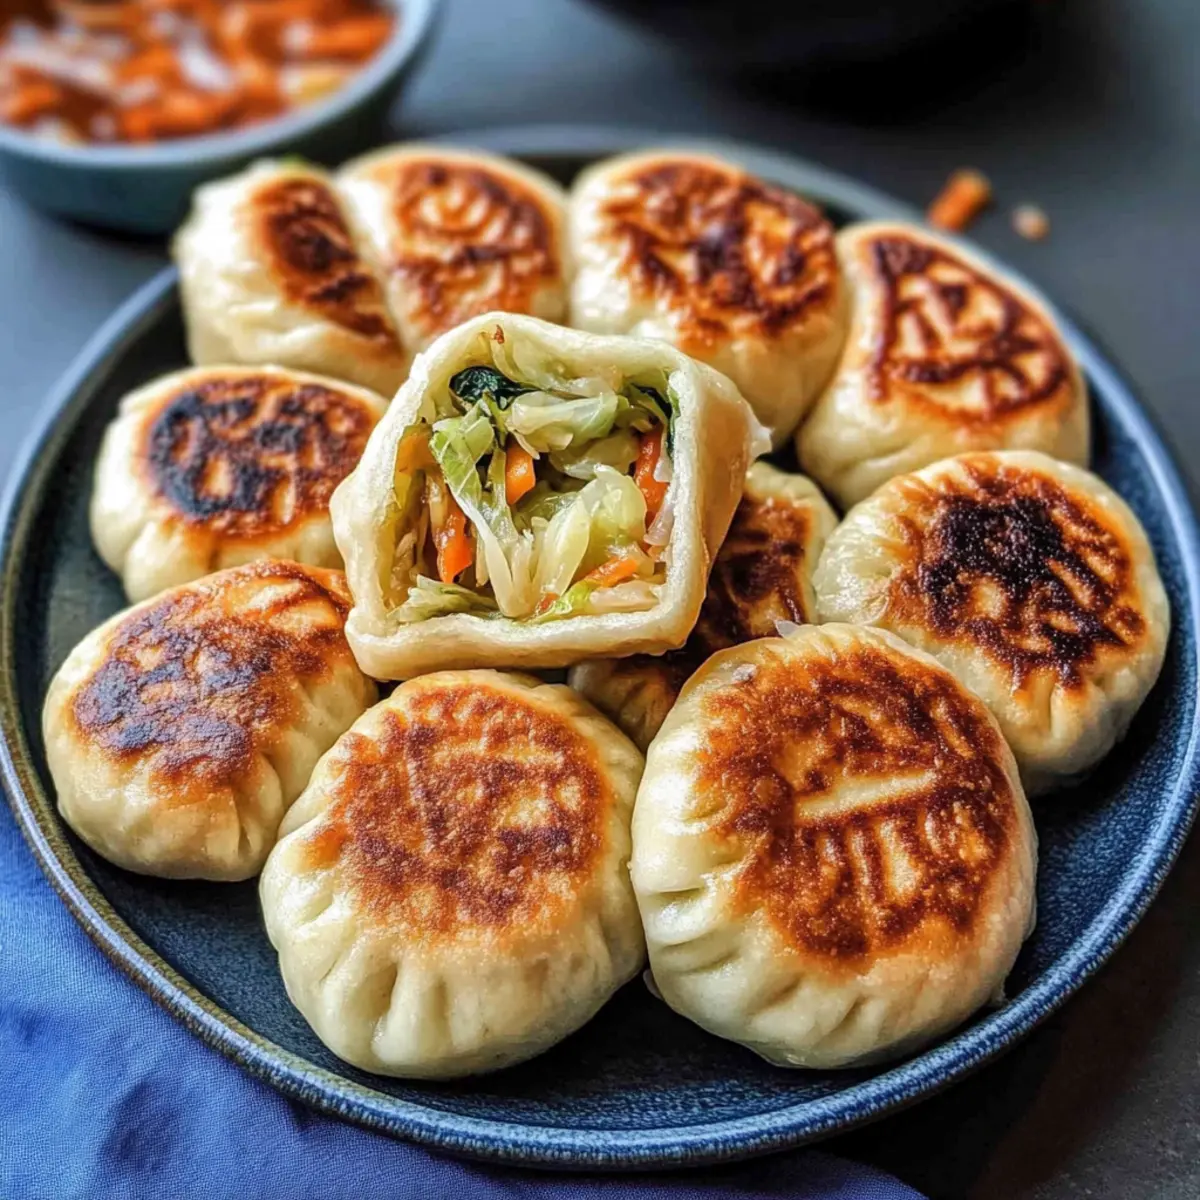
As I walked down the vibrant streets of Taipei, the sizzle of golden-brown pan-fried buns called to me like an irresistible siren song. These Vegan Pan-Fried Cabbage and Noodle Buns bring that buzzing night market experience straight to your kitchen, delivering layers of crispy goodness wrapped around a delightful medley of cabbage, vermicelli noodles, and colorful veggies. Not only are they simple to make, but they also freeze beautifully, making them the ultimate convenience food for busy days. With a crispy exterior and a chewy, satisfying filling, these buns are sure to become a staple in your home-cooking repertoire. Ready to satisfy your taste buds and impress your friends? Let’s dive into this savory adventure!
Why are these buns a must-try?
Crispy Perfection: The golden-brown crust offers a satisfying crunch, making each bite a delightful experience.
Flavor-Packed Filling: With a blend of cabbage, noodles, and vibrant veggies, these buns are bursting with taste!
Vegan & Versatile: Enjoy a delicious vegan version while customizing the filling with your favorite vegetables.
Meal Prepping Made Easy: A large batch can be made in advance, perfect for busy schedules—just freeze and reheat!
Crowd Pleaser: Serve these at parties or family gatherings, and watch them disappear in minutes! Pair them with homemade chili oil for a delicious dip. Whether you’re a vegan foodie or just looking for a scrumptious snack, these Vegan Pan-Fried Cabbage and Noodle Buns are sure to win your heart!
Pan-Fried Cabbage and Noodle Buns Ingredients
Explore the flavors behind your new favorite treat!
For the Dough
- All-Purpose Flour – Provides structure for the dough; can substitute with gluten-free flour blends as needed.
- Instant Dry Yeast – Helps the dough rise, creating a light texture; store opened packets in the freezer for longevity.
- Sugar – Slightly sweetens the dough and feeds the yeast; any granulated sugar can be used as a substitute.
- Salt – Enhances flavor; essential for balance; feel free to experiment with sea salt or kosher salt.
- Roasted Sesame Seeds – Adds a nutty flavor and crunch to the dough; optional but highly recommended for texture.
- Warm Soy Milk (or other non-dairy milk) – Adds moisture and creates a tender dough; any plant-based milk can work as a substitute.
- Toasted Sesame Oil (or neutral oil) – Infuses flavor into the dough; toasted oil gives a richer taste.
For the Filling
- Neutral Oil for Cooking – Used to stir-fry vegetables; can use olive oil or any cooking oil you prefer.
- Raw Shredded Cabbage – Main filling that provides crunch and nutrition; can swap with other greens like napa cabbage or bok choy.
- Vermicelli Noodles – Adds chewiness to the filling; rice noodles can substitute if needed; make sure to soak well first.
- Carrot (finely shredded) – For sweetness and color in the filling; can replace it with a similar vegetable, like bell pepper.
- Chopped Scallions or Chives – Adds a fresh oniony flavor; shallots could also be an alternative.
- Soy Sauce – Brings umami flavor to the filling; feel free to use tamari as a gluten-free substitute.
- Salt (to taste) – Adjust according to preference for the perfect flavor balance.
- Roasted Sesame Seeds (for filling) – Adds flavor and crunch; completely optional but delightful!
- Toasted Sesame Oil (for filling) – Enhances the overall flavor profile; don’t skip this!
These Pan-Fried Cabbage and Noodle Buns are not just a meal; they’re a whole experience waiting to happen!
Step‑by‑Step Instructions for Pan-Fried Cabbage and Noodle Buns
Step 1: Prepare Dough
In a large mixing bowl, combine all-purpose flour, instant dry yeast, sugar, salt, and roasted sesame seeds. Create a well in the center and pour in warm soy milk and toasted sesame oil. Mix until a dough forms, then knead on a floured surface for about 10 minutes until smooth and elastic. Place the dough in a lightly oiled bowl, cover with a damp cloth, and let it rise in a warm spot for about 2 hours, or until doubled in size.
Step 2: Cook Filling
While the dough rises, soak the vermicelli noodles in boiling water for about 5 minutes until soft. Drain and chop them into small pieces. In a large skillet over medium heat, add neutral oil and sauté shredded cabbage, scallions, and finely shredded carrots for about 5–7 minutes until softened. Stir in the chopped noodles, soy sauce, and seasoning; cook for an additional 2 minutes, ensuring everything is heated through. Allow the filling to cool before using.
Step 3: Make Wrappers
Once the dough has risen, turn it out onto a floured surface. Divide the dough into 12-16 equal pieces and roll each piece into a ball. Flatten each ball and roll it out into a thin circle about 3-5 inches in diameter. Make sure the edges are thinner than the center to help with folding. Keep the rolled wrappers covered with a damp cloth to prevent drying out while you work.
Step 4: Assemble Buns
Now it’s time to form your pan-fried cabbage and noodle buns! Take a wrapper and spoon a generous amount of the filling into the center. Carefully fold the edges over the filling, pinch them together, and twist to seal tightly. Make sure there are no gaps to avoid leaking during cooking. Place the buns on a parchment-lined tray while you finish assembling the rest.
Step 5: Cook Buns
Heat a non-stick skillet over medium heat and add a generous drizzle of neutral oil. Arrange the buns in the skillet, crease-side down, and cook for about 3–4 minutes until golden brown. Carefully add about 1/4 cup of water to the skillet, cover immediately with a lid, and steam for 6–8 minutes. The buns should be fluffy and fully cooked, with a crispy bottom and soft top.
Step 6: Serve
Remove the buns from the skillet and serve immediately while hot. Pair them with a dipping sauce made from soy sauce mixed with a bit of sugar and chili if desired. Enjoy these delightful pan-fried cabbage and noodle buns as a savory snack, appetizer, or meal that brings the vibrant, street food flavors of Taipei right to your home!
Step 7: Store
If you have any leftovers, store them in an airtight container in the refrigerator for up to 5 days. Alternatively, you can freeze uncooked buns by placing them in a single layer on a tray, then transferring them to a freezer-safe bag once frozen. Reheat as desired—perfect for quick meals on busy days!
Make Ahead Options
These Vegan Pan-Fried Cabbage and Noodle Buns are perfect for meal prep enthusiasts! You can prepare the dough and filling up to 24 hours in advance. Simply follow the instructions to make the dough and let it rise, then store it covered in the refrigerator. For the filling, sauté your vegetables, let them cool, and refrigerate in an airtight container. When you’re ready to enjoy, just take the dough and filling out, roll out the wrappers, assemble the buns, and cook them as instructed. This way, you’ll have delicious, homemade buns with minimal effort, maintaining their amazing taste and texture throughout the week!
Expert Tips for Pan-Fried Cabbage and Noodle Buns
- Well-Drained Filling: Make sure the vegetable filling is well-drained to prevent soggy buns; excess moisture can ruin the texture.
- Gentle Handling: When making the dough wrappers, handle them gently to avoid tearing; they should be thin but strong enough to hold the filling.
- Practice Sealing: Don’t worry if your buns aren’t perfectly sealed on the first try; practice improves your technique, and they will still taste delicious!
- Steaming Technique: Add water gradually to the skillet when cooking; too much at once can lead to overcooked buns.
- Customize Filling: Feel free to venture with different veggies in the filling; this flexibility makes these pan-fried cabbage and noodle buns even more enjoyable!
Storage Tips for Pan-Fried Cabbage and Noodle Buns
- Fridge: Store cooked pan-fried cabbage and noodle buns in an airtight container for up to 5 days. Reheat in the skillet with a splash of water to restore crispness.
- Freezer: Freeze uncooked buns by placing them in a single layer on a tray; once frozen, transfer to a freezer-safe bag. They can be stored for up to 3 months.
- Reheating: When ready to enjoy frozen buns, simply steam them straight from the freezer for about 10-12 minutes or cook in a pan with a little water until heated through.
- Storage Tip: Always ensure the filling is well-drained before cooking to prevent soggy buns, ensuring every bite remains delightful.
What to Serve with Vegan Pan-Fried Cabbage and Noodle Buns
Pair your delightful vegan pan-fried buns with these scrumptious options to create a well-rounded meal experience.
- Dipping Sauce: A mix of soy sauce, sugar, and chili pairs excellently, bringing an extra layer of flavor to each bite.
- Crispy Green Salad: A fresh salad with crunchy veggies balances the savory richness of the buns, adding a refreshing contrast.
- Asian-Inspired Pickles: Tangy pickled vegetables offer a zesty side that enhances the umami flavor of the filling, making it a delightful accompaniment.
- Steamed Bok Choy: Tender steamed bok choy adds a subtle, earthy flavor to your meal and complements the veggies inside the buns perfectly.
- Coconut Rice: Creamy coconut rice delivers a mellow sweetness that pairs beautifully with the rich pan-fried buns, making every bite satisfying.
- Hot and Sour Soup: This popular soup brings a warming spiciness and a comforting broth, aligning wonderfully with the texture of the buns.
- Sweet Chili Sauce: Drizzle sweet chili sauce over the buns for an unexpected sweet and spicy kick that ignites your taste buds.
- Ginger Lemonade: A refreshing, zesty drink like ginger lemonade cleanses the palate and adds a refreshing touch to your meal.
- Mango Sticky Rice: Serve this beloved dessert for a sweet finish. The creamy coconut milk and fresh mango complement the savory buns, creating a delightful end to your meal.
- Lychee Iced Tea: A fragrant lychee iced tea refreshes and adds just the right fruity note, brightening the overall dining experience.
Pan-Fried Cabbage and Noodle Buns Variations
Customize your cooking adventure and discover exciting twists that will make these buns even better!
- Gluten-Free: Use a gluten-free flour blend in place of all-purpose flour for a delightful, allergy-friendly dough.
- Spicy Kick: Incorporate finely chopped jalapeños or sriracha into the filling for a fiery flavor explosion! Just a tablespoon or two can transform your buns!
- Herb-Infused: Add fresh herbs like cilantro or mint to the filling for a refreshing brightness—perfect for summertime snacking.
- Mixed Veggies: Swap in a combination of seasonal vegetables, such as bell peppers, zucchini, or mushrooms, to keep things vibrant and interesting. Summer squash adds a lovely texture too!
- Crispy Topping: Before serving, sprinkle the tops of the buns with additional roasted sesame seeds for an added crunch element!
- Soy-Free: Replace soy sauce with coconut aminos for a soy-free option that still packs a flavorful punch!
- Sweetness Twist: For a hint of sweetness, mix in a teaspoon of hoisin sauce with the filling for added depth. It beautifully complements the savory notes.
- Texture Boost: Incorporate chopped walnuts or cashews into the filling for extra crunch and nutritious texture—this also complements the cabbage wonderfully!
These buns can be enjoyed in so many ways! You might even find yourself wanting to try them alongside other favorites, like some delicious Crock Pot Beef or a delightful Salad Bacon Cheese.
Pan-Fried Cabbage and Noodle Buns Recipe FAQs
How should I choose ripe ingredients for the filling?
Absolutely! For the filling, select fresh, crunchy vegetables—look for cabbage with bright green leaves and no dark spots. Carrots should be firm and vibrant, and scallions should be crisp. Quality ingredients make a world of difference in flavor!
What is the best way to store leftover buns?
Great question! You can store cooked pan-fried cabbage and noodle buns in an airtight container in the fridge for up to 5 days. I often reheat them in a skillet with a splash of water to help restore the crispiness of the crust.
Can I freeze uncooked buns for later?
Yes! Freezing is an excellent option. Place your uncooked pan-fried cabbage and noodle buns in a single layer on a tray and freeze until solid. Then transfer them to a freezer-safe bag. They can last for up to 3 months. Just steam them straight from the freezer for about 10-12 minutes when you’re ready to enjoy!
What if my dough is too sticky or dry?
Very! If your dough is sticky, add a little extra flour, a tablespoon at a time, until manageable. For dry dough, try adding tiny amounts of warm water or oil until it becomes soft and pliable. Don’t worry – dough can be forgiving; just keep working with it!
Are these buns safe for those with allergies?
Yes, for the most part! These pan-fried cabbage and noodle buns can easily accommodate various dietary needs. If you have a gluten allergy, opt for a certified gluten-free flour for the dough. For soy allergies, using coconut aminos in place of soy sauce works beautifully.
How long can I keep cooked buns in the freezer?
You can keep uncooked buns in the freezer for up to 3 months. Just make sure they are well-separated before transferring them to a bag. For cooked buns, they’re best enjoyed fresh, but if stored properly, they can last up to a month in the freezer. When reheating, ensure they are heated through without compromising texture!
Delicious Pan-Fried Cabbage and Noodle Buns You’ll Love
Ingredients
Equipment
Method
- In a large mixing bowl, combine all-purpose flour, instant dry yeast, sugar, salt, and roasted sesame seeds. Create a well in the center and pour in warm soy milk and toasted sesame oil. Mix until a dough forms, then knead on a floured surface for about 10 minutes until smooth and elastic. Place the dough in a lightly oiled bowl, cover with a damp cloth, and let it rise in a warm spot for about 2 hours, or until doubled in size.
- While the dough rises, soak the vermicelli noodles in boiling water for about 5 minutes until soft. Drain and chop them into small pieces. In a large skillet over medium heat, add neutral oil and sauté shredded cabbage, scallions, and finely shredded carrots for about 5–7 minutes until softened. Stir in the chopped noodles, soy sauce, and seasoning; cook for an additional 2 minutes, ensuring everything is heated through. Allow the filling to cool before using.
- Once the dough has risen, turn it out onto a floured surface. Divide the dough into 12-16 equal pieces and roll each piece into a ball. Flatten each ball and roll it out into a thin circle about 3-5 inches in diameter. Keep the rolled wrappers covered with a damp cloth to prevent drying out.
- Take a wrapper and spoon a generous amount of the filling into the center. Carefully fold the edges over the filling, pinch them together, and twist to seal tightly.
- Heat a non-stick skillet over medium heat and add a drizzle of neutral oil. Arrange the buns in the skillet, crease-side down, and cook for about 3-4 minutes until golden brown. Carefully add water to the skillet, cover immediately with a lid, and steam for 6–8 minutes.
- Remove the buns from the skillet and serve immediately while hot. Pair them with a dipping sauce made from soy sauce mixed with sugar and chili if desired.
- If you have any leftovers, store them in an airtight container in the refrigerator for up to 5 days.
Leave a Reply