
As the aroma of garlic butter fills the kitchen, I can’t help but feel excited about making crispy Chicken Caesar Sandwiches. This delightful twist on a classic combines golden-brown, perfectly seasoned chicken with a fresh Caesar salad tucked between buttery toasted hoagies. Not only are these sandwiches simple to make in under 30 minutes, but they also guarantee satisfaction as a hearty lunch or dinner option that beats any fast food drive-thru. With a crunchy exterior and a savory burst from the Parmesan cheese, each bite is a delicious surprise. So, are you ready to elevate your sandwich game and impress your family with this foolproof recipe?

Why are these Chicken Caesar Sandwiches special?
Simplicity at its best: Perfect for busy weeknights, these sandwiches come together in under 30 minutes without sacrificing flavor.
Deliciously Crispy: The golden-brown chicken cutlets deliver a satisfying crunch that elevates your ordinary sandwich experience.
Creamy and Tangy: With a homemade dressing that blends the flavors of lemon and garlic, each bite explodes with freshness.
Customizable: Feel free to experiment with ingredients—try grilled chicken for a lighter twist or toss in extra veggies like avocado for added flavor and nutrition.
Crowd-Pleasing: These sandwiches are ideal for family dinners or gatherings, offering a gourmet touch that everyone will love. No one will miss fast food when you serve up these delicious Chicken Caesar Sandwiches!
Chicken Caesar Sandwiches Ingredients
For the Chicken
• Chicken Breasts – This primary protein source should be cut into thin cutlets for even cooking.
• Egg with Milk – Acts as a binder for the breading; you can substitute with buttermilk for extra moisture.
• Garlic Powder, Salt, Pepper – These seasonings enhance flavor; using fresh garlic can add a bolder taste.
• Breadcrumbs & Panko – They provide a crunchy coating; consider quinoa or gluten-free breadcrumbs for dietary needs.
• Vegetable Oil – Essential for frying; olive oil or avocado oil works as healthier substitutes.
For the Garlic Butter Spread
• Salted Butter – Use this for the garlic butter spread; you can swap to unsalted butter if you adjust the salt.
• Minced Garlic – A flavor enhancer that adds richness to the garlic butter.
For the Dressing
• Mayo – Adds creamy texture; Greek yogurt is a healthier alternative.
• Chopped Fresh Parsley – This adds color and freshness; feel free to omit if it’s not on hand.
• Finely Grated Parmesan – Provides an additional flavor punch; use nutritional yeast for a dairy-free option.
• Sour Cream or Greek Yogurt – A creamy base for the dressing; plain yogurt is also a suitable substitute.
• Lemon Juice, Dijon Mustard, Anchovy Paste, Worcestershire Sauce – These key ingredients create the dressing; adjust them to your taste, or omit anchovy paste for a vegetarian version.
For the Sandwiches
• Hoagies or Baguette – The sandwich base you’ll need; gluten-free bread can be used for those with gluten sensitivity.
• Romaine Lettuce – Offers crunch and freshness; substitute with any leafy greens if necessary.
These Chicken Caesar Sandwiches are sure to be a hit, combining convenience and flavor for a quick meal that delights!
Step‑by‑Step Instructions for Chicken Caesar Sandwiches
Step 1: Prep Chicken
Start by slicing the chicken breasts into thin cutlets for even cooking. In a mixing bowl, whisk together the egg and milk, adding garlic powder, salt, and pepper for flavor. In another bowl, combine the breadcrumbs. Dip each chicken cutlet first into the egg mixture, allowing excess to drip off, then coat with breadcrumbs until evenly covered.
Step 2: Fry Chicken
Heat vegetable oil in a skillet over medium-high heat until it reaches about 350°F. Carefully add the breaded chicken cutlets to the hot oil, frying for about 5 minutes on each side until they turn golden brown and crispy. Once cooked, transfer the chicken to a paper towel-lined plate to absorb excess oil and keep them warm.
Step 3: Make Garlic Butter Bread
In a small bowl, mix softened salted butter with minced garlic to create a rich garlic butter spread. Carefully slice the hoagies or baguettes open and generously spread the garlic butter on the inner sides. Place them on a baking sheet and toast in a preheated oven at 450°F or under the broiler for 3-4 minutes, until golden and aromatic.
Step 4: Prepare Dressing
Combine the mayo, chopped parsley, grated Parmesan, sour cream, lemon juice, Dijon mustard, anchovy paste, and Worcestershire sauce in a bowl or jar. Whisk until smooth and creamy, adjusting seasoning to taste. This refreshing dressing will be the perfect complement to your Chicken Caesar Sandwiches.
Step 5: Assemble Sandwiches
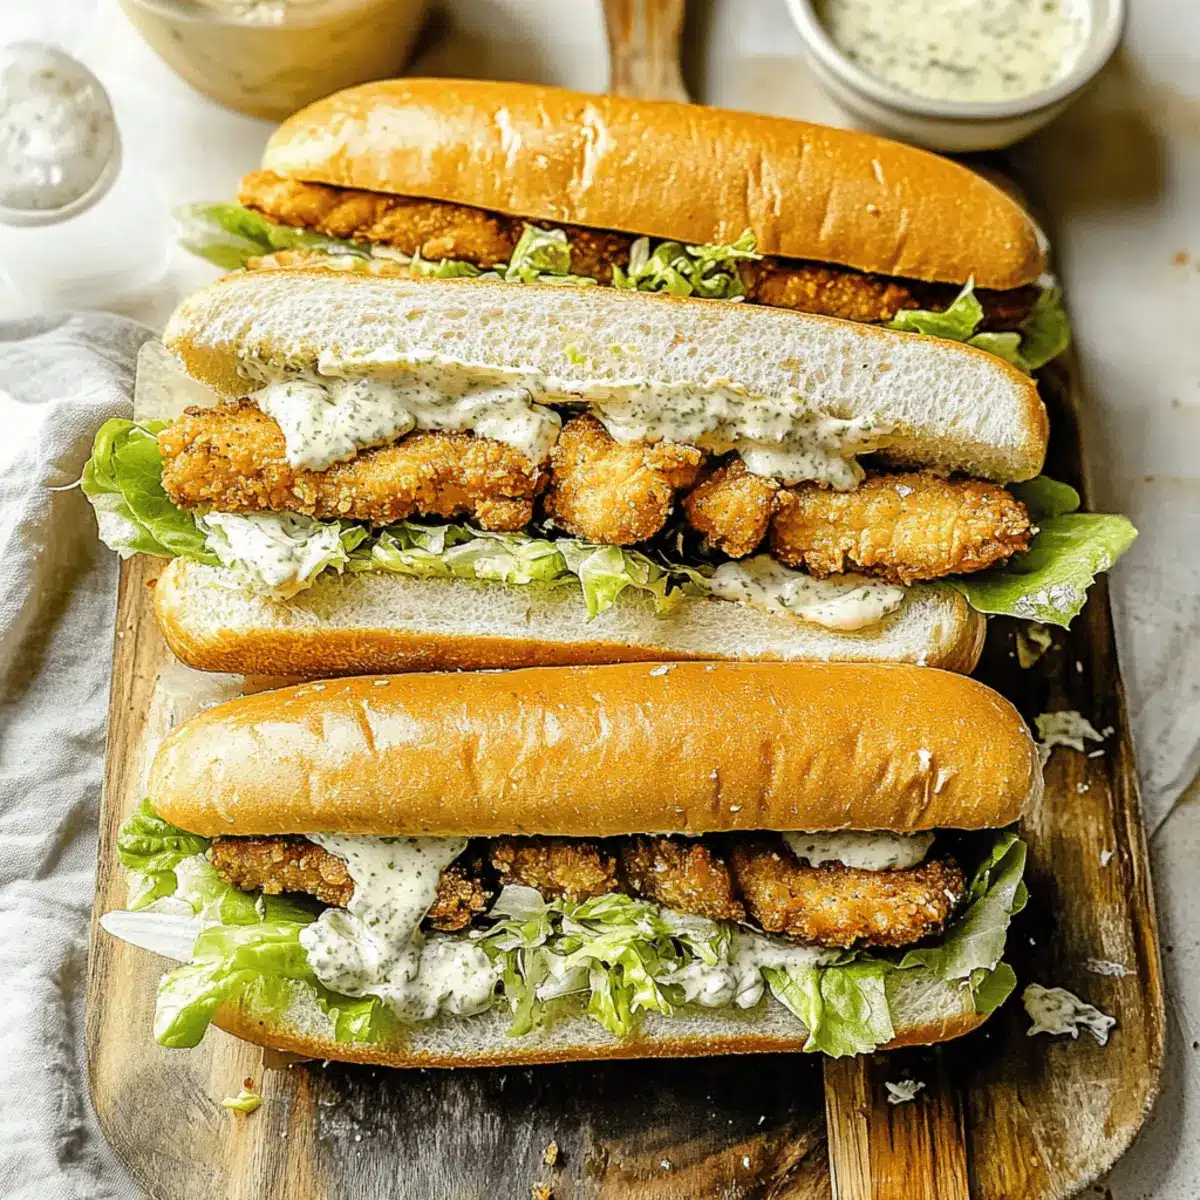
Once the garlic butter bread is toasted, begin layering the crispy chicken cutlets on the bottom half. Toss the romaine lettuce in the prepared dressing and place it generously on top of the chicken, followed by an extra sprinkle of Parmesan cheese. Close the sandwiches with the top piece of bread and serve immediately for a delicious Chicken Caesar experience.
Make Ahead Options
These Chicken Caesar Sandwiches are perfect for busy home cooks looking to streamline mealtime! You can prep the chicken cutlets up to 24 hours in advance—simply bread them and store in an airtight container in the refrigerator. Additionally, prepare the Caesar dressing and store it separately for up to 3 days to ensure freshness. When ready to serve, just fry the chicken and toast the garlic butter bread for that crucial crunch. Keep the lettuce in a separate container to maintain its crispness. With these simple steps, you’ll have a delicious meal ready with minimal effort, allowing you to savor every bite just as if it were freshly made!
What to Serve with Chicken Caesar Sandwiches
There’s nothing quite like pairing your flavorful Chicken Caesar Sandwiches with delightful sides that elevate your dining experience!
-
Crispy Potato Wedges: These oven-baked beauties offer a crunchy contrast and are perfect for dipping in your favorite sauces, making every bite exciting.
-
Garlic Parmesan Fries: Golden fries tossed in garlic and Parmesan cheese complement the rich flavors in the sandwich while adding a delightful crunch.
-
Classic Caesar Salad: Enhance the experience with a light Caesar salad on the side. The familiar flavors tie everything together beautifully.
-
Deli-Style Pickles: Tangy dill pickles provide a refreshing crunch that cuts through the richness, adding a zesty note to your meal.
-
Coleslaw: A cool and creamy coleslaw adds a refreshing crunch and balances the savory flavors of the sandwich, making it a perfect pairing for a summer picnic.
-
Iced Lemonade: Quench your thirst with a chilled glass of lemonade; its citrusy brightness harmonizes wonderfully with the savory elements of the sandwich.
-
Chocolate Chip Cookies: End your meal on a sweet note! Soft and chewy cookies are a nostalgic favorite, offering a comforting finish to your delicious sandwich feast.
Chicken Caesar Sandwiches Variations
Feel free to explore these delightful twists and tailor the flavors to your family’s preferences!
- Grilled Chicken: Swap out fried chicken for grilled to lighten up the dish while keeping that delicious flavor. Perfect for summer picnics!
- Veggie Twist: Swap the chicken for grilled vegetables like zucchini, bell peppers, or a fresh avocado to create a delicious vegetarian version.
- Spicy Kick: Add sliced jalapeños or a dash of cayenne pepper in the dressing for a zesty heat that will tantalize your taste buds.
- Creamy Avocado: Introduce slices of creamy avocado on your sandwich for a rich texture that pairs beautifully with the Caesar dressing.
- Extra Crunch: Sprinkle some crispy bacon bits on top of the chicken before adding the lettuce to add a savory crunch and elevate the taste! Try it with some homemade Sticky Garlic Chicken for an even bigger flavor explosion.
- Herb-Infused Dressing: Mix fresh herbs like dill or basil into your dressing for a fragrant twist that enhances the overall flavor profile.
- Gluten-Free Bread: Substitute the hoagies or baguette with gluten-free bread for a delicious option for those with dietary restrictions.
- Cheesy Delight: Layer on some melted mozzarella or provolone cheese before closing your sandwich for a gooey, comforting addition.
The only limit is your imagination! Enjoy these Chicken Caesar Sandwiches any way you like for a delightful meal every time.
Expert Tips for Chicken Caesar Sandwiches
-
Crispy Chicken Secret: Fry immediately after breading to achieve the crispiest texture. Letting it sit can lead to soggy results.
-
Oil Temperature Check: Maintain your oil at 350°F for perfect frying; too hot will burn the coating, while too low will make it greasy.
-
Gentle Placement: When adding chicken to oil, do so gently to minimize splattering—this helps maintain a safe cooking environment.
-
Warm is Best: Always serve sandwiches warm; the mixture of crispy chicken and garlic butter bread is best enjoyed hot for maximum flavor.
-
Meal Prep Smart: To keep meals fresh, store chicken, greens, and dressing separately. Assemble just before serving to preserve that signature crunch!
-
Customizable Flavors: Experiment with your own favorite ingredients; enjoy fresh vegetables or spicy toppings to create your ultimate Chicken Caesar Sandwiches!
Storage Tips for Chicken Caesar Sandwiches
Fridge: Store leftover chicken and salad separately in airtight containers. The chicken is best consumed within 3 days for optimal freshness.
Freezer: If you want to enjoy your Chicken Caesar Sandwiches later, freeze the bread and chicken separately. The chicken can retain its quality for up to 2 months when wrapped properly.
Reheating: For crispy results, reheat the chicken in an oven or air fryer rather than the microwave. This method ensures it stays crunchy and delicious, just like when it was first made!
Assemble Just Before Serving: To maintain freshness and crunchiness, avoid assembling the sandwiches in advance. Store components separately and bring them together when you’re ready to enjoy!

Chicken Caesar Sandwiches Recipe FAQs
How do I select ripe chicken for the recipe?
Absolutely! When choosing chicken breasts, look for pieces that are pink and have a consistent color. Avoid any that have dark spots or a slimy texture. Fresh chicken should also have no unpleasant odor. It’s always best to purchase from a reputable source to ensure quality for your Chicken Caesar Sandwiches.
How should I store leftover Chicken Caesar Sandwiches?
For optimal freshness, store your leftover chicken, greens, and dressing in separate airtight containers in the fridge. This way, you can enjoy your meal for up to 3 days without losing that delightful crunch. The chicken will stay juicy, while the salad remains fresh and crisp when stored properly!
Can I freeze the components of the Chicken Caesar Sandwiches?
Yes, you can! Freeze the chicken cutlets and bread separately. Properly wrapped, the chicken can last up to 3 months in the freezer. Just make sure to cool completely before wrapping! When you’re ready to eat, thaw the chicken overnight in the refrigerator, then reheat it in the oven for that same crispiness you love.
What should I do if my bread gets soggy?
Ah, the dreaded soggy sandwich—nobody wants that! To prevent this, always store ingredients separately until you’re ready to eat. Additionally, toast your bread right before assembling the sandwiches and avoid adding salad until you’re set to enjoy. If your bread has already turned soggy, you can quickly toast it again for a few minutes to reintroduce some crispiness.
Can I make this recipe gluten-free?
Very! Simply substitute the hoagies or baguette with gluten-free bread. You can also use gluten-free breadcrumbs for the chicken coating. This way, everyone can enjoy these scrumptious Chicken Caesar Sandwiches—no one will miss out on the flavor!
Is there a vegetarian option for this recipe?
Absolutely! For a vegetarian twist, you can replace the chicken with grilled or breaded eggplant slices or even portobello mushrooms. Just ensure they’re seasoned and cooked thoroughly. Layer them with the same Caesar dressing and fresh greens for a delightful veggie alternative that retains all the flavors of this classic dish.

Crispy Chicken Caesar Sandwiches in Just 30 Minutes!
Ingredients
Equipment
Method
- Begin by slicing the chicken breasts into thin cutlets for even cooking. In a bowl, whisk together the egg and milk, then add garlic powder, salt, and pepper for seasoning.
- In another bowl, place the breadcrumbs. Dip each chicken cutlet into the egg mixture, ensuring it's well-coated, then dredge it in the breadcrumbs.
- In a large skillet, heat the vegetable oil over medium-high heat until it reaches 350°F. Carefully add the breaded chicken cutlets, frying them for about 5 minutes on each side until they turn golden brown.
- While the chicken is frying, prepare the garlic butter by mixing softened butter with minced garlic. Split open the hoagies or baguette, and spread the garlic butter inside.
- Toast them in a preheated oven at 450°F or under the broiler for 3-4 minutes until golden and aromatic.
- In a bowl, combine mayonnaise, sour cream (or Greek yogurt), lemon juice, Dijon mustard, anchovy paste, Worcestershire sauce, and finely grated Parmesan. Whisk until smooth.
- Layer each toasted bread piece with a crispy chicken cutlet, toss the chopped romaine with the Caesar dressing and add it atop the chicken. Sprinkle extra Parmesan before closing.
- Cut each sandwich in half for easy handling and serve them warm.
Leave a Reply