
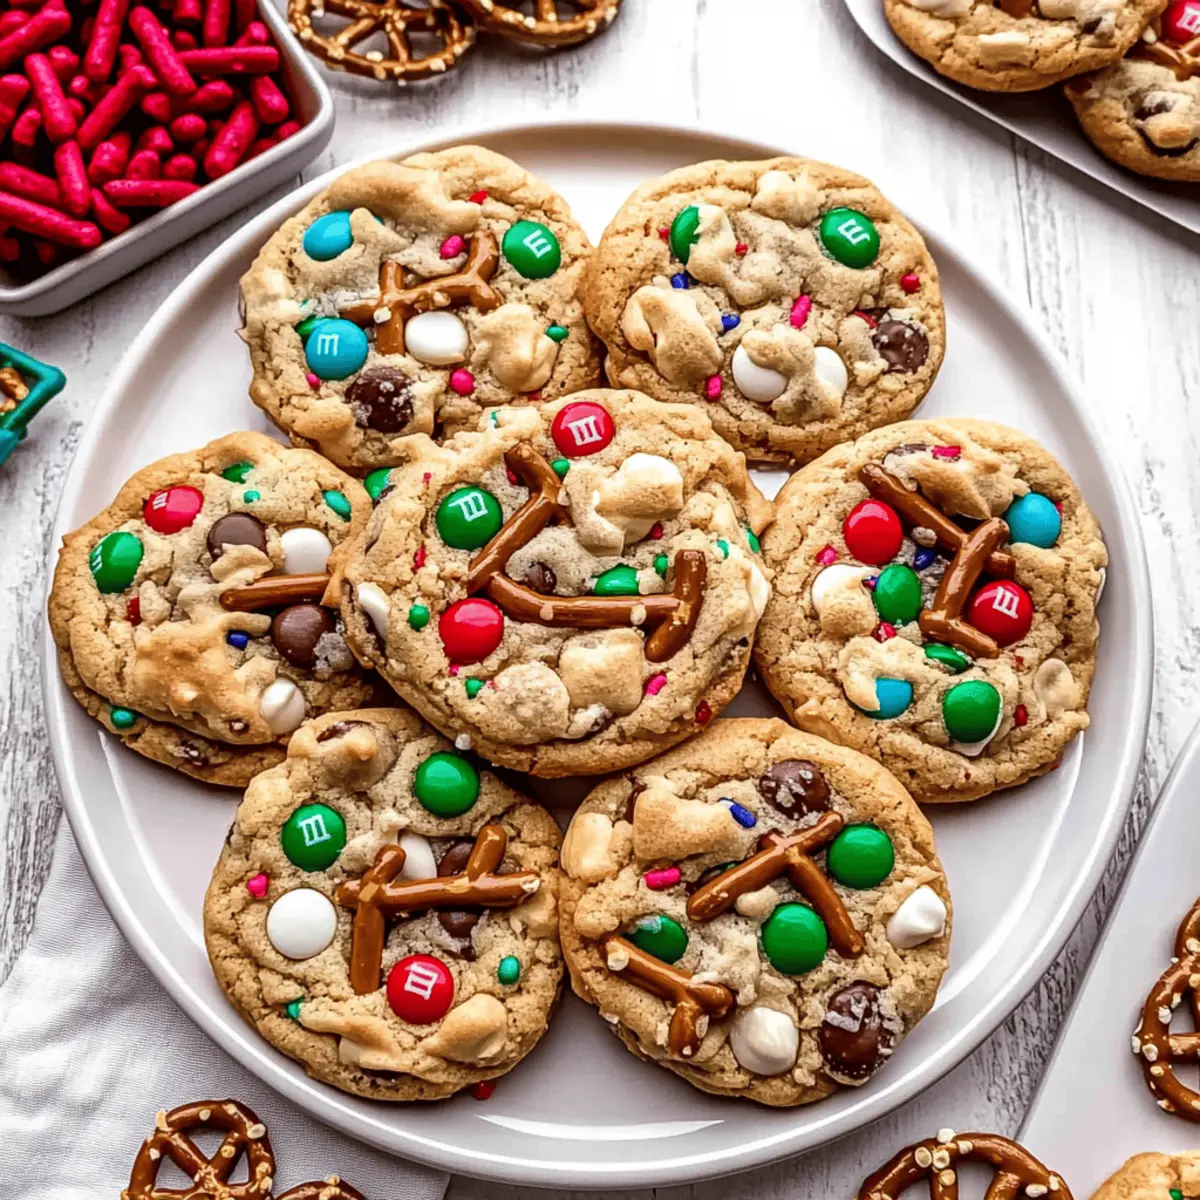
As the aroma of warm cookies fills my kitchen, I can already picture a bustling holiday gathering, filled with laughter and cheer. These Christmas Kitchen Sink Cookies are the ultimate sweet and salty delight, perfectly blending pretzel pieces, colorful M&M’s, and creamy white chocolate chips into each chewy bite. What’s more, this easy preparation means you can whip them up in under 30 minutes, making them a go-to treat when time is short during the busy festive season. No chill time is needed, which means more time for creating holiday memories with family and friends. So, are you ready to dive into the magic of these festive cookies that will surely be the highlight of any cookie platter?

Why are Christmas Kitchen Sink Cookies special?
Versatility: You can easily swap ingredients to customize these cookies based on your preferences or what you have on hand.
Family Fun: Involve the kids in an exciting baking adventure, making memories while creating these delightful treats.
Quick & Easy: With no chill time and baking done in under 30 minutes, this recipe is perfect for busy holiday schedules.
Crowd-Pleasing Delight: The combination of sweet M&M’s, salty pretzels, and creamy chocolate makes these cookies irresistibly fun for everyone.
Festive Flair: The vibrant colors and playful mix of textures embody the festive spirit, making them a stunning addition to any holiday gathering.
For more delightful treats, check out my Chewy Pumpkin Cookies or elevate your cookie game with these Pumpkin Smores Cookies.
Christmas Kitchen Sink Cookies Ingredients
Ready to bake some magic in your kitchen? Let’s gather everything you need for these delightful Christmas Kitchen Sink Cookies!
For the Cookie Dough
- Salted Butter – Provides richness and moisture; swap for unsalted butter for less salt.
- Light Brown Sugar – Adds depth of flavor and moisture; can substitute with dark brown sugar for a richer taste.
- Granulated Sugar – Sweetens and helps achieve a crispy texture; swap with coconut sugar for a lower GI option.
- Egg Yolks – Adds structure and richness; use aquafaba (3 tablespoons per yolk) for a vegan alternative.
- Vanilla Bean Paste/Extract – Enhances flavor; replace with almond extract for a unique twist.
- All-Purpose Flour – Forms the base of the cookie dough; use gluten-free flour for a gluten-free version.
- Baking Powder & Baking Soda – Provides leavening for a softer texture; don’t substitute as they serve different purposes.
- Salt – Enhances all flavors; consider reducing if using salted butter.
For the Fun Add-Ins
- Red and Green M&M’s – Adds color, sweetness, and crunch; substitute with any chocolate candies you prefer.
- White Chocolate Chips – Supplies sweetness and creaminess; swap them for dark chocolate for a bolder flavor.
- Pretzel Pieces – Introduces saltiness and crunch; substitute with crushed nuts or sunflower seeds for a nut-free option.
- Potato Chip Pieces – Provides unexpected crunch; can swap with corn chips for a different flavor profile.
- Red and Green Jimmies – Decorative touch; feel free to use any color sprinkles to suit the occasion.
Now that you’re all set with the ingredients, let’s get those warm, sweet smells flowing through your home! Happy baking!
Step‑by‑Step Instructions for Christmas Kitchen Sink Cookies
Step 1: Preheat Oven & Prepare Sheets
Start by preheating your oven to 350°F (175°C). While it’s warming up, line your baking sheets with parchment paper to prevent sticking and make cleanup easier. This step sets the stage for perfectly baked Christmas Kitchen Sink Cookies, ensuring an even bake and beautiful presentation.
Step 2: Cream Butter & Sugars
In a large mixing bowl, use an electric mixer to cream together 1 cup of softened salted butter, 1 cup of light brown sugar, and ½ cup of granulated sugar. Beat the mixture on medium speed for about 2 minutes until it’s light and fluffy. This creamy base will add richness and sweetness to your Christmas Kitchen Sink Cookies.
Step 3: Add Egg Yolks & Vanilla
Next, add 2 egg yolks and 2 teaspoons of vanilla bean paste or extract to your creamed mixture. Continue to mix on medium speed for another 2 minutes until the batter becomes pale and fluffier. This step enhances the flavor and provides richness, creating a deliciously moist cookie dough.
Step 4: Mix Dry Ingredients
In a separate bowl, whisk together 2 cups of all-purpose flour, ½ teaspoon of baking powder, ½ teaspoon of baking soda, and ½ teaspoon of salt. Gradually incorporate this dry mixture into the wet ingredients, mixing just until combined. Be careful not to over-mix—this will ensure your Christmas Kitchen Sink Cookies turn out soft and chewy.
Step 5: Incorporate Mix-ins
Gently fold in 1 cup of red and green M&M’s, ½ cup of white chocolate chips, 1 cup of pretzel pieces, 1 cup of crushed potato chips, and ¼ cup of red and green jimmies. Use a spatula to ensure that all the mix-ins are evenly distributed throughout the dough, creating that delightful sweet and salty profile that makes Christmas Kitchen Sink Cookies so fun!
Step 6: Scoop Dough
Using a cookie scoop or a tablespoon, portion out about 20 balls of dough and place them 2 inches apart on your prepared baking sheets. For an extra festive touch, you can sprinkle some additional M&M’s and jimmies on top of the dough balls. This extra decor will make your cookies even more visually appealing!
Step 7: Bake
Place the baking sheets in the preheated oven and bake for 10-12 minutes. For chewier cookies, aim for 10 minutes; for crisper edges, go for 12 minutes. The cookies should look lightly golden around the edges and soft in the center. If desired, use a cookie cutter to refine the shapes right after baking.
Step 8: Cool
Once baked, allow the cookies to cool on the sheet for about 5 minutes. After they’ve set, gently transfer them to a wire rack to cool completely. This cooling process ensures your Christmas Kitchen Sink Cookies maintain their chewy texture while allowing you to enjoy their delicious aroma filling your home.

How to Store and Freeze Christmas Kitchen Sink Cookies
Room Temperature: Store cookies in an airtight container at room temperature for up to 3 days to keep them fresh and chewy.
Fridge: For longer freshness, store in the fridge, where they will last up to 5 days; allow to come to room temperature before serving for the best texture.
Freezer: You can freeze the cookies for up to 3 months. Place them in a single layer in a freezer-safe container with parchment paper in between to prevent sticking.
Reheating: To revive the chewiness, microwave the cookies for 10-15 seconds or warm them in the oven at 300°F (150°C) for about 5 minutes.
Christmas Kitchen Sink Cookies Variations
Get ready to make your Christmas Kitchen Sink Cookies unique and personal with these fun swaps and additions!
-
Dairy-Free: Substitute butter with coconut oil or vegan butter for a dairy-free version. Enjoy the same rich texture without the dairy!
-
Nutty Delight: Add in chopped walnuts or pecans for a wonderful crunch and nutty flavor. This twist complements the sweet and salty balance beautifully.
-
Spicy Kick: Introduce a pinch of cayenne pepper or crushed red pepper flakes for a surprising heat. This contrast enhances the sweetness just right!
-
Coconut Twist: Incorporate shredded coconut for a tropical flair. It brings a delightful chewiness that pairs wonderfully with the other ingredients.
-
Choco-Lover’s Dream: Swap white chocolate chips for semi-sweet or dark chocolate for a more intense chocolatey flavor. It’s a luxurious take everyone will love!
-
Holiday Themes: Use festive-shaped sprinkles instead of traditional jimmies to personalize these cookies for different occasions. How about heart sprinkles for Valentine’s Day?
For even more delightful variations, don’t forget to check out my Chewy Pumpkin Cookies and elevate your holiday treats with the decadent Pumpkin Smores Cookies. Customizing these recipes is where the magic begins!
Make Ahead Options
These Christmas Kitchen Sink Cookies are a fantastic choice for meal prep, allowing you to enjoy fresh-baked cookies with minimal hassle! You can prepare the dough up to 3 days in advance by scooping it into balls and storing them in an airtight container in the refrigerator. Alternatively, you can freeze the dough for up to 2 weeks; simply portion it out and place the balls on a baking sheet until frozen, then transfer them to a zip-top bag. When you’re ready to bake, just pop them directly onto a baking sheet and add a couple of extra minutes to the baking time. With these make-ahead tips, you will have delicious, chewy Christmas Kitchen Sink Cookies ready to impress your family and friends, even on the busiest days!
Expert Tips for Christmas Kitchen Sink Cookies
-
Accurate Measurements: Always spoon the flour into your measuring cup rather than scooping directly. This prevents dense cookies, ensuring your Christmas Kitchen Sink Cookies are perfectly chewy.
-
Mix-Ins Balance: Aim for a balanced mix of sweet and salty ingredients. Too many salty add-ins may overpower the cookie’s sweetness, so adjust accordingly to suit your palate.
-
Avoid Over-Baking: Keep a close eye on your cookies as they bake. Remove them while they still look slightly underbaked for a soft, chewy texture.
-
Using Cold Dough: If you’re preparing dough to bake later, chill it for at least 30 minutes before scooping to help maintain shape during baking.
-
Decorating Tips: Add a few extra sprinkles or candies on top just before baking for an eye-catching finish. Your Christmas Kitchen Sink Cookies will look as festive as they taste!
What to Serve With Christmas Kitchen Sink Cookies?
Indulging in these delightful cookies is a joyful experience, but why stop there? Let’s create a festive spread!
-
Creamy Hot Cocoa: A warm cup of hot cocoa complements the sweet and salty flavors, turning snack time into a cozy moment.
-
Vanilla Ice Cream: Serve these cookies warm alongside a scoop of creamy vanilla ice cream for a delightful contrast in temperature and texture.
-
Nuts & Dried Fruits: A mixed platter of roasted nuts and dried fruits adds a healthy crunch, balancing the sweetness of the cookies perfectly.
-
Cheese Board: Pair with a mild cheese, like Brie or Gouda, to enhance the sweet-salty experience. The creaminess of the cheese ties everything together beautifully.
-
Festive Fruit Salad: A fresh fruit salad bursting with seasonal fruits provides a refreshing contrast, brightening up the cookie plate with vibrant colors.
-
Sparkling Cider: This non-alcoholic beverage offers a bubbly, festive touch, making it an ideal drink to enjoy with your cookie creations.
With these pairings, your holiday gathering will be filled with flavors that dance on the palate, making every bite and sip memorable!
Christmas Kitchen Sink Cookies Recipe FAQs
How do I choose the right ripeness of ingredients?
When it comes to the butter, make sure it’s softened for easy creaming. If you’re using eggs, opt for fresh ones, as they provide the best binding and richness. For any add-ins like M&M’s or pretzels, look for vibrant colors and no signs of staleness. Fresh ingredients ensure your Christmas Kitchen Sink Cookies will taste their best!
What’s the best way to store my cookies?
Store your cookies in an airtight container at room temperature for up to 3 days to keep them fresh and chewy. If you’d like to prolong their shelf life, place them in the fridge for up to 5 days. Just remember to let them come to room temperature before indulging for optimal texture!
Can I freeze Christmas Kitchen Sink Cookies?
Absolutely! You can freeze these cookies for up to 3 months. To do this, let the cookies cool completely, then arrange them in a single layer in a freezer-safe container with parchment paper between layers to prevent sticking. When you’re ready for a treat, just thaw them in the fridge overnight or pop them in the microwave for about 10-15 seconds for a quick revival.
What should I do if my cookies turn out too flat?
If your Christmas Kitchen Sink Cookies are flat, it could be due to too much butter or not enough flour. Make sure you’re spooning the flour into your measuring cup rather than scooping it, which can compact it. If you suspect your baking powder or soda is old, that can also affect rising, so check their expiration date and consider replacing them if necessary.
Are there any dietary considerations for my pets with these cookies?
Yes, it’s important to keep these cookies away from pets. The chocolate from M&M’s and the salt from pretzels can be harmful to dogs and cats. If you’re baking for a pet-friendly occasion, consider making a special cookie recipe tailored for them instead, using safe ingredients like pumpkin or peanut butter!
What are some alternatives if I’m missing key ingredients?
If you find yourself out of eggs, substitute each yolk with 3 tablespoons of aquafaba (chickpea water). Also, if you’re aiming for lower sugar options, consider using coconut sugar in place of granulated sugar. And remember, you can mix and match the sweet and salty elements—like swapping pretzel pieces with crushed nuts or using any chocolate candies that you have on hand. The creative possibilities are endless with these delightful Christmas Kitchen Sink Cookies!

Irresistible Christmas Kitchen Sink Cookies You’ll Love
Ingredients
Equipment
Method
- Preheat oven to 350°F (175°C) and line baking sheets with parchment paper.
- Cream together butter, light brown sugar, and granulated sugar in a bowl for 2 minutes until fluffy.
- Add egg yolks and vanilla; mix for another 2 minutes until pale and fluffy.
- Whisk together flour, baking powder, baking soda, and salt; mix into wet ingredients until combined.
- Fold in M&M's, white chocolate chips, pretzel pieces, potato chips, and jimmies until evenly distributed.
- Scoop out about 20 balls of dough and place 2 inches apart on prepared baking sheets.
- Bake for 10-12 minutes; aim for 10 for chewy and 12 for crisper edges.
- Cool on sheets for 5 minutes before transferring to a wire rack.
Leave a Reply