
As the clock ticks closer to Halloween, a delightful excitement fills the air—pumpkins carve, costumes are donned, and the kitchen beckons for something festive. Enter my Halloween Mini Pizzas, a fun and fast treat that transforms ordinary pizza night into a spooky celebration! These playful creations allow for endless customization, making them perfect for family gatherings or a cozy night in. With just a few simple ingredients and a dash of creativity, you can whip up a batch that’s not only delicious but also a hit with both kids and adults alike. Plus, they cater to different dietary needs, with gluten-free options available. What spooky toppings will you choose for your miniature masterpieces?
Why are Halloween Mini Pizzas a Must-Try?
Endless Creativity: Halloween Mini Pizzas let your imagination run wild with toppings! Gooey Cheese provides that comforting melty texture everyone loves, while Quick Prep means you can whip these up just in time for trick-or-treaters. Family Fun awaits as kids can design their own spooky characters, making it an interactive experience. With customizable options, you can accommodate any dietary preferences, including gluten-free choices. These playful bites are not just a meal; they’re the perfect way to dive into the festive spirit of Halloween!
Halloween Mini Pizzas Ingredients
For the Crusts
- Mini Pizza Crusts – Use gluten-free pita rounds or cauliflower bases for a delicious alternative.
For the Sauce
- Pizza Sauce – Store-bought or homemade, this will provide a tasty base for your spooky creations.
For the Cheese
- Mozzarella Cheese – Melts beautifully for that gooey texture everyone loves, but try vegan cheese for a dairy-free option.
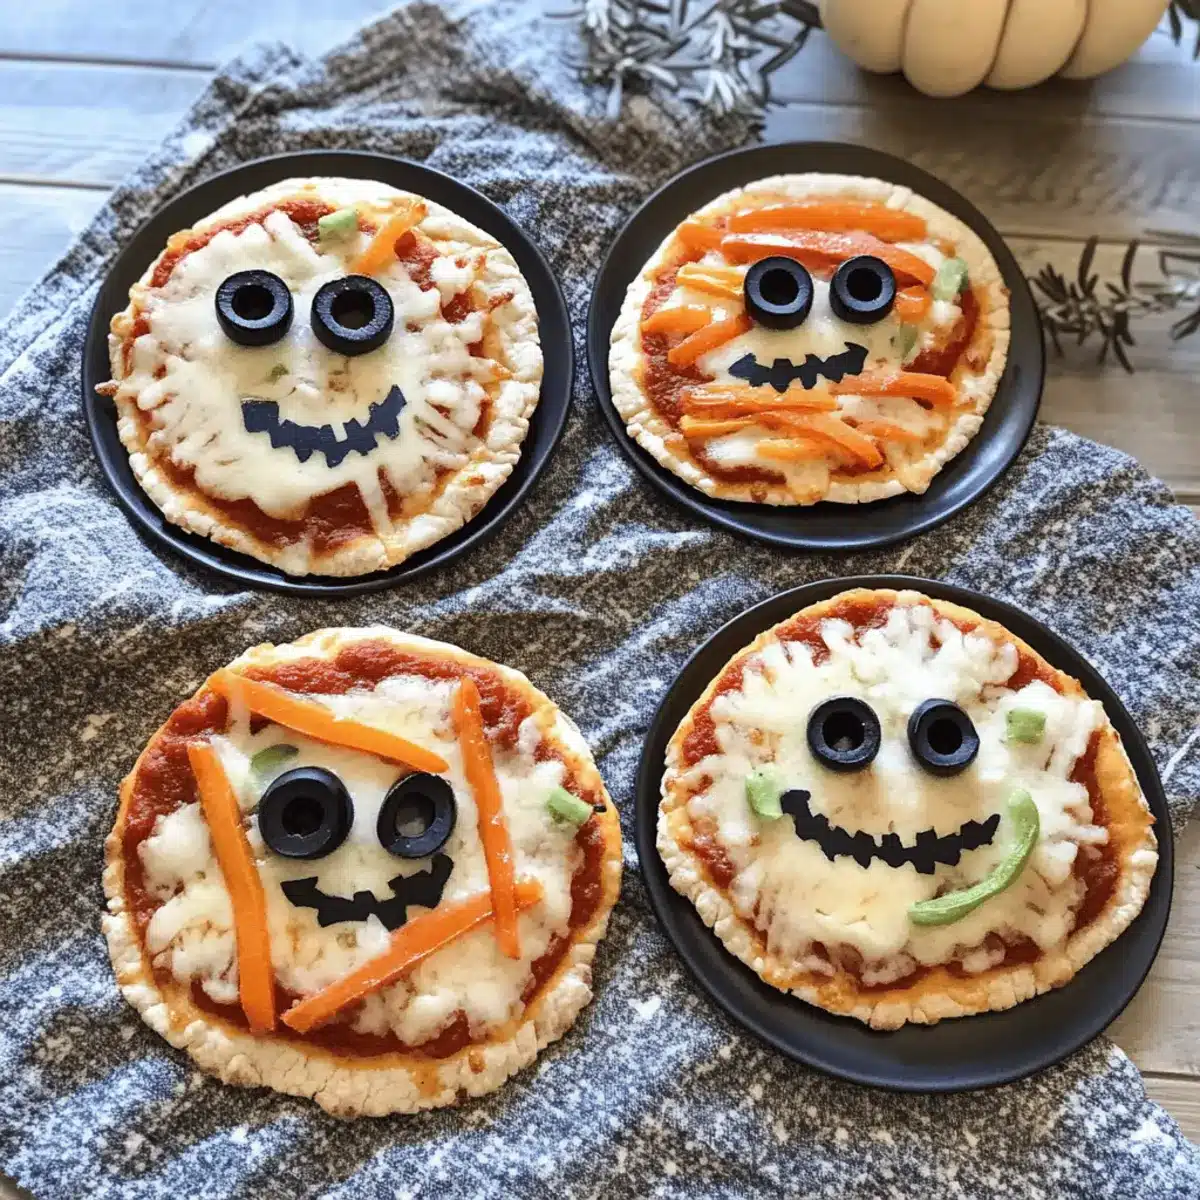
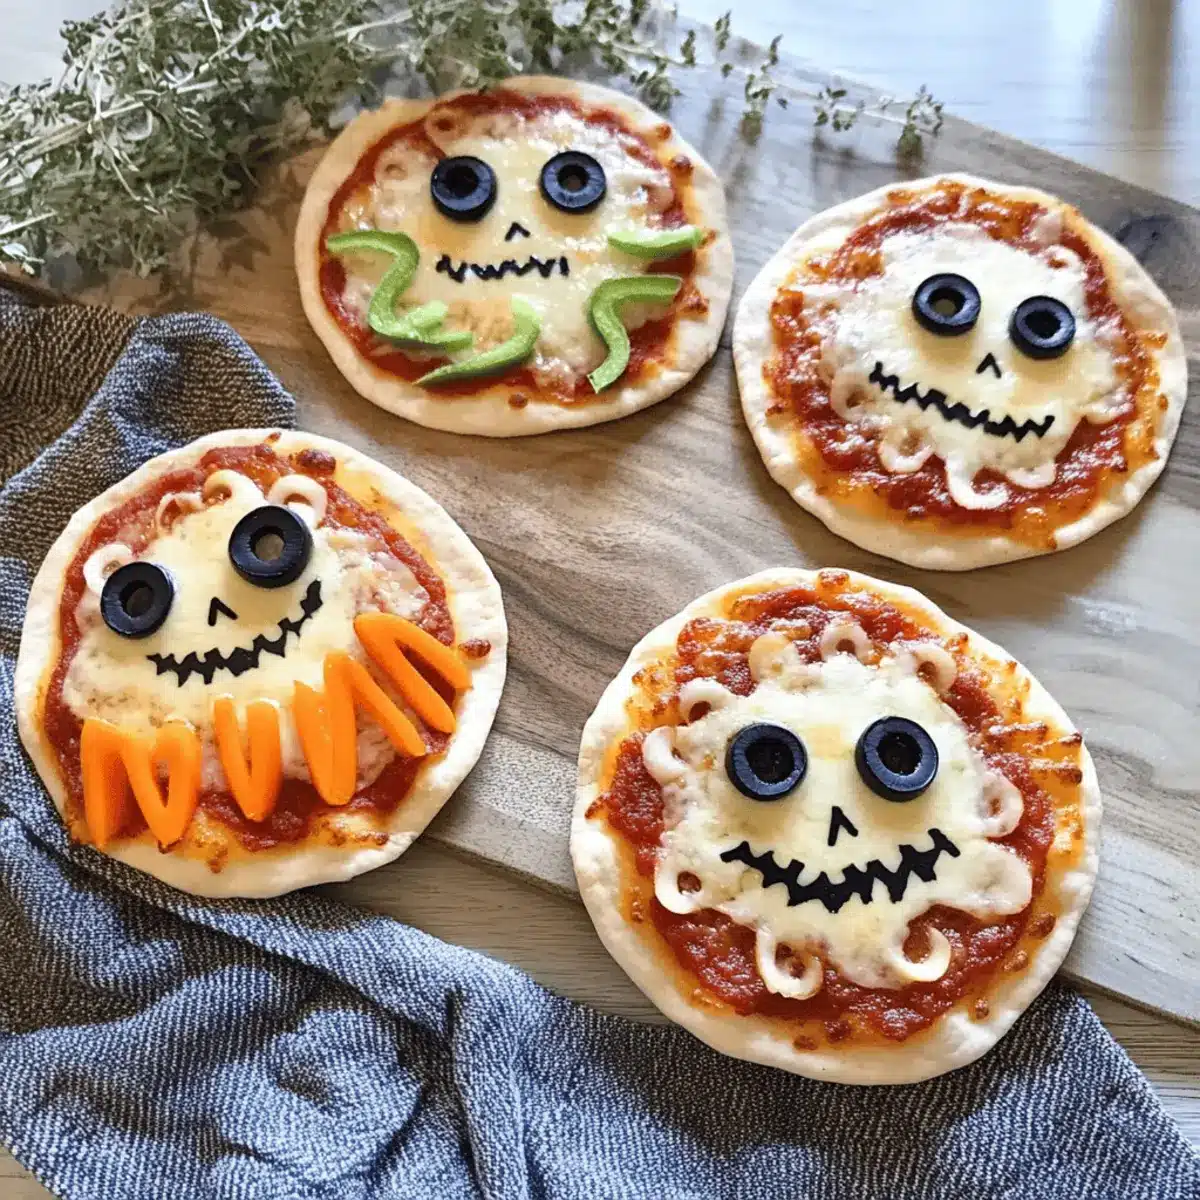
- Part-Skim String Cheese – Pull apart to create mummy wraps that add a fun twist to your pizzas.
For the Toppings
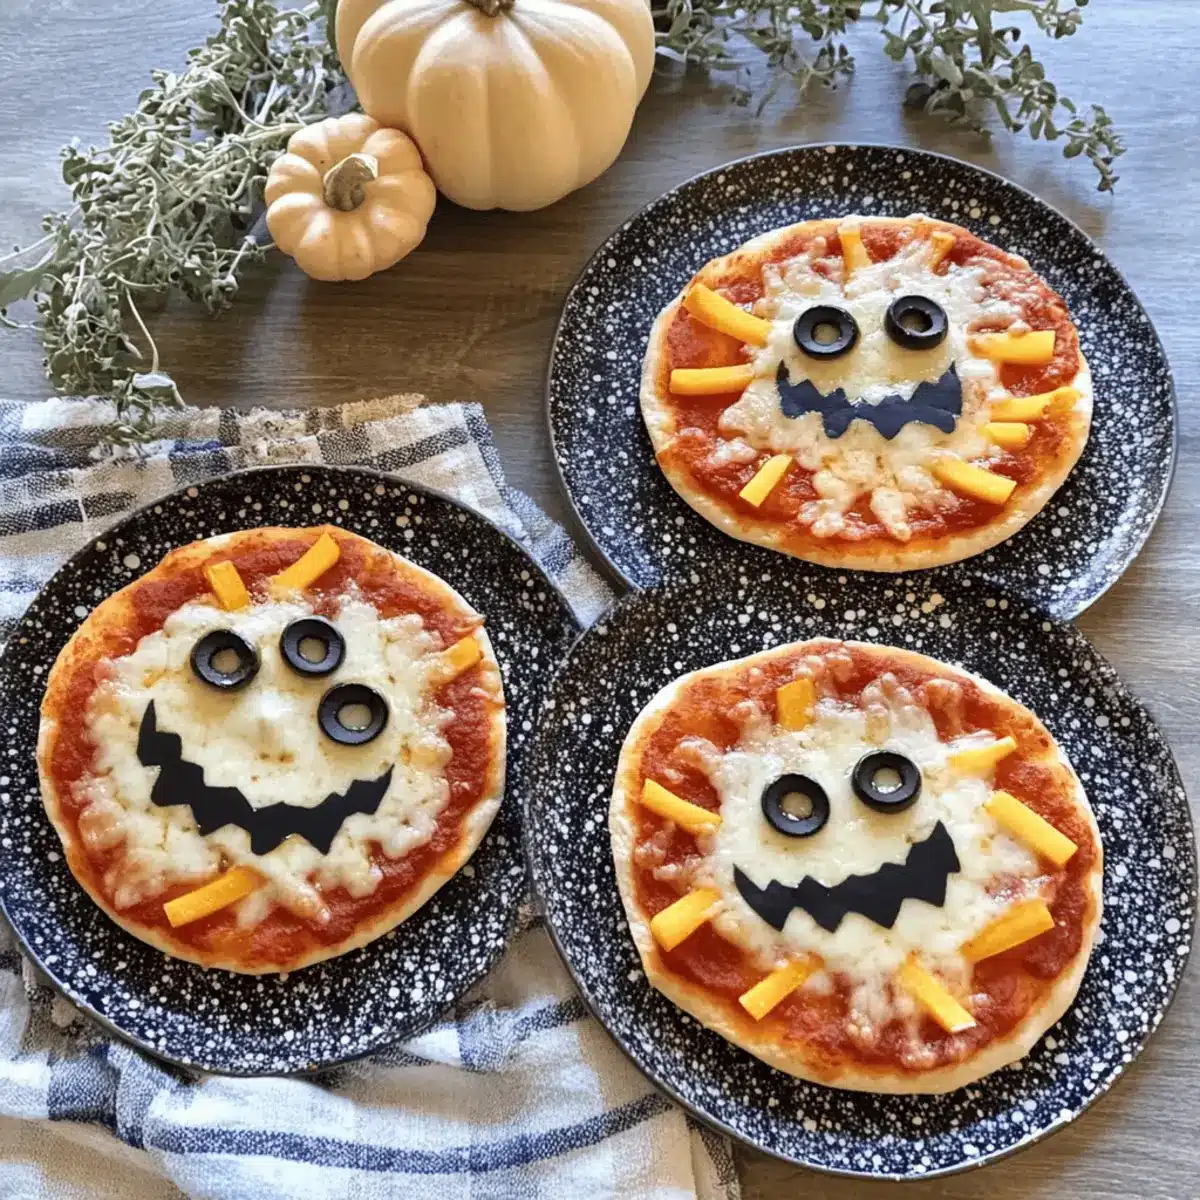
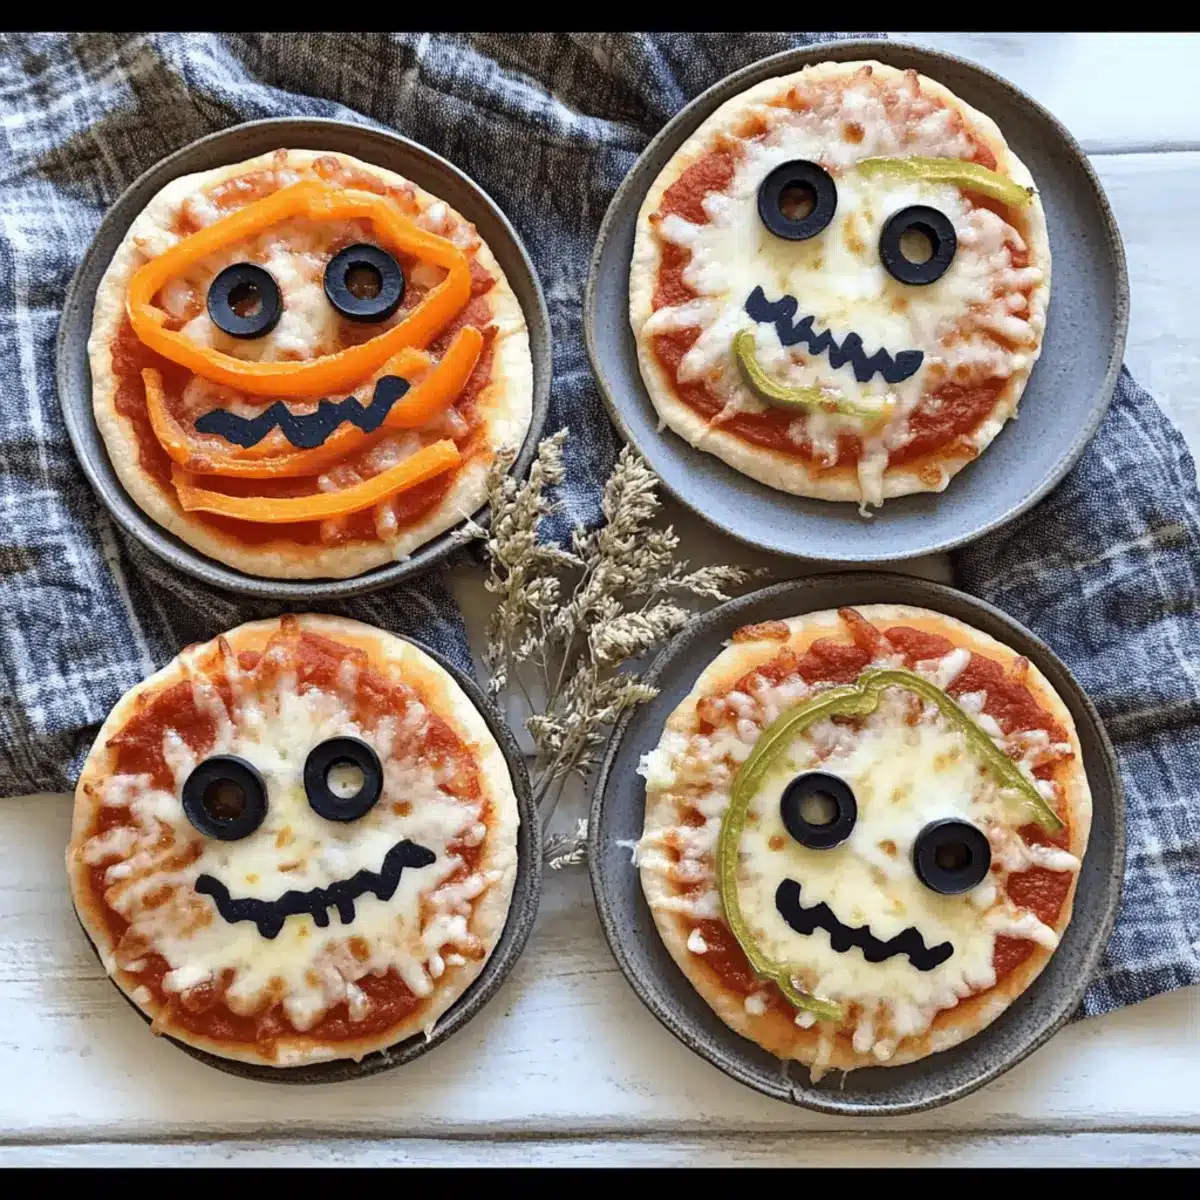
- Black Olives – Sliced for ease and great for making spider bodies or eyes.
- Mini Pepperoni – Optional for extra flavor; feel free to replace with turkey pepperoni if desired.
- Orange & Green Bell Peppers – Thin strips are perfect for crafting jack-o’-lantern faces that bring your pizzas to life.
- Fresh Basil – A touch of freshness and color to garnish your Halloween mini pizzas.
For Preparation
- Olive Oil Spray – Lightly mist your baking sheet to ensure crusts don’t stick while baking.
Create your Halloween mini pizzas with these ingredients and let your creativity shine!
Step‑by‑Step Instructions for Halloween Mini Pizzas
Step 1: Preheat and Prepare
Begin by preheating your oven to 425°F (220°C). While the oven warms up, grab a baking sheet and lightly mist it with olive oil spray to prevent the mini pizzas from sticking. This small step ensures a perfectly crispy crust, setting the stage for your delightful Halloween Mini Pizzas.
Step 2: Spread the Sauce
Next, take your mini pizza crusts and spread 1-2 tablespoons of pizza sauce on each, leaving a small border around the edges. Create a nice, even layer that will keep the crust flavorful and moist. This is the perfect canvas for your spooky toppings, so take your time to apply the sauce evenly.
Step 3: Add Cheese and Create Mummies
Sprinkle mozzarella cheese generously over half of the mini pizzas for that gooey, melty goodness everyone loves. For the other half, pull apart the part-skim string cheese and creatively lay it over the pizzas to form playful mummy faces, leaving gaps for “eyes” to be added later.
Step 4: Decorate with Toppings
Now it’s time to bring your Halloween Mini Pizzas to life! Use sliced black olives to create spider bodies or eyes, and arrange thin strips of orange and green bell peppers to form smiling jack-o’-lantern faces. Feel free to add mini pepperoni for extra flavor or appeal to your personal taste!
Step 5: Bake to Perfection
Place the decorated baking sheet into the preheated oven and bake for 10-12 minutes. Keep an eye on them, and rotate the pan halfway through for even cooking. You’ll know your Halloween Mini Pizzas are ready when the crusts are golden and the cheese is bubbling with joy!
Step 6: Cool and Garnish
Once baked, carefully remove the mini pizzas from the oven and let them cool for about 2 minutes. This brief cooling period helps the cheese set slightly, making them easier to eat. Finish by garnishing with fresh basil for a pop of color and a dash of flavor before serving these delightful treats to your family!
What to Serve with Halloween Mini Pizzas?
As you gather for a delightful Halloween feast, let these mini pizzas inspire your meal with tasty accompaniments.
- Crispy Green Salad: Light and refreshing, topped with a tangy vinaigrette, it balances the rich, cheesy goodness of your mini pizzas.
- Roasted Veggies: Seasoned seasonal vegetables bring a warm, savory side that complements the playful flavors of the pizzas and adds a splash of color.
- Garlic Breadsticks: Soft and buttery, these baked delights make for a fantastic dipper into any leftover pizza sauce.
- Pumpkin Soup: Rich and creamy, this seasonal favorite warms the soul and pairs perfectly with the fun, festive spirit of Halloween.
- Apple Slices with Caramel Dip: A sweet and crunchy contrast that cleanses the palate after enjoying the cheesy, hearty bites.
- Spooky Fruit Platter: Arrange cut fruits like oranges, grapes, and berries in fun Halloween shapes to give your gathering a fruity, fresh touch.
- Hot Chocolate or Spiced Cider: These cozy beverages will warm the heart, making your Halloween celebration even more enchanting while complementing the savory snacks.
- Halloween Cookies: Sweet treats shaped like ghosts, bats, or pumpkins will delight guests and add a playful finish to your festive feast.
Halloween Mini Pizzas: Delightful Customizations
Feel free to unleash your creativity and personalize these mini pizzas with exciting toppings and variations!
- Gluten-Free: Substitute traditional mini pizza crusts with cauliflower crusts or gluten-free pita rounds to make them accessible for everyone.
- Vegan Twist: Swap out mozzarella for a vegan cheese option, allowing everyone to enjoy a plant-based delight.
- Flavor Adventure: Try using pesto or barbecue sauce instead of pizza sauce to give your mini pizzas a unique flavor.
- Hearty Veggies: Add roasted vegetables like zucchini or mushrooms for a satisfying boost of nutrients and flavor.
- Spicy Kick: Sprinkle some red pepper flakes or jalapeños on top for those who enjoy a little heat in their Halloween treats.
- Sweet Treats: For a fun dessert pizza, top a crust with Nutella and seasonal fruits like sliced bananas or strawberries, perfect for a spooky sweet finish!
- Herb-Infused: Experiment with different herbs like oregano, thyme, or Italian seasoning to elevate your flavors and introduce delightful aroma.
- Meat Lovers’ Delight: Incorporate cooked sausage or diced ham for a meaty punch that’s sure to satisfy hearty appetites.
By customizing your Halloween Mini Pizzas, you can create not just a meal, but a canvas for culinary imagination! They’re such a fun way to welcome the festive spirit, don’t forget to check out our expert tips for even more delicious ideas!
How to Store and Freeze Halloween Mini Pizzas
Fridge: Store cooled Halloween Mini Pizzas in an airtight container for up to 3 days. This keeps them fresh and delicious, ready for your next family movie night!
Freezer: For longer storage, freeze fully assembled mini pizzas on a baking sheet until solid, then transfer them to a freezer-safe bag or container. They can last up to 2 months.
Reheating: To reheat, place frozen pizzas on a baking sheet and warm in a preheated oven at 375°F (190°C) for about 10-15 minutes. This method restores their delightful crispiness!
Making Ahead: If preparing in advance for a spooky gathering, consider par-baking the crusts or fully assembling the pizzas before freezing, so you can easily bake them fresh when needed!
Tips for the Best Halloween Mini Pizzas
- Prep Ahead: Prepare your ingredients in advance for a smoother cooking experience. This makes it easier to create your Halloween Mini Pizzas when the fun begins.
- Crust Types: Experiment with different bases! Use gluten-free pita rounds or cauliflower crust for a delightful change that suits dietary needs.
- Avoid Soggy Crusts: Be cautious not to overload with sauce; an even amount keeps the crust crispy while allowing the toppings to shine.
- Creative Toppings: Don’t be shy! Mix and match toppings based on your family’s favorites. Customize each pizza to reflect personal tastes and dietary requirements.
- Bake Smart: Remember to rotate the pan halfway through baking. This ensures even cooking and perfect melty cheese on your Halloween Mini Pizzas!
- Invite the Kids: Make it a family activity! Let the children design their own unique pizzas for a spooky, interactive cooking experience.
Make Ahead Options
These Halloween Mini Pizzas are perfect for busy weeknights when you want to enjoy fun homemade food without the fuss! You can prep the mini pizza crusts and assemble the pizzas up to 24 hours in advance; simply refrigerate them after decorating to maintain freshness and prevent sogginess. If you want even more convenience, freeze fully assembled mini pizzas for up to 3 months. When you’re ready to serve, just pop them in a preheated oven at 375°F (190°C) for about 5-7 minutes, or until heated through and crispy. This way, you can delight in these spooky treats just as deliciously as if they were made fresh!
Halloween Mini Pizzas Recipe FAQs
How do I select the best ingredients for my Halloween Mini Pizzas?
Absolutely! For mini pizzas, always pick mini pizza crusts that are fresh and firm to the touch. If you’re opting for gluten-free options, check that they are specifically marked gluten-free to avoid any mix-ups. For veggies, choose bright, fresh bell peppers without any dark spots, ensuring they’ll look vibrant on your pizzas. When choosing olives, go for plump, shiny ones to avoid any bittery taste.
How should I store leftover Halloween Mini Pizzas?
Very! Once they’re cooled, store your Halloween Mini Pizzas in an airtight container in the fridge. They will stay fresh for up to 3 days. Just remember to place a layer of parchment paper between the pizzas if you’re stacking them to keep everything looking as delightful as it tastes!
Can I freeze Halloween Mini Pizzas for later use?
Absolutely! To freeze your mini pizzas, lay them on a baking sheet first until they are solid, then transfer them to a freezer-safe bag or container. This helps prevent them from sticking together and allows for easier access later. They can last in the freezer for up to 2 months. When you’re ready to enjoy them, just pop them into a preheated oven at 375°F (190°C) for 10-15 minutes.
What if my mini pizzas turn out soggy instead of crispy?
No worries! A common reason for soggy crusts is adding too much sauce. To avoid this, stick to spreading just 1-2 tablespoons of sauce on each crust and try to ensure it doesn’t reach the edges. If you’re looking for extra crispiness, bake them a little longer while keeping an eye on them, or pre-bake the crusts for 5 minutes before adding toppings. Rotate your pan halfway through baking—the heat will work in your favor!
Are there any dietary considerations for making Halloween Mini Pizzas?
Great question! You can easily customize your Halloween Mini Pizzas to accommodate various dietary needs. For gluten-free options, use specifically labeled gluten-free crusts or cauliflower bases. If you’re catering to dairy-free diets, opt for vegan cheese alternatives. Remember to double-check labels for any allergens, such as nuts or soy, in store-bought ingredients like sauces or cheeses for peace of mind.
Halloween Mini Pizzas: Fun & Creative Family Treats
Ingredients
Equipment
Method
- Preheat your oven to 425°F (220°C) and lightly mist a baking sheet with olive oil spray.
- Spread 1-2 tablespoons of pizza sauce on each mini pizza crust, leaving a small border.
- Sprinkle mozzarella cheese on half of the mini pizzas and use string cheese to form mummy faces on the other half.
- Decorate with sliced black olives and bell pepper strips for jack-o'-lantern faces. Add mini pepperoni if desired.
- Bake in the preheated oven for 10-12 minutes until the crusts are golden and cheese is bubbly.
- Let the pizzas cool for about 2 minutes, then garnish with fresh basil before serving.
Leave a Reply