
There’s something magical about indulging in a treat that requires no oven. Enter the No-Bake Biscoff Cheesecake Cups—a dessert dream that combines the sweetness of Biscoff cookie butter with the creamy richness of cheesecake, all layered into charming little cups. Not only are these cheesecake cups easy to whip up, making them perfect for those hectic weeknights, but they’re also a guaranteed crowd-pleaser for any gathering. With their delightful crunch from the cookie crust and airy whipped filling, they offer an indulgence that feels special without the fuss of traditional baking. Plus, they’re family-friendly and customizable to fit everyone’s taste. Curious about how to create this no-bake wonder? Let’s dive into the simple steps to make your new favorite dessert!
Why Are No-Bake Cheesecake Cups Amazing?
Simplicity: These No-Bake Biscoff Cheesecake Cups come together effortlessly, requiring no baking skills—just mix and chill!
Crowd-Pleaser: With their unique flavor, they’re bound to impress at any gathering or as a special family treat.
Texture Contrast: Experience an enticing combination of creamy cheesecake filling and a crunchy cookie crust in every delightful cup.
Customizable: Feel free to adapt the recipe by incorporating fruit layers or swapping out flavors to suit everyone’s preferences.
Make Ahead: Prepare these cups in advance for an easy dessert solution—just chill and serve, making them an ideal option for busy days!
No-Bake Biscoff Cheesecake Cups Ingredients
For the Crust
• Lotus Biscoff biscuits – They create a crunchy base for the cups; you can also use any spiced cookie if you don’t have these on hand.
• Unsalted butter – This binds the crust together, providing richness; coconut oil can be a great dairy-free substitute.
For the Filling
• Heavy cream – This forms the airy whipped element, ensuring a light texture; half-and-half is a good lower-fat alternative.
• Cream cheese – The key ingredient for a creamy filling; opt for dairy-free cream cheese for a vegan-friendly version.
• Powdered sugar – This sweetens the filling and ensures a smooth texture; granulated sugar can be used, but the consistency may change.
• Biscoff (cookie butter) spread – Adds the iconic Biscoff flavor that this dessert is known for; alternative spreads may alter taste.
• Vanilla extract – Enhances the flavor profile; consider almond extract for a different twist.
For Garnish
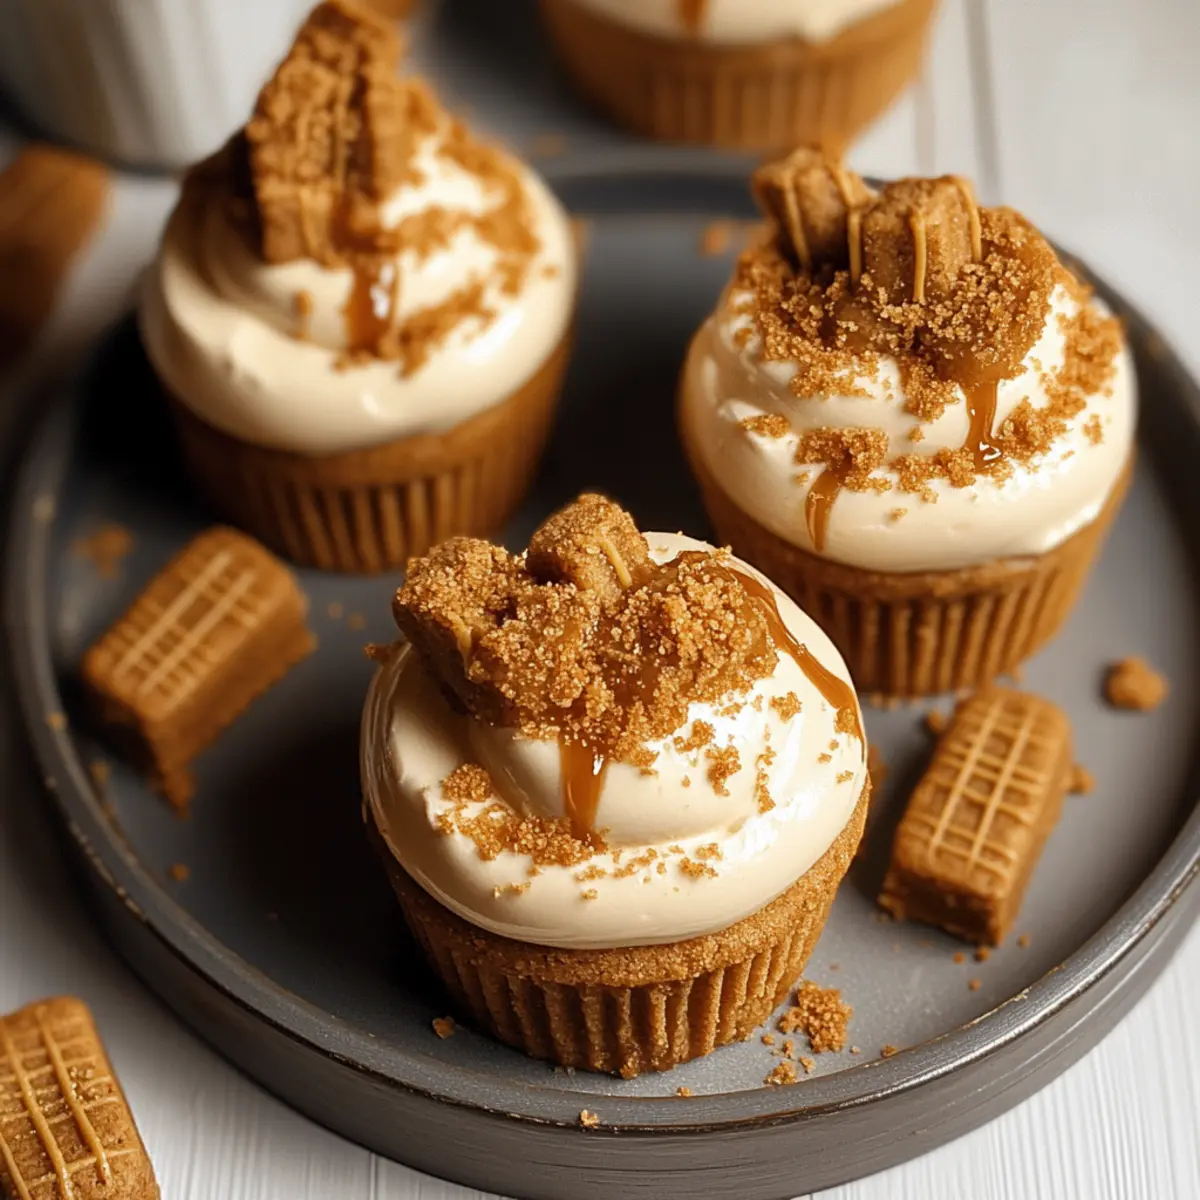
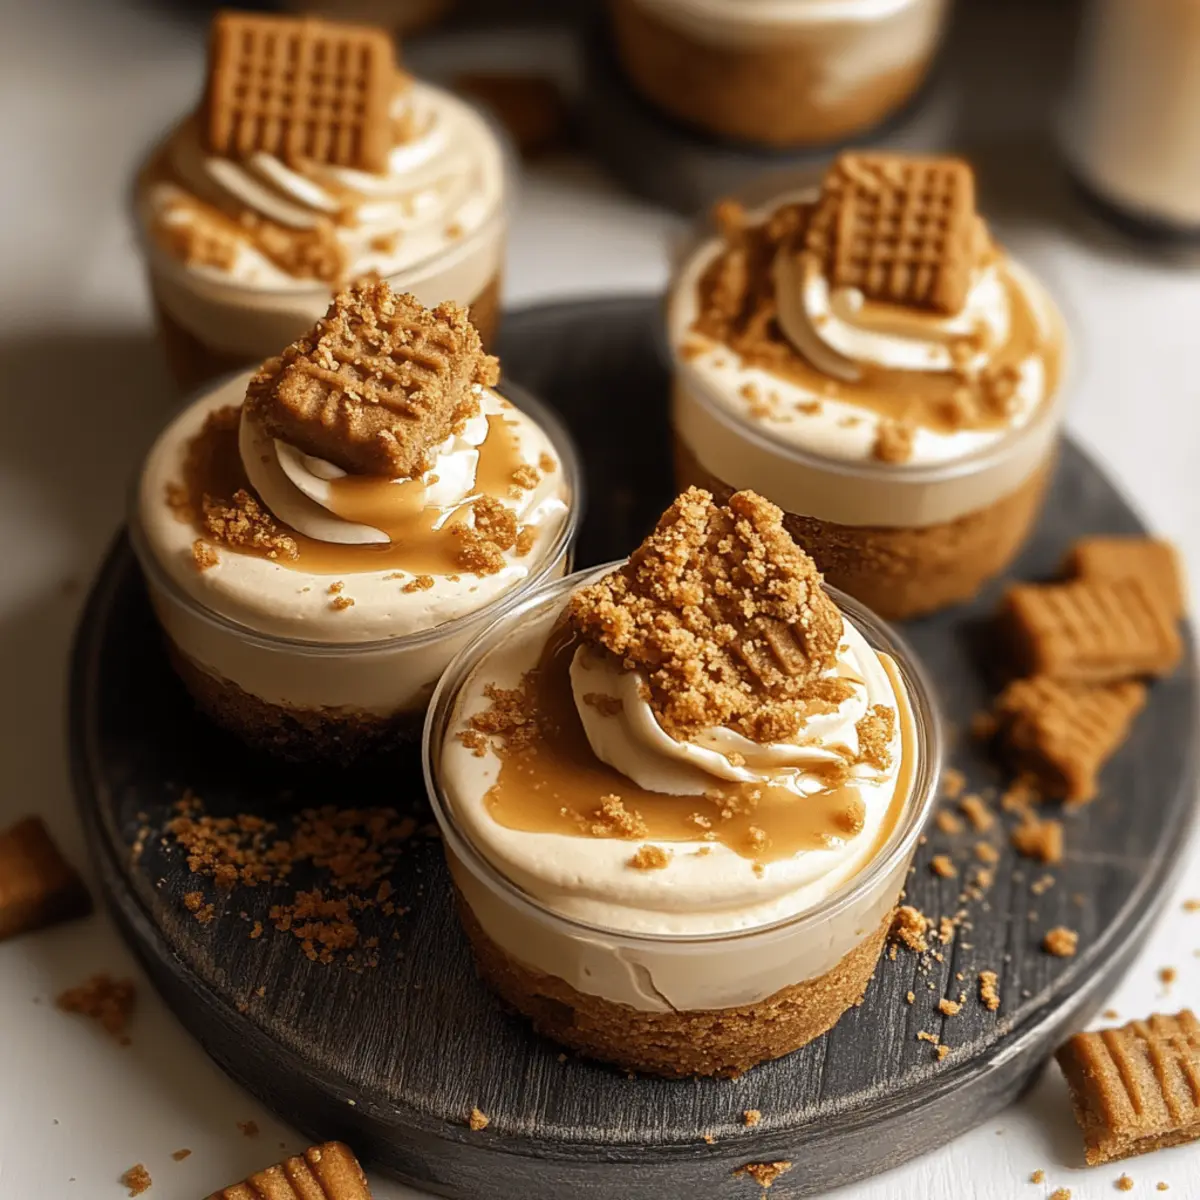
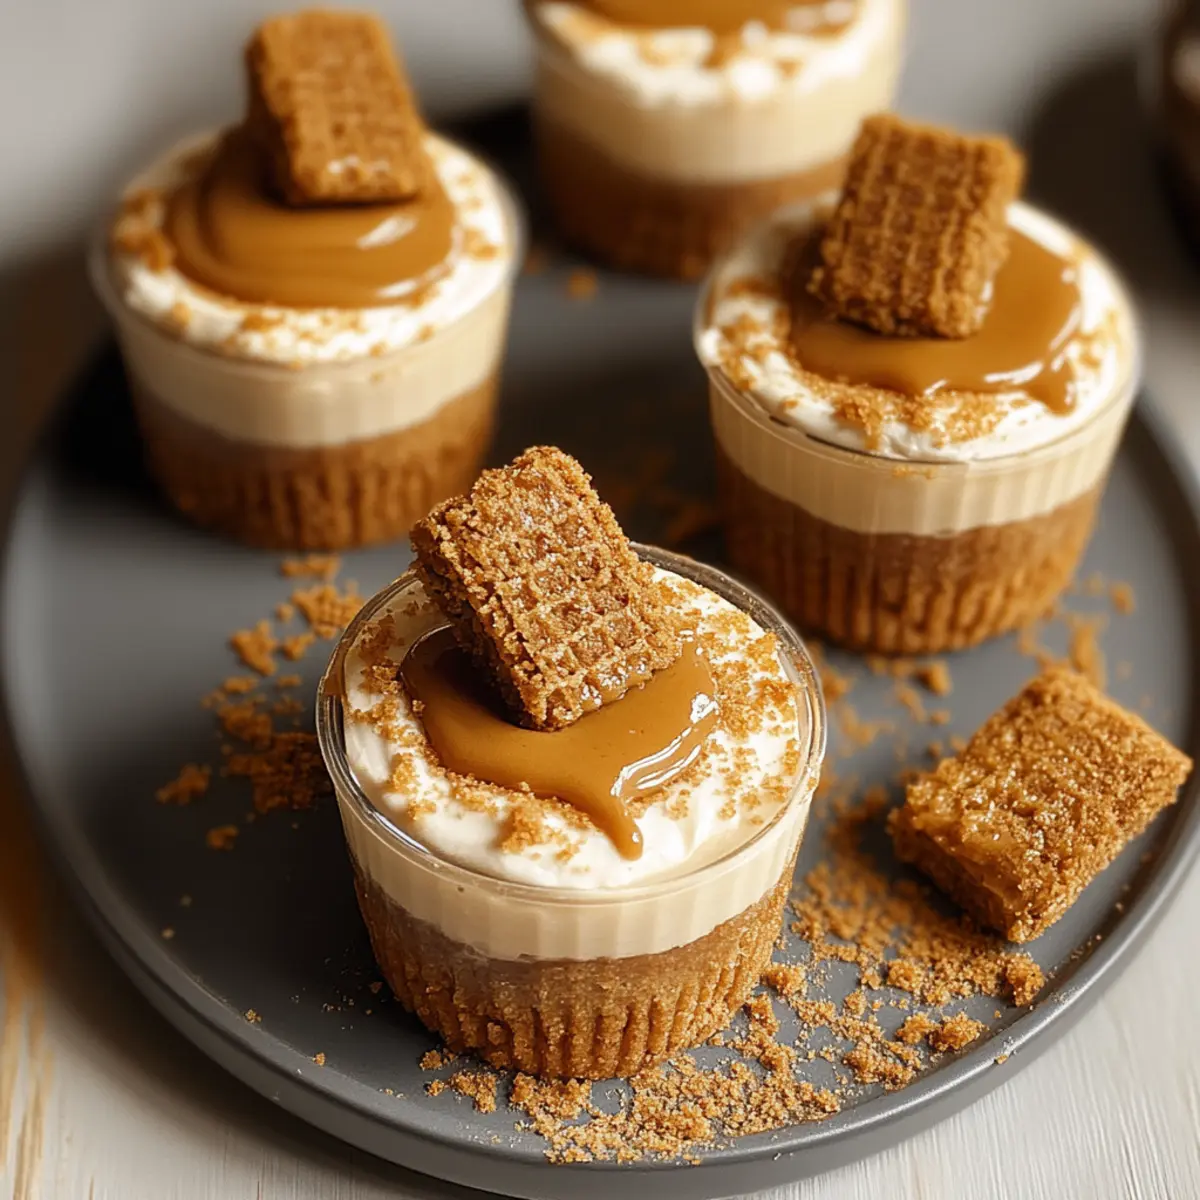
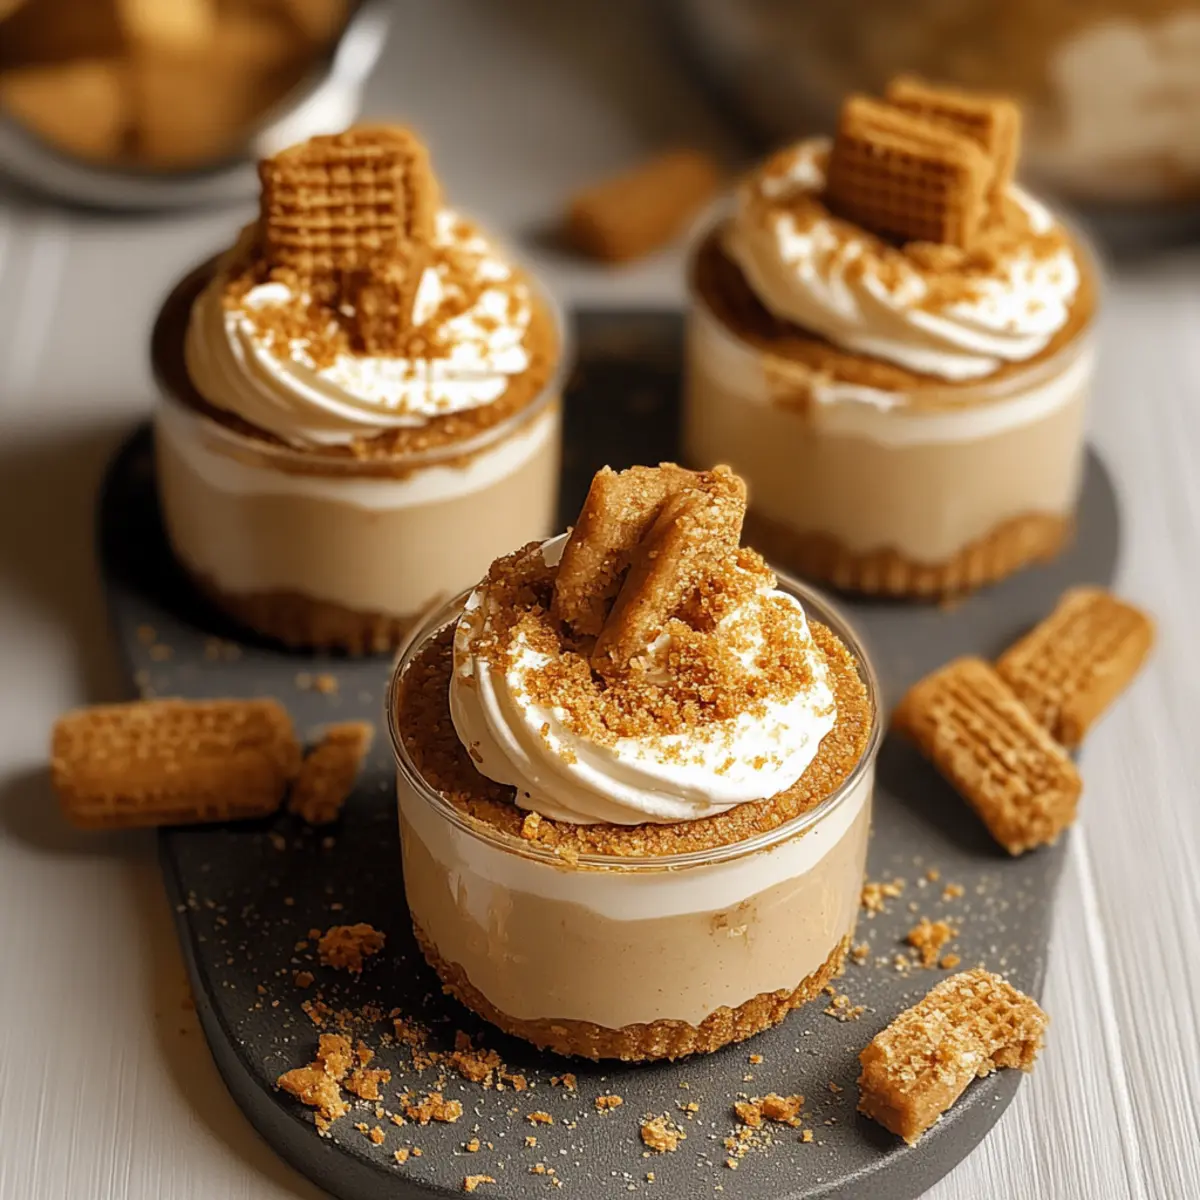
• Garnish – Halved Biscoff cookies and cookie crumbs add a decorative touch that enhances visual appeal; they also provide an extra crunch.
With these simple ingredients, you’ll be on your way to creating delicious No-Bake Biscoff Cheesecake Cups that your family and friends will adore!
Step‑by‑Step Instructions for No-Bake Biscoff Cheesecake Cups
Step 1: Prepare the Crust
Start by crushing the Lotus Biscoff biscuits into fine crumbs using a food processor or a zip-top bag and rolling pin. In a medium bowl, mix the cookie crumbs with melted unsalted butter until well combined. Reserve a tablespoon of this mixture for garnish, then press the crust evenly into the bottom of serving cups, using about 2-3 tablespoons for each cup.
Step 2: Whip Cream
In a large mixing bowl, pour in the heavy cream and use an electric mixer to whip the cream on medium-high speed. Continue whisking until stiff peaks form, which should take about 3-5 minutes. Keep an eye out for a fluffy, airy texture. Gently set the whipped cream aside while you prepare the cheesecake filling for the No-Bake Biscoff Cheesecake Cups.
Step 3: Make Cheesecake Filling
In another bowl, blend the softened cream cheese, powdered sugar, Biscoff cookie butter, and vanilla extract until the mixture is smooth and free of lumps. This should take about 2-3 minutes on medium speed. Once combined, carefully fold in the whipped cream with a spatula to maintain that light and airy texture. You’re now ready to fill your cups!
Step 4: Fill Cups
Using a piping bag or a spoon, transfer the creamy cheesecake filling into each cup, layering it over the prepared Biscoff crust. Fill each cup until just above the brim, ensuring an even distribution for a delightful presentation. This step will create the indulgent layers that the No-Bake Biscoff Cheesecake Cups are known for.
Step 5: Top with Biscoff Spread
To create a glossy top for your cheesecake cups, melt additional Biscoff spread in the microwave for about 15-20 seconds until pourable. Gently drizzle this luscious layer over the cheesecake filling in each cup, allowing it to ooze slightly down the sides for a beautiful effect. This topping will add an irresistible flavor, enhancing your No-Bake Biscoff Cheesecake Cups.
Step 6: Garnish
Finish your delightful No-Bake Biscoff Cheesecake Cups by garnishing them with halved Biscoff cookies and sprinkling the reserved cookie crumbs on top. This adds not only a decorative touch but also an extra crunch. Make sure to create a beautiful visual presentation that is sure to impress anyone you serve.
Step 7: Chill
Finally, refrigerate the prepared cheesecake cups for at least 4 hours or, preferably, overnight. This chilling time allows the filling to set properly and the flavors to meld beautifully. When ready to serve, remove from the refrigerator, and enjoy the delightful contrast of creamy and crunchy textures in each delectable cup.
Make Ahead Options
These No-Bake Biscoff Cheesecake Cups are a dream for meal prep! You can prepare the crust and cheesecake filling up to 24 hours in advance, allowing you to save precious time when you’re ready to serve. Start by crushing the Biscoff biscuits and combining them with melted butter; then press this mixture into the bottoms of your cups. Next, whip the cream and blend it with the cream cheese, powdered sugar, and Biscoff spread, and refrigerate the filling in an airtight container. When it’s time to finish, simply fill your cups with the cheesecake mixture, add the melted Biscoff topping, garnish, and chill for a few hours. With this prep, you’ll enjoy effortless dessert pleasure, just as delicious as if you made it fresh!
How to Store and Freeze No-Bake Biscoff Cheesecake Cups
Fridge: These cheesecake cups can be stored in the refrigerator for up to 5 days. Keep them covered with plastic wrap or in an airtight container to maintain freshness.
Freezer: If you’d like to store them longer, freeze the cheesecake cups for up to 2 months. Wrap each cup tightly in plastic wrap and then place it in a freezer-safe container.
Thawing: To enjoy your frozen No-Bake Biscoff Cheesecake Cups, simply transfer them to the fridge to thaw overnight before serving.
Reheating: There’s no need to reheat these cups; enjoy them chilled to savor the perfect balance of creamy and crunchy textures!
Expert Tips for No-Bake Biscoff Cheesecake Cups
Soften Cream Cheese: Ensure your cream cheese is at room temperature to avoid lumps and achieve a smooth, creamy filling for your No-Bake Biscoff Cheesecake Cups.
Whip Cream Properly: Whip the heavy cream until it forms stiff peaks; this is crucial for a light and airy texture that balances the dense cheesecake filling.
Pack the Crust: Press the cookie crust firmly and evenly into the cups. A spoon or glass bottom can help create a solid layer that won’t crumble easily.
Use Piping Bags: For a neat and professional look, use a piping bag to fill the cups with cheesecake filling, creating beautiful layers without the mess.
Chill Long Enough: Be sure to refrigerate your cheesecake cups for at least 4 hours, or preferably overnight, to allow them to set perfectly for that ideal scoopable texture.
No-Bake Biscoff Cheesecake Cups Variations
Feel free to get creative and customize your No-Bake Biscoff Cheesecake Cups to suit your taste buds!
-
Fruit Layer: Add a layer of fresh fruit compote, like raspberry or blueberry, for a refreshing twist and a pop of color.
-
Chocolate Delight: Mix cocoa powder into the cheesecake filling for a rich, chocolaty version that chocolate lovers will adore.
-
Nutty Flavor: Blend in some finely chopped nuts, like pecans or walnuts, for added crunch and a delightful nutty flavor throughout.
-
Gluten-Free: Substitute the Biscoff biscuits with gluten-free cookies to enjoy this treat without compromising your dietary needs.
-
Vegan-Friendly: Use dairy-free cream cheese and coconut cream in place of heavy cream for a vegan take on these delectable cups. Plant-based indulgence is just as delicious!
-
Spiced Version: Incorporate a touch of cinnamon or nutmeg into the filling for a warmer, spiced flavor that’s perfect for cozy gatherings.
-
Layered Presentation: Serve in jars for an elegant presentation, layering the cheesecake, cookie crumbs, and fruit. This not only looks beautiful but also adds to the texture experience.
-
Kick of Spice: For those who enjoy a bit of heat, add a pinch of cayenne pepper or chili powder to the cheesecake filling. It’s a unique contrast that will surprise and delight!
By exploring these variations, you can create your own signature version of the No-Bake Biscoff Cheesecake Cups, making them perfect for any occasion!
What to Serve with No-Bake Biscoff Cheesecake Cups
Elevate your dessert experience by pairing these delightful cheesecake cups with complementary sides and drinks that enhance their creamy splendor.
- Fresh Berries: The brightness of strawberries or raspberries adds a tangy contrast, perfectly balancing the richness of the cheesecake.
- Chocolate Drizzle: A drizzle of melted dark chocolate adds an indulgent touch, heightening the dessert’s flavor while providing a luxurious finish.
- Coffee: A rich cup of coffee or espresso pairs beautifully, cutting through the sweetness and enhancing the dessert’s warm, spiced notes.
- Vanilla Ice Cream: The creaminess of vanilla ice cream adds a delightful temperature contrast, offering a cold and silky element to every bite.
- Crushed Nuts: Sprinkle crushed almonds or hazelnuts on top for an extra crunch and nutty flavor, adding another layer of texture to the cups.
- Homemade Whipped Cream: A dollop of lightly sweetened whipped cream adds airiness, enhancing the overall indulgence of the dessert experience.
- Mint Leaves: A fresh sprig of mint not only decorates your plates but also provides a refreshing aroma and flavor that contrasts elegantly with the sweetness.
- Sparkling Water: Opt for some chilled sparkling water with a twist of lemon to cleanse the palate between bites and keep the refreshing vibe alive.
- Chocolate-Covered Pretzels: The salty-sweet profile of chocolate-covered pretzels mirrors the flavors of the cheesecake, making for a fun and playful pairing.
No-Bake Biscoff Cheesecake Cups Recipe FAQs
What type of Biscoff biscuits should I use?
Absolutely! Lotus Biscoff biscuits are the traditional choice for the crust, providing that distinctive buttery and spiced flavor. However, if you’re in a pinch, any spiced cookie or graham crackers can work as a substitute. Just be sure they’re crunchy enough to hold up under the cheesecake filling!
How should I store the cheesecake cups?
These amazing No-Bake Biscoff Cheesecake Cups can be kept in the refrigerator for up to 5 days. Simply cover them tightly with plastic wrap or store in an airtight container to keep them fresh and delicious. This is ideal for preparing them in advance for a special occasion or an impromptu gathering!
Can I freeze No-Bake Biscoff Cheesecake Cups?
Certainly! To freeze, wrap each individual cup tightly in plastic wrap, then place them in a freezer-safe container. They can be frozen for up to 2 months. When you’re ready to enjoy them, transfer the cups to the fridge to thaw overnight. This method preserves their creamy texture beautifully!
What should I do if the whipped cream isn’t thickening?
If your whipped cream is not reaching stiff peaks, make sure that your bowl and beaters are clean and dry; any fat or moisture can impede its ability to whip properly. Additionally, ensure the heavy cream is chilled and not near its expiration date. Whip on medium-high speed for about 3-5 minutes, and you should see that delightful fluffy texture emerge.
Can I modify this recipe for dietary restrictions?
Very! If you or someone you’re serving has dietary restrictions, you can easily modify the recipe. Use dairy-free cream cheese and coconut oil for a vegan version. For a gluten-free option, swap in gluten-free cookies for the crust. Just be mindful that the flavor may change slightly with different substitutes, but the end results will still be delicious!
How long do these dessert cups need to chill?
Allow your No-Bake Biscoff Cheesecake Cups to chill in the refrigerator for at least 4 hours, but for the best results, I recommend overnight. This ample chilling time helps the cheesecake filling to set properly and allows the flavors to meld beautifully, creating a richer taste experience when you finally dig in!
No-Bake Biscoff Cheesecake Cups: Effortless Indulgence Awaits
Ingredients
Equipment
Method
- Crush the Lotus Biscoff biscuits into fine crumbs and mix with melted unsalted butter. Press into the bottom of serving cups.
- Whip the heavy cream on medium-high speed until stiff peaks form, then set aside.
- Blend the softened cream cheese, powdered sugar, Biscoff spread, and vanilla extract until smooth. Fold in the whipped cream.
- Fill the cups with the cheesecake filling over the crust, ensuring even distribution.
- Melt additional Biscoff spread and drizzle over the cheesecake filling.
- Garnish with halved Biscoff cookies and cookie crumbs.
- Refrigerate for at least 4 hours or overnight before serving.
Leave a Reply