
As I sift through my kitchen for ingredients, my heart races at the thought of baking colorful treats for Easter. That’s when I came up with the irresistible Easter Bunny Button Cookies, tiny delights that are perfect for both kids and the young at heart. These cookies are not only simple to whip up, but they also make a charming, giftable surprise for friends and family. With their buttery crumb and vibrant candy centers, they’re sure to spark joy at any gathering. Best of all, they take little time to prepare—leaving you with more moments to cherish during the holiday! Ready to bring some cheer to your cookie platter? Let’s hop into the fun of making these adorable bites!

Why will Easter Bunny Button Cookies delight you?
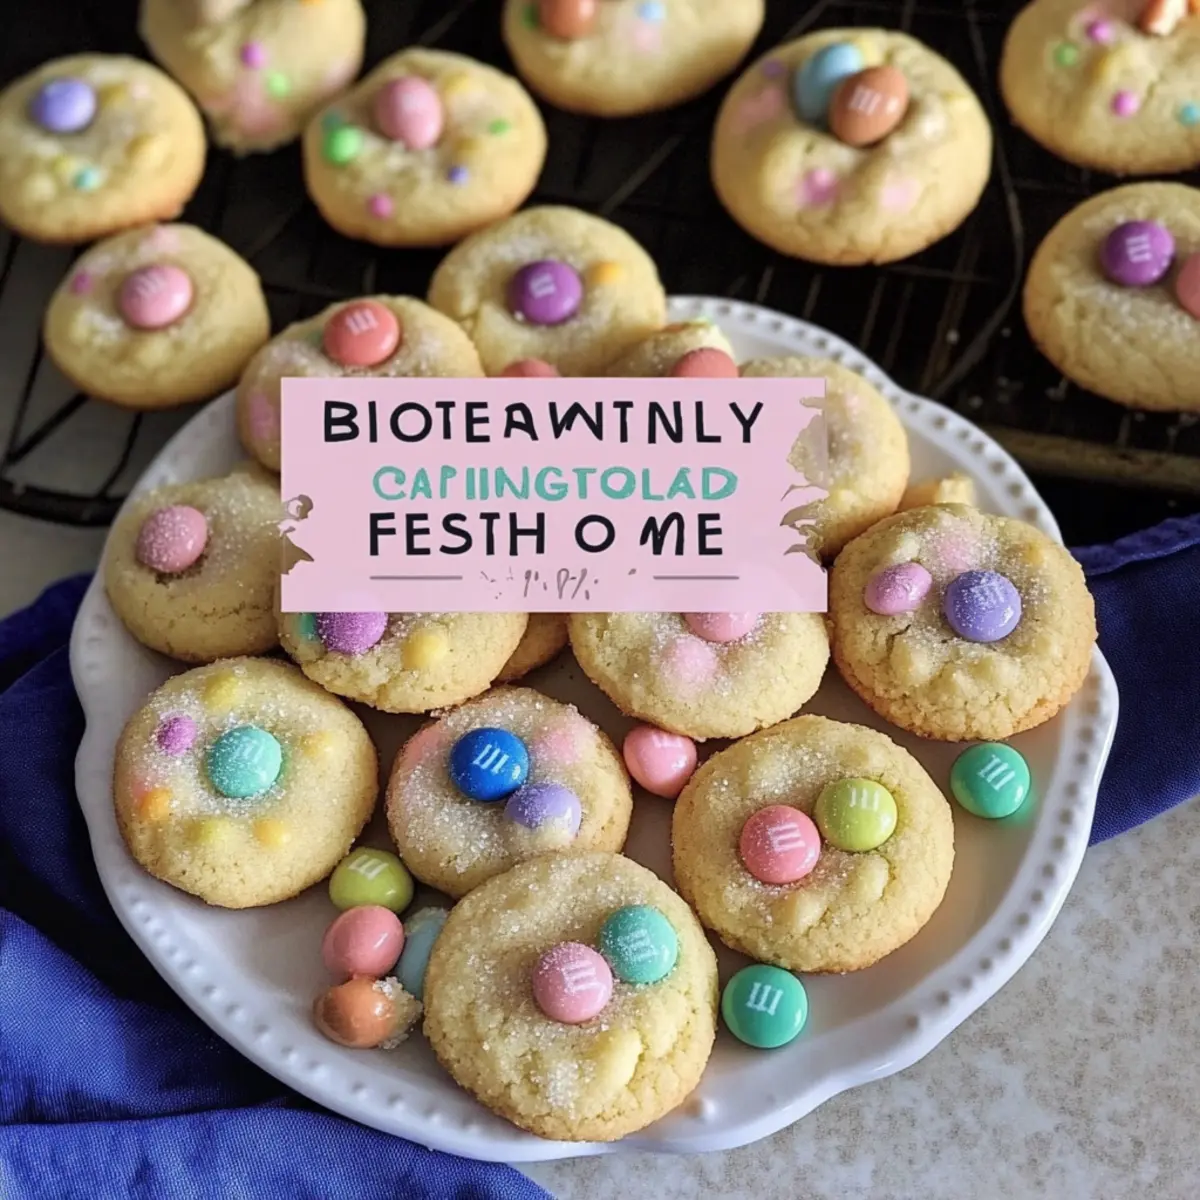
Joyful, Colorful Treats: These cookies are a visual feast, packed with pastel candy centers that add cheer to any occasion.
Kid-Friendly Appeal: Perfectly sized for little hands, they are guaranteed hit with kids and adults alike!
Quick and Easy: With a simple process, you can whip these up in no time—it’s like magic!
Giftable Goodness: Beautifully packaged, they make delightful gifts for loved ones this Easter season.
Endless Variations: Get creative! Swap out candy toppings or add sprinkles for a personal touch.
Memorable Moments: Each bite offers a burst of sweetness that’s sure to create lasting holiday memories, much like my Chewy Pumpkin Cookies or Pumpkin S’mores Cookies!
Easter Bunny Button Cookies Ingredients
• Discover the sweet components for playful baking!
For the Dough
- Butter – softened for easy mixing and richness.
- Sugar – provides sweetness and helps create a tender texture.
- Egg Yolks – adds moisture and richness; egg whites alter the cookie texture.
- Vanilla Extract – enhances the flavor profile of the dough.
- All-Purpose Flour – the key ingredient for structure in these cookies.
For the Topping
- Sanding Sugar – sprinkled for a sparkling finish; substitute with coarse sugar if needed.
- Chocolate M&M Candy – gives a colorful and crunchy center; other candy-coated chocolates work too.
Embrace the joy of baking these Easter Bunny Button Cookies and indulge in the colorful memories they create!
Step‑by‑Step Instructions for Easter Bunny Button Cookies
Step 1: Preheat the Oven
Begin by preheating your oven to 350°F (175°C). While the oven warms, line a baking sheet with parchment paper or a silicone mat to prevent the cookies from sticking. This little prep step ensures your Easter Bunny Button Cookies will bake evenly and release easily when they are done.
Step 2: Mix the Ingredients
In a mixing bowl, beat together the softened butter and sugar using a hand mixer until the mixture is light and fluffy, about 2-3 minutes. Add the egg yolks and vanilla extract, then mix until fully combined. This creamy base will create a tender texture for your delicious cookies, ensuring a delightful bite at Easter celebrations.
Step 3: Incorporate the Flour
Gradually add the all-purpose flour to the butter mixture, mixing by hand or at low speed until just combined. Be careful not to over-mix, as this can lead to denser cookies. The dough should come together into a soft ball, ready to shape into those adorable Easter Bunny Button Cookies.
Step 4: Shape the Cookies
Using a teaspoon, portion out the dough and roll it into small balls about 1 inch in diameter. These bites will puff slightly while baking, so aim for uniformity. Once rolled, gently coat each ball in sanding sugar, ensuring a sparkly finish that adds to the festive look of your cookies.
Step 5: Add the M&Ms
After shaping the cookies, place each ball on the prepared baking sheet, making sure to leave space between them. Gently press an M&M into the center of each dough ball, which will create a colorful pop that’s perfect for these Easter Bunny Button Cookies. This is where the fun comes in, as you can mix and match your candy colors!
Step 6: Bake the Cookies
Slide the baking sheet into the preheated oven and bake your cookies for about 10 minutes, until the edges are just starting to turn golden. Be careful not to overbake; you want the centers to remain soft and tender for that delightful bite. Once done, remove from the oven and let them cool on the sheet for 3-5 minutes.
Step 7: Cool and Serve
After cooling on the baking sheet, transfer the Easter Bunny Button Cookies to a wire rack to cool completely. This step allows the cookies to firm up while still retaining their soft centers. Once cooled, they are ready to be enjoyed or beautifully packaged for gifting to friends and family during the Easter festivities!

Make Ahead Options
These Easter Bunny Button Cookies are a fantastic option for meal prep, allowing you to enjoy the festivities without the last-minute rush! You can prepare the cookie dough up to 24 hours in advance by mixing all ingredients and storing the dough wrapped tightly in plastic wrap in the refrigerator. This helps preserve the freshness and guarantees that your cookies will be just as delicious when baked. Additionally, you can roll the cookie balls, coat them with sanding sugar, and keep them on a baking sheet covered in the fridge for up to 3 days. When you’re ready to bake, simply press an M&M into each ball and pop them in the oven straight from the fridge—no need to wait for the dough to come to room temperature, ensuring that your Easter Bunny Button Cookies turn out perfectly every time!
Expert Tips for Easter Bunny Button Cookies
-
Butter Matters: Use softened butter for easy mixing; cold butter can result in dense cookies that don’t spread as they should.
-
Mixing Technique: Mix just until combined after adding flour to maintain the tender texture of your Easter Bunny Button Cookies. Over-mixing can lead to tough cookies.
-
Sanding Sugar Substitute: For the perfect sparkling finish, stick to sanding sugar. If substituting, avoid granulated sugar, which melts and alters the cookie’s texture.
-
Candy Placement: Press the M&Ms in gently to ensure they stay nestled in the center as the cookies bake. This keeps the bright colors front and center!
-
Watch the Bake Time: Keep an eye on the cookies as they near the 10-minute mark; every oven is different, and you want soft centers for the best taste.
Easter Bunny Button Cookies Variations & Substitutions
Feel free to play and customize these delightful cookies to suit your tastes and dietary needs!
- Dairy-Free: Substitute the butter with a plant-based margarine for an equally delicious cookie.
- Gluten-Free: Use a gluten-free all-purpose flour blend for those avoiding gluten—perfect for everyone to enjoy!
- Nutty Twist: Add 1/4 cup of finely chopped nuts, such as walnuts or pecans, for a crunchier texture and nutty flavor.
- Fruit-Filled: Press a piece of dried fruit, like a cherry or apricot, in place of the candy for a fruity surprise!
- Chocolate Lovers: Incorporate mini chocolate chips into the dough for an extra chocolaty flavor that pairs beautifully with the candy centers.
- Flavor Boost: Replace vanilla extract with almond or lemon extract for a different fragrant twist that brightens each bite.
- Sprinkles Galore: Before baking, decorate the tops with colorful sprinkles to jazz them up even more—because who doesn’t love sprinkles?
- Spicy Surprise: Add a pinch of cinnamon or a dash of cayenne pepper to the dough for a subtle kick that will surprise your taste buds!
With these variations, you’ll find countless ways to create memorable moments with your Easter Bunny Button Cookies! You can also enjoy other sweet treats like Chewy Pumpkin Cookies and Pumpkin S’mores Cookies for a delightful culinary adventure!
What to Serve with Easter Bunny Button Cookies
Imagine a delightful spread that perfectly complements your cheerful Easter Bunny Button Cookies, enriching the festive atmosphere with colors and flavors.
-
Fresh Fruit Salad: A medley of strawberries, blueberries, and kiwi adds a refreshing touch and balances the sweetness of the cookies. Bright colors will bring a smile to everyone’s face!
-
Creamy Vanilla Ice Cream: Serve a scoop on the side for a delicious contrast. The rich creaminess of the ice cream plays beautifully with the buttery texture of the cookies, creating a truly indulgent treat.
-
Sparkling Lemonade: This bubbly drink enhances the festive spirit with its zesty flavors. The brightness of the lemonade cuts through the sweetness, making it a perfect pairing for a sunny Easter gathering.
-
Chocolate-Covered Strawberries: A playful nod to Easter, these treats echo the colors in your cookies. They introduce another layer of richness with a burst of juicy sweetness.
-
Mini Carrot Cupcakes: Adorned with cream cheese frosting, these bites echo the Easter theme and provide a delightful contrast to the lighter texture of your cookies. Perfect for those who can’t resist a touch of spring in their dessert!
-
Drizzled White Chocolate: Melted white chocolate drizzled over fresh berries adds a touch of elegance and encourages a playful dipping moment. This pairing transforms your cookie experience into a fun, interactive dessert platter!
How to Store and Freeze Easter Bunny Button Cookies
Room Temperature: Store cookies in an airtight container at room temperature for up to 3-5 days to maintain freshness and prevent them from becoming too soft.
Fridge: If you want to extend their shelf life, you can keep cookies in the refrigerator for up to a week. However, this may change their texture slightly.
Freezer: Place cookies in a single layer in a freezer-safe container, separated by parchment paper, for up to 3 months. Thaw at room temperature before serving.
Reheating: If you prefer warm cookies, gently reheat them in the microwave for 5-10 seconds. Enjoy the delightful taste of Easter Bunny Button Cookies fresh out of the oven!
Easter Bunny Button Cookies Recipe FAQs
How do I select the best ingredients for the cookies?
Absolutely! For the best flavor and texture, use high-quality, unsalted butter that’s been properly softened at room temperature. Check your eggs for freshness—look for a clean shell and store them in the main body of the fridge, not the door. For the M&M candies, choose vibrant, fresh ones to ensure your cookies are as visually appealing as they are delicious!
How should I store the Easter Bunny Button Cookies?
To keep your cookies fresh, store them in an airtight container at room temperature for about 3-5 days. For longer storage, transfer them to the refrigerator where they can last up to a week. Just remember, chilling may alter their texture slightly, making them a bit firmer.
Can I freeze the Easter Bunny Button Cookies?
Yes! To freeze your cookies, arrange them in a single layer on a baking sheet and freeze until solid. Then, place them into a freezer-safe container, layering parchment paper between batches. They can stay good for up to 3 months. When you’re ready to enjoy, simply let them thaw at room temperature until they’re soft and delightful!
What should I do if my cookies spread too much while baking?
Very! If the cookies spread too much, it usually means either the butter was too warm or there was too much mixing after adding the flour. Take it easy on the mixing and ensure your butter is simply softened, not melted. If you encounter this issue, next time, you might consider chilling the dough for about 30 minutes to help prevent excessive spreading.
Are these cookies safe for kids with nut allergies?
Yes, these Easter Bunny Button Cookies are nut-free, making them a great choice for kids with allergies! Just ensure that all your other ingredients, like the candy-coated chocolates you choose, are also nut-free and sourced from manufacturers that guarantee no cross-contamination. Happy baking!
What do I do if I don’t have sanding sugar?
No worries! If you don’t have sanding sugar, you can use coarse sugar for a similar sparkling finish, but avoid granulated sugar as it will melt. You can also try adding colored sprinkles for a festive pop, especially if you’re making these adorable cookies for a special event or gift!

Easter Bunny Button Cookies: Sweet Joy in Every Colorful Bite
Ingredients
Equipment
Method
- Preheat your oven to 350°F (175°C) and line a baking sheet with parchment paper.
- Beat together softened butter and sugar until light and fluffy, then add egg yolks and vanilla extract.
- Gradually add all-purpose flour, mixing until just combined to form a soft dough.
- Roll the dough into small balls about 1 inch in diameter, coating each in sanding sugar.
- Place on the prepared baking sheet and gently press an M&M into the center of each ball.
- Bake for about 10 minutes until edges start to turn golden, then cool on the sheet.
- Transfer cookies to a wire rack to cool completely before serving or packaging.
Leave a Reply