
As I stood in my kitchen, the sweltering heat outside had me longing for something cool and refreshing. That’s when the idea hit me—Homemade Frozen Yogurt Bark! This delightful treat is not only a quick 10-minute preparation but also a canvas for my creativity. With its creamy base and endless possibilities for toppings like fresh fruits, nuts, and even a sprinkle of chocolate, it’s the perfect guilt-free dessert for any occasion. Plus, it’s gluten-free and customizable, making it a fantastic choice for everyone in the family, whether you’re watching your diet or just craving something special. What exciting combinations will you whip up for your own Frozen Yogurt Bark?
Why Make Homemade Frozen Yogurt Bark?
Endless topping possibilities: Customize your bark with a variety of fresh fruits, nuts, and sweet drizzles.
Quick to prepare: With just 10 minutes of prep time, you can create a refreshing treat without the fuss.
Healthy indulgence: Made with nonfat yogurt and packed with nutrients, you can enjoy this dessert guilt-free.
Versatile flavors: Whether you prefer creamy peanut butter, zesty citrus, or rich chocolate, the flavor combinations are limitless.
Crowd-pleaser: Serve it at parties, picnics, or as an after-school snack—everyone will be reaching for a piece! Check out my recipe for Chicken Enchiladas for a delicious meal to pair with this sweet treat.
Homemade Frozen Yogurt Bark Ingredients
For the Bark
• Nonfat Plain Yogurt or Greek Yogurt – Serves as the creamy base for your bark; substitute with dairy-free yogurt for a vegan option.
• Organic Honey – Acts as a natural sweetener that adds depth; adjust or replace with agave for a vegan version.
For the Toppings
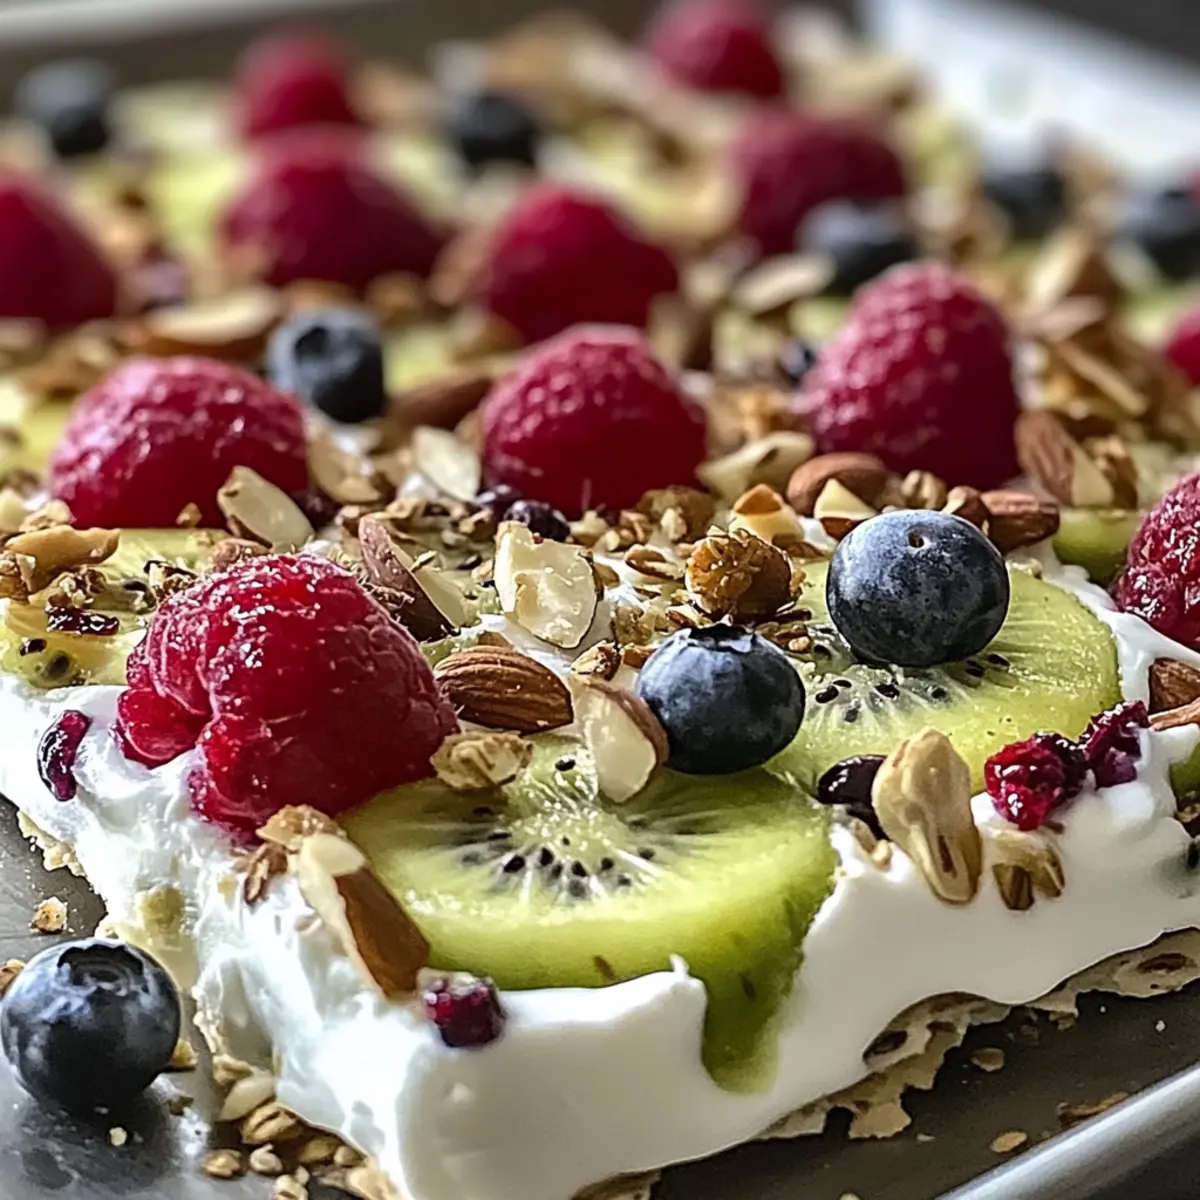
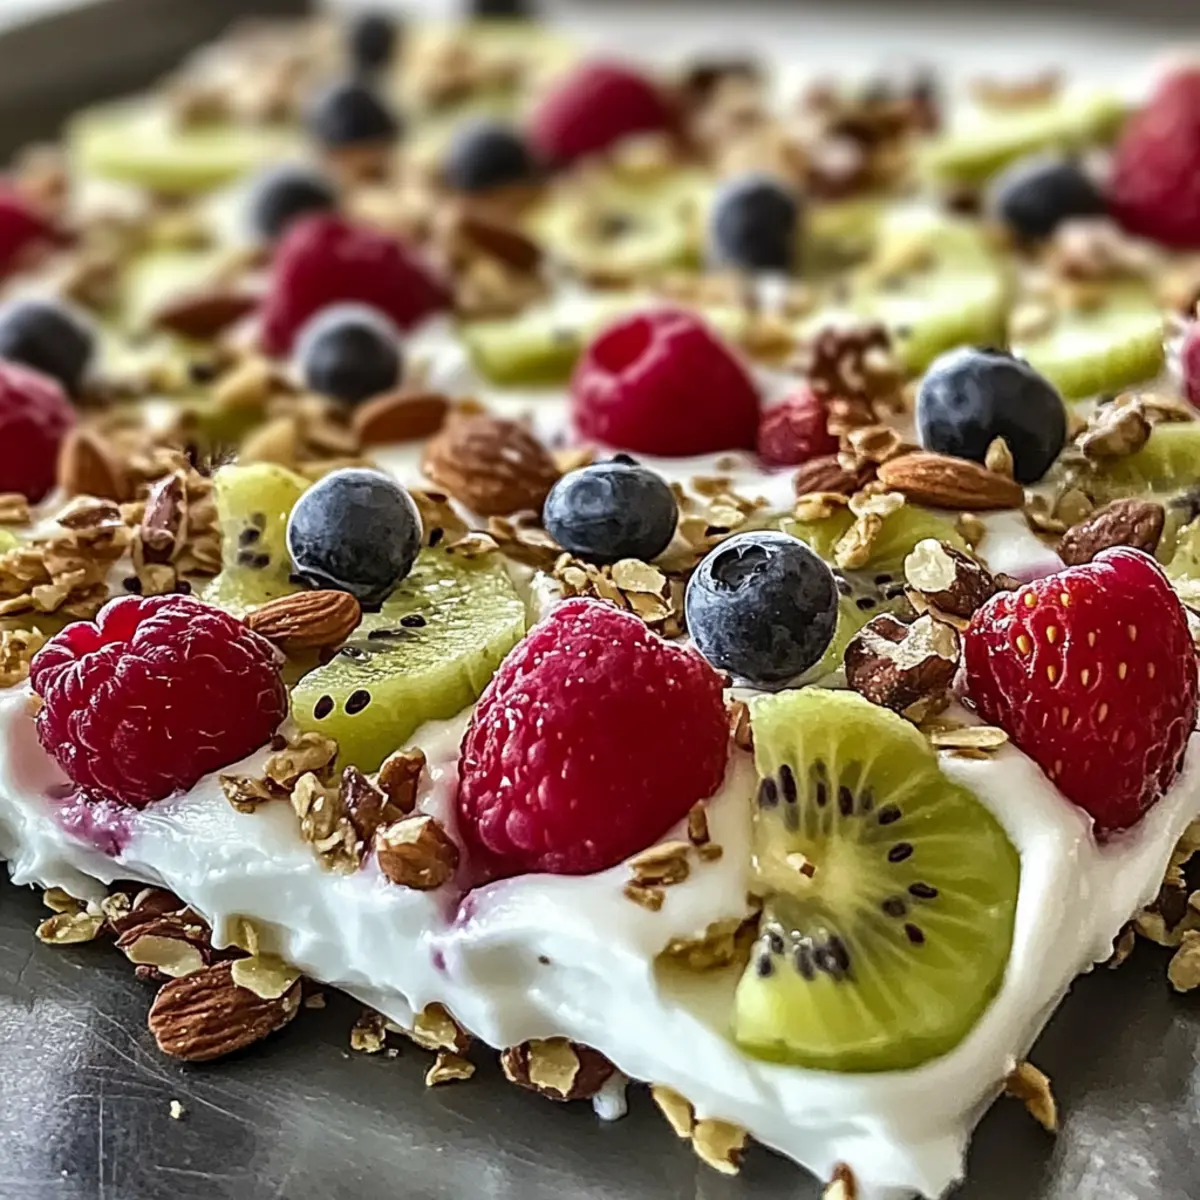
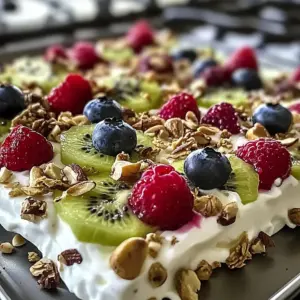
• Fresh Fruit – The star of the bark; opt for strawberries, blueberries, bananas, or mango. Seasonal or frozen fruits work well for convenience.
• Granola – Provides a satisfying crunch; optional, but can be replaced with your favorite granola variety.
• Chocolate (White or Dark) – Adds a delightful twist; use dairy-free chocolate for a vegan-friendly bark.
• Nuts – Chopped almonds or walnuts add texture and flavor; feel free to use any nuts you enjoy.
Get ready to customize your Homemade Frozen Yogurt Bark into a delicious dessert that everyone will love!
Step‑by‑Step Instructions for Homemade Frozen Yogurt Bark
Step 1: Prepare the Baking Sheet
Begin by lining a baking sheet with parchment paper to prevent sticking. Make sure the parchment extends slightly over the edges for easy removal later. This setup is crucial for your Homemade Frozen Yogurt Bark, ensuring a smooth release once frozen. A standard size around 9×13 inches works perfectly for this recipe.
Step 2: Mix the Yogurt Base
In a mixing bowl, combine 2 cups of nonfat plain yogurt or Greek yogurt with 2 tablespoons of organic honey. Use a whisk or spatula to blend until smooth and creamy. If desired, mix in a scoop of protein powder or a touch of vanilla extract for added flavor. This yogurt mixture forms the delicious base of your bark, so be sure it’s well-mixed before proceeding.
Step 3: Spread the Yogurt Mixture
Pour the creamy yogurt mixture onto the lined baking sheet and spread it out evenly using a spatula. Aim for about 1/2 inch thick throughout, which helps it freeze uniformly. Take your time with this step to avoid any gaps for a perfect presentation in your Homemade Frozen Yogurt Bark.
Step 4: Add Toppings
Now it’s time to add your favorite toppings! Sprinkle fresh fruits like sliced strawberries, blueberries, and bananas evenly across the yogurt layer. Don’t forget to add a handful of granola, chopped nuts, or a drizzle of melted chocolate for extra flair. This custom topping mix is what truly brings your bark to life!
Step 5: Freeze
Place the baking sheet in the freezer and let the yogurt bark set for at least 2 hours. For best results, avoid opening the freezer door frequently, allowing it to freeze solidly. You’ll know it’s ready when the edges are firm and the center feels set. This step is vital for achieving a delightful bite in your Homemade Frozen Yogurt Bark.
Step 6: Break and Serve
After at least 2 hours, remove the baking sheet from the freezer. Using your hands, break the frozen yogurt into pieces of your preferred size. The bark can be quite breakable, so be gentle. Arrange the pieces on a serving platter or store them in an airtight container in the freezer for a quick, refreshing snack!
Tips for the Best Frozen Yogurt Bark
• Fresh Fruits First: Use ripe, fresh fruits for the best flavor; avoid overly ripe fruits that can become mushy when frozen.
• Uniform Thickness: Spread the yogurt mixture evenly at about 1/2 inch thick to ensure the entire Homemade Frozen Yogurt Bark freezes uniformly.
• Topping Timing: Add toppings before freezing to prevent them from sinking; make sure they’re evenly distributed for consistent flavor in every bite.
• Gentle Breaking: When breaking the bark, do it gently to avoid crumbling too much; larger pieces are easier to handle and serve.
• Storage Savvy: Keep leftover bark in an airtight container for up to 2 weeks; prevent freezer burn by wrapping it tightly in plastic wrap before closing the lid.
Homemade Frozen Yogurt Bark Variations
Feel free to get creative with your Homemade Frozen Yogurt Bark—customizing it is part of the fun!
- Seasonal Fruits: Swap in your favorite seasonal fruits like cherries or peaches for a burst of freshness in every bite.
- Nut Butter Swirl: Drizzle peanut butter or almond butter on top before freezing for a nutty flavor explosion.
- Dairy-Free Delight: Use coconut yogurt instead of regular yogurt for a tropical twist; it adds a beautiful creaminess.
- Crunchy Topping: Replace granola with crushed cereal for extra crunch and a fun twist on your bark.
- Spicy Kick: Sprinkle some cayenne or chili powder over the toppings for a surprising touch of heat contrast.
- Chocolate Lovers: Mix mini chocolate chips into the yogurt for a rich, chocolaty flavor, even in a healthy treat.
- Sweet Spice: Incorporate cinnamon or pumpkin spice to evoke cozy vibes—perfect for fall-inspired barks.
- Crunchy Seeds: Add pumpkin or sunflower seeds for an extra crunch and a nutritious boost.
Each of these variations allows you to enjoy a different flavor profile with your Homemade Frozen Yogurt Bark! Serve it alongside dishes like my savory Chicken Enchiladas for a well-rounded meal or enjoy it as your go-to refreshing snack. What delightful combination will you create today?
What to Serve with Healthy Frozen Yogurt Bark?
Imagine indulging in a refreshing dessert that’s light, tasty, and perfectly pairs with all your favorite summer flavors.
-
Fresh Fruit Salad: A colorful, vibrant mix of seasonal fruits enhances the freshness of the yogurt bark while adding extra juiciness. Perfect for a sunny afternoon or side by side for dessert.
-
Granola Parfait: Layer up some granola, yogurt, and stunning fruits for a hit of crunch and creaminess that complements each bite of the bark. This delightful combination makes breakfast feel like dessert—a win-win!
-
Nutty Trail Mix: A handful of mixed nuts and dried fruits brings an earthy crunch to the table, wonderfully balancing the creamy yogurt bark’s sweetness. Perfect for snacking in between meals or as a topping!
-
Homemade Lemonade: This zesty, refreshing drink provides a sweet yet tangy contrast to the creamy bark. Enjoy it on a hot day to quench your thirst as you delight in each bite of your treat.
-
Honey Drizzle: Elevate the bark’s sweetness with a simple drizzle of honey or agave syrup. It adds a touch of elegance and extra flavor without overpowering the delicious combinations you’ve chosen.
-
Coconut Sorbet: Keep the cool vibes flowing with a scoop of coconut sorbet. Its tropical touch pairs beautifully with the yogurt bark for a delightful twist on your dessert spread.
-
Chocolate-Covered Almonds: The rich taste of chocolate provides a lovely contrast to the fruity yogurt bark, creating a balance of textures and flavors in every mouthful. They make a perfect snack or a fancy dessert addition!
These pairings will transform your healthy frozen yogurt bark into an unforgettable experience, making it a delightful centerpiece for any gathering or a simple indulgent treat at home.
How to Store and Freeze Homemade Frozen Yogurt Bark
Fridge: Store leftover bark in the fridge for up to 3 days; keep it in an airtight container to maintain freshness.
Freezer: For longer storage, freeze the yogurt bark in an airtight container for up to 2 weeks. Ensure it’s wrapped tightly to prevent freezer burn.
Reheating: No need to reheat—just break off a piece and enjoy it straight from the freezer for a refreshing treat!
Serving: If stored in the freezer, allow the bark to sit at room temperature for a few minutes before serving to make breaking easier.
Make Ahead Options
These delightful Homemade Frozen Yogurt Bark pieces are perfect for meal prep enthusiasts! You can prepare the yogurt base up to 24 hours in advance by mixing it and spreading it on the baking sheet, then covering it with plastic wrap to refrigerate. Feel free to add your toppings (fruits, nuts, granola) right before you plan to freeze the bark, ensuring the toppings stay fresh and vibrant. Once ready to serve, place the baking sheet in the freezer for at least 2 hours. This way, you’ll have a refreshing treat on hand for busy weeknights, giving you the delicious satisfaction of homemade goodness with minimal effort!

Homemade Frozen Yogurt Bark Recipe FAQs
How do I choose the best fruits for my Frozen Yogurt Bark?
Absolutely! Opt for ripe, vibrant fruits that add flavor and texture to your bark. Fruits such as strawberries, blueberries, bananas, and mangoes work wonderfully! Avoid overly ripe fruits with dark spots or softness, as they can become mushy when frozen—freshness is key for that delightful crunch.
How should I store my Homemade Frozen Yogurt Bark?
I recommend storing your leftover bark in an airtight container to keep it fresh for up to 2 weeks. If you’re planning to keep it longer, wrapping it tightly in plastic wrap before placing it in the container helps prevent freezer burn. Just remember, there’s no need to reheat it; simply break off a piece and enjoy straight from the freezer!
Can I freeze Homemade Frozen Yogurt Bark, and how long will it last?
Absolutely! You can freeze your yogurt bark for up to 2 weeks. To freeze, first allow the bark to set completely in the freezer for about 2 hours. Once firm, store it in an airtight container to maintain its delightful texture. If you want to enjoy it after a bit, let it sit at room temperature for a few minutes before breaking it into pieces for easy handling.
What if my yogurt mixture isn’t spreading evenly?
Very often, this happens when the yogurt is too thick; in this case, try mixing in a splash of milk or water to loosen it up! Spread the mixture using a spatula, making sure to smooth it out to about 1/2 inch thick for uniform freezing. If it’s not working, take a moment to reassess—patience is your best friend in making this treat!
Are there any dietary considerations I should keep in mind?
Yes! This Homemade Frozen Yogurt Bark is customizable and gluten-free, making it suitable for most diets. If you’re making it for someone with allergies or dietary restrictions, you can easily swap out the honey for agave syrup for a vegan option, use dairy-free yogurt, or add any nut of choice, always double-checking for allergens!
Can I add protein powder or other mixes to my Yogurt Bark?
You bet! Adding protein powder or a dash of vanilla extract to your yogurt base not only enriches the nutrients but also enhances the flavor. Mix well until completely combined before spreading on your baking sheet. Feel free to get creative with flavor profiles and nutritional boosts; there’s no limit to what you can incorporate for a healthier treat!

Delightful Homemade Frozen Yogurt Bark: Customize Your Treat!
Ingredients
Equipment
Method
- Prepare the Baking Sheet: Line a baking sheet with parchment paper, extending it over the edges for easy removal.
- Mix the Yogurt Base: Combine 2 cups of yogurt with 2 tablespoons of honey in a mixing bowl and blend until smooth and creamy.
- Spread the Yogurt Mixture: Pour the mixture onto the baking sheet and spread it evenly to about 1/2 inch thickness.
- Add Toppings: Sprinkle your chosen toppings evenly across the yogurt layer.
- Freeze: Place the baking sheet in the freezer for at least 2 hours until firm.
- Break and Serve: Remove from the freezer, break into pieces, and serve immediately or store in an airtight container.
Leave a Reply