
As I stood by the fireplace, the sweet aroma of melted chocolate mixed with the nostalgic scent of winter evenings warmed my heart. It was the perfect moment to whip up a magical dessert: Hot Chocolate Cheesecake. This velvety delight merges the rich, creamy goodness of cheesecake with the comforting essence of your favorite cold-weather drink, transforming an ordinary dessert into a showstopper for any gathering. Not only is it simple to make, perfect for both seasoned bakers and kitchen novices alike, but it’s also a crowd-pleaser that will leave chocolate lovers craving more. With each forkful, you’ll experience a harmonious blend of flavors that is simply irresistible. Are you ready to indulge in this chocolatey creation? Let’s dive into the recipe!

Why is this Hot Chocolate Cheesecake special?
Decadent Flavor: Every bite offers a rich chocolate experience that combines both cheesecake and hot cocoa delights.
Easy to Make: This recipe simplifies the cheesecake-making process, making it accessible for all skill levels.
Customizable Options: You can play with flavors, adding peppermint or creating a nutty crust to suit your taste.
Perfect for Gatherings: The velvety texture and delightful presentation make it an instant crowd favorite, whether for holiday parties or family dinners.
Leftover Friendly: This cheesecake keeps well in the fridge, so you can relish this treat for days! Pair it with our Decadent Chocolate Chip Cookies or enjoy it as a sweet treat after a meal.
Hot Chocolate Cheesecake Ingredients
For the Crust
- Oreo Cookies – Crushed for a delightful chocolate base; consider graham crackers for a unique flavor twist.
- Butter – Melted to bind the crust; unsalted butter is ideal to manage salt levels.
- Salt – A pinch enhances sweetness; feel free to omit if using salted butter.
For the Cheesecake Filling
- Cream Cheese – The key to that creamy cheesecake texture; ensure it’s softened for easy mixing.
- Granulated Sugar – Sweetens the filling; can be swapped with a sugar alternative if needed.
- Flour – Provides structure to the filling; cornstarch works great for a gluten-free option.
- Hot Cocoa Packs – Infuses the cheesecake with a delicious chocolate flavor; choose your favorite brand.
- Heavy Whipping Cream – Adds richness and volume, essential for both filling and ganache.
- Eggs – Binds the filling together; for an egg-free version, consider silken tofu as a substitute.
For the Ganache Topping
- Chocolate Chips – Used for the ganache; opt for high-quality chocolate to elevate the flavor.
For Garnishing
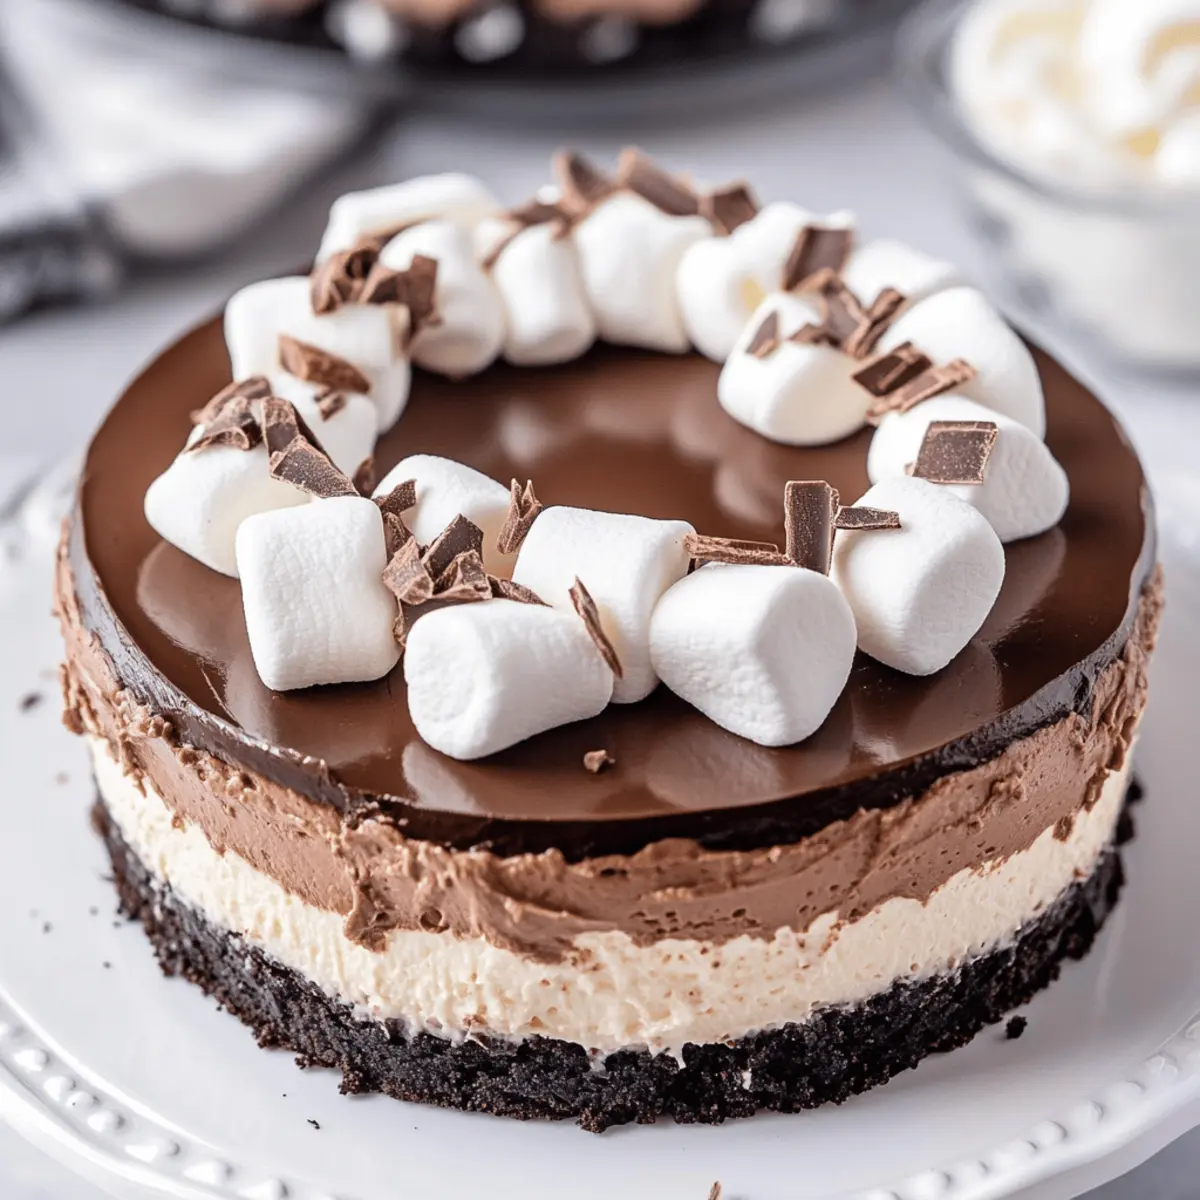
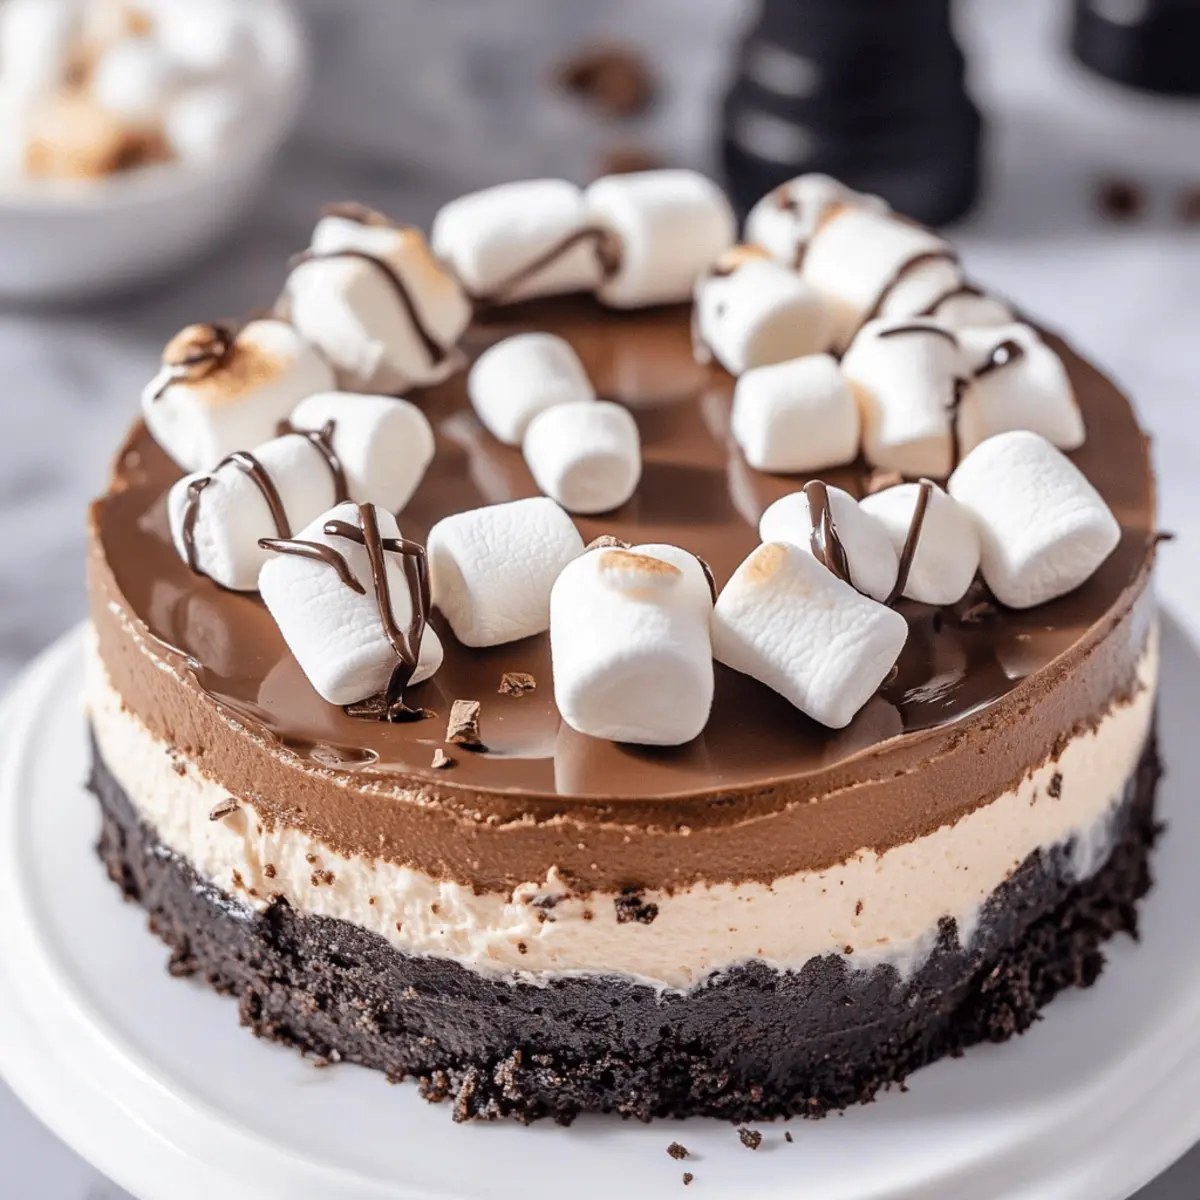
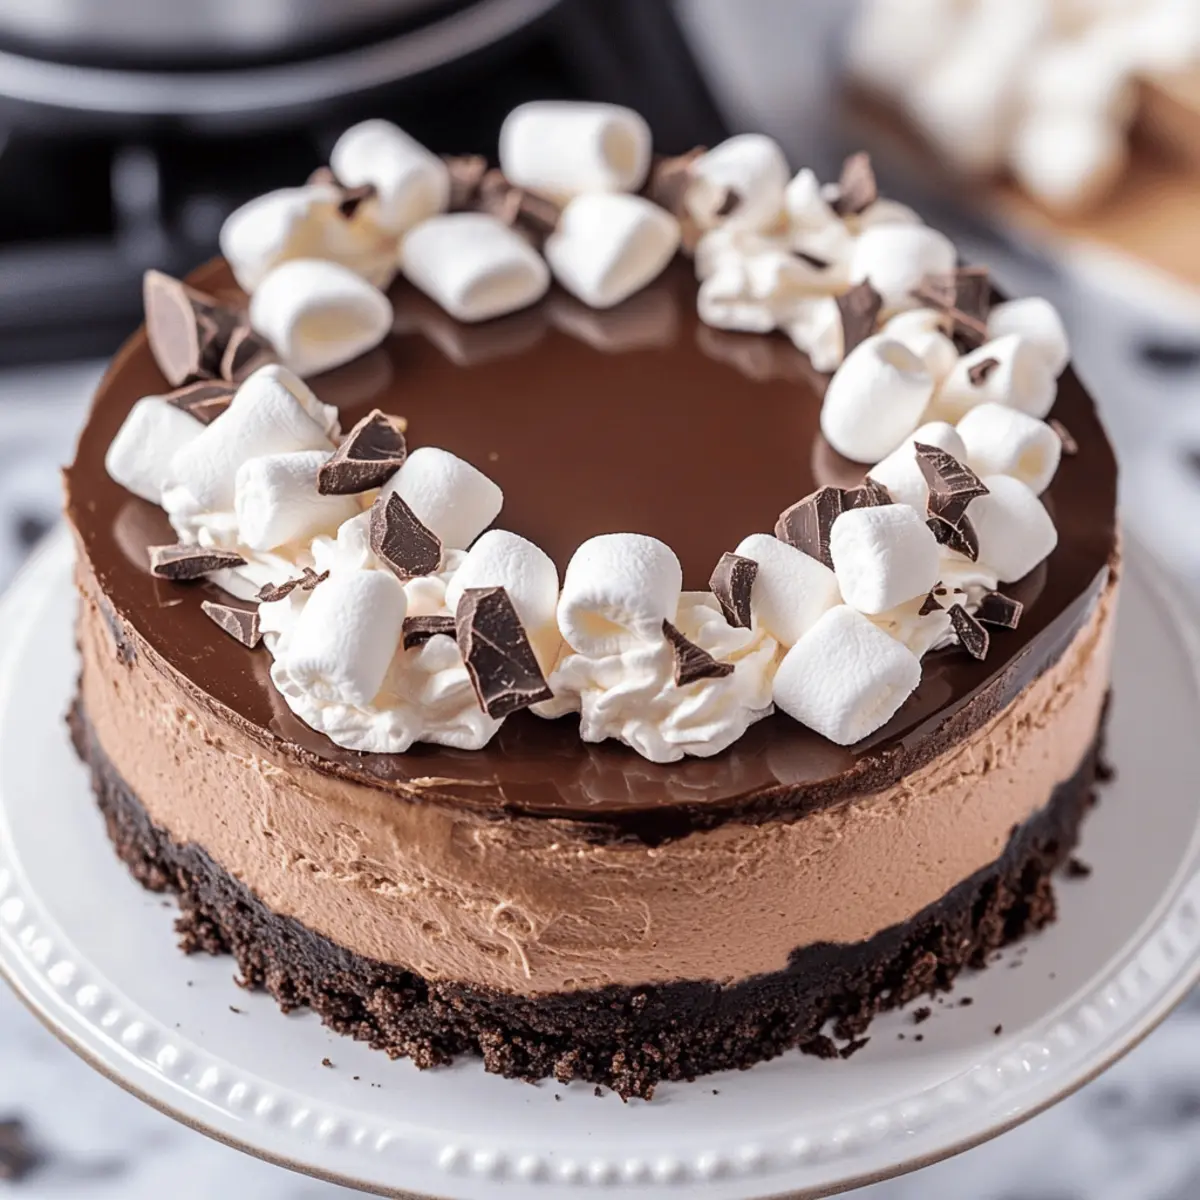
- Whipped Cream, Mini Marshmallows, Chocolate Shavings – These delightful toppings add a festive touch; customize them based on your whim!
Indulge in this Hot Chocolate Cheesecake, and let the flavors bring warmth to your cozy nights!
Step‑by‑Step Instructions for Hot Chocolate Cheesecake
Step 1: Preheat the Oven and Prepare the Pan
Begin by preheating your oven to 350°F (175°C). While it warms up, take a 9-inch springform pan and generously coat it with non-stick spray to prevent sticking. Line the bottom with parchment paper for easy release later. This will ensure your Hot Chocolate Cheesecake comes out beautifully once it’s baked.
Step 2: Make the Crust
In a food processor, crush the Oreo cookies into fine crumbs. Combine these crumbs with melted butter and a pinch of salt in a mixing bowl. Press the mixture firmly into the bottom and slightly up the sides of the prepared springform pan. Bake the crust in your preheated oven for 10 minutes, then set it aside to cool while you prepare the filling.
Step 3: Prepare the Cream Cheese Filling
In a stand mixer, beat the softened cream cheese on medium speed until smooth and creamy. Gradually add granulated sugar, flour, and hot cocoa packs, mixing until well combined and there are no lumps. This creates the base for your rich filling, ensuring your Hot Chocolate Cheesecake is perfectly smooth and decadent.
Step 4: Add Heavy Cream and Eggs
Slowly pour in the heavy whipping cream while the mixer is on low speed. Once combined, add the eggs one at a time, mixing just until incorporated. Be careful not to overmix the filling, as this will help prevent cracks from forming while baking. The mixture should be creamy and velvety, inviting anticipation for your delightful cheesecake.
Step 5: Bake the Cheesecake
Pour the luscious filling into the cooled crust, smoothing the top with a spatula. Bake for 15 minutes at 350°F (175°C). After this time, lower the oven temperature to 200°F (93°C) and continue baking for an additional 50-55 minutes until the cheesecake is set but still slightly jiggly in the center. This ensures the perfect texture for your Hot Chocolate Cheesecake.
Step 6: Cool in the Oven
Turn off the oven and leave the cheesecake inside with the door closed for 30 minutes. This gentle cooling method helps prevent cracks from forming. After the initial cooling in the oven, crack the door open and let the cheesecake cool for another 15 minutes before removing it. This gradual temperature change is crucial for a smooth top.
Step 7: Refrigerate
Once cooled, gently run a knife around the edges of the cheesecake to loosen it from the pan. Cover the cheesecake with plastic wrap and refrigerate for at least 6 hours or, preferably, overnight. Chilling allows the flavors to meld beautifully and gives your Hot Chocolate Cheesecake the ideal texture upon serving.
Step 8: Make the Ganache
To prepare the ganache, heat the heavy whipping cream in a small saucepan over medium heat until it just starts to simmer. Remove the pan from heat and add the chocolate chips, whisking until smooth and glossy. Allow the ganache to cool slightly before pouring it over the chilled cheesecake for a luxurious finish.
Step 9: Garnish and Serve
Once the ganache has set, it’s time to garnish your Hot Chocolate Cheesecake! Top with a generous dollop of whipped cream, sprinkle mini marshmallows, and add chocolate shavings for an indulgent touch. Slice and serve to your eager guests, making sure to share this delightful treat that brings warmth and joy to any gathering.
How to Store and Freeze Hot Chocolate Cheesecake
Fridge: Store your cheesecake covered in the refrigerator for up to 1 week. This helps maintain its freshness and creamy texture, so you can enjoy it daily!
Freezer: For long-term storage, wrap the cheesecake tightly in plastic wrap and foil. It can be frozen for up to 3 months—just thaw it in the fridge overnight before serving.
Reheating: If you prefer warm cheesecake, slice and gently heat individual pieces in the microwave for about 10-15 seconds. This will bring back that velvety texture.
Serving: Always make sure to add your favorite toppings like whipped cream or chocolate shavings just before serving for the best presentation and flavor experience.
Hot Chocolate Cheesecake Variations
Feel free to personalize this indulgent dessert to suit your taste buds and dietary needs!
-
Dairy-Free: Substitute cream cheese and heavy cream with dairy-free alternatives like cashew cheese and coconut cream for a luscious, creamy result.
-
Sugar-Free: Use a granular sugar substitute to sweeten the filling without the calories, making this dessert guilt-free yet delightfully sweet.
-
Gluten-Free: Swap out Oreos for a gluten-free cookie crust or crushed gluten-free graham crackers, ensuring everyone can enjoy this treat.
-
Flavor Twist: Add a splash of peppermint extract to create a festive holiday version of your Hot Chocolate Cheesecake, perfect for winter gatherings.
-
Nutty Crust: Mix crushed nuts like almonds or pecans with your crust for an added layer of flavor and texture that complements the chocolate beautifully.
-
Marshmallow Topping: Use mini marshmallows beyond just garnish. Carefully toast them for a gooey twist that mimics the experience of a hot cocoa!
-
Chocolate Depth: Incorporate dark chocolate or even a blend of milk and dark chocolate for a richer ganache that takes this cheesecake to the next level.
-
Spicy Kick: For an adventurous flavor, add a pinch of cinnamon or cayenne pepper to the filling for a warming spice that enhances the chocolate experience.
These variations make it easy to enjoy this Hot Chocolate Cheesecake any time, especially if you’re looking to experiment a bit or need to accommodate different dietary preferences. Want more scrumptious inspiration? Try our Gluten Free Chocolate or check out the Decadent Chocolate Chip Cookies that are sure to impress!
Expert Tips for Hot Chocolate Cheesecake
-
Room Temperature Cream Cheese: Ensure the cream cheese is softened to room temperature for easy mixing, preventing lumps in your filling.
-
Oven Door Etiquette: Avoid opening the oven during baking to maintain consistent heat. This prevents unwanted cracks in your beautiful Hot Chocolate Cheesecake.
-
Refrigeration Magic: Allow ample refrigeration time—overnight if possible. This helps the cheesecake set properly and develop its rich flavors.
-
Perfect Ganache Ratio: For a creamy ganache, stick to a 1:1 ratio of heavy cream to chocolate chips. This ensures a smooth, pourable consistency.
-
Crust Variations: Feel free to experiment with the crust. Substitute half the Oreo cookies with nuts for a delightful crunch and a nutty flavor twist.
What to Serve with Hot Chocolate Cheesecake
Imagine a cozy evening, where the sweet aroma of chocolate fills your home, and you’re ready to create a delightful meal that pairs perfectly with this indulgent dessert.
-
Warm Spiced Cider: A comforting drink that enhances the cozy vibes, its spices complement the chocolate beautifully.
-
Vanilla Ice Cream: A scoop of creamy vanilla offers a lovely contrast to the rich chocolate, making every bite divine.
-
Chocolate-Dipped Strawberries: The freshness of strawberries balances the richness of the cheesecake, adding a burst of flavor.
-
Chocolate Chip Cookies: For a double chocolate treat, these chewy delights echo the flavors of your cheesecake while adding crispy texture.
-
Salted Caramel Sauce: Drizzling this luxurious sauce on top creates a sweet-salty experience, elevating the cheesecake to new heights.
-
Coffee or Espresso: The boldness of coffee enhances the chocolate notes in the cheesecake, perfect for a more grown-up pairing.
-
Whipped Cream Topped Hot Cocoa: A warm mug of hot cocoa topped with whipped cream mirrors the flavors of the cheesecake, creating a sweet synergy.
-
Hazelnut Latte: The nutty flavor from the coffee complements the chocolate and adds warmth to your dessert enjoyment.
-
Crushed Peppermints: Sprinkle these on for a festive touch; their minty freshness contrasts wonderfully with the rich flavors.
Make Ahead Options
These indulgent Hot Chocolate Cheesecake slices are perfect for meal prep enthusiasts and busy home cooks! You can prepare the crust and filling up to 24 hours in advance. Simply bake the crust, allow it to cool completely, and then mix your cheesecake filling and pour it into the crust. Cover it tightly with plastic wrap and refrigerate until you’re ready to bake. This ensures the crust stays crisp and prevents any unwanted moisture. When you’re ready to serve, bake the cheesecake as directed. After it cools, top with ganache and your favorite garnishes just before serving for a delightful treat that tastes freshly made with minimal effort!
Hot Chocolate Cheesecake Recipe FAQs
How do I choose ripe ingredients for the Hot Chocolate Cheesecake?
Absolutely! For the best flavor and texture, ensure your cream cheese is soft and at room temperature before mixing. It should feel smooth and spreadable without lumps. If you’re using eggs, select the freshest ones possible; check for firmness and check the sell-by date to ensure quality.
What’s the best way to store leftovers?
Very! Store your cheesecakes covered in the refrigerator for up to 1 week. To keep it fresh, use an airtight container or wrap it well with plastic wrap. This will help to maintain its creamy texture and delightful flavor, allowing you to enjoy this treat slowly!
Can I freeze the Hot Chocolate Cheesecake?
Absolutely! To freeze, wrap the cheesecake tightly in plastic wrap and then in foil to prevent freezer burn. It can be frozen for up to 3 months. When you’re ready to enjoy, simply thaw it in the refrigerator overnight. This preserves its velvety texture beautifully.
How can I troubleshoot if my cheesecake cracks?
Let’s keep it crack-free! To avoid cracks in your Hot Chocolate Cheesecake, ensure your oven temperature remains consistent. Avoid opening the oven door too soon during baking, and make sure to cool the cheesecake gradually in the oven after baking. Following the specified cooling instructions can also work wonders!
Are there any dietary considerations for this cheesecake?
Very! If you have allergies or dietary restrictions, there are alternatives you can use. For gluten-free options, substitute all-purpose flour with cornstarch. For a vegan version, use silken tofu instead of eggs and consider using dairy-free cream cheese. Do always check labels to avoid allergens, especially when choosing pre-packaged ingredients like hot cocoa packs!
What’s the best way to garnish the cheesecake?
Absolutely! For a festive touch, top your Hot Chocolate Cheesecake with whipped cream, mini marshmallows, and chocolate shavings just before serving. This not only adds visual appeal but also enhances the delightful flavors, making it even more irresistible.
Irresistible Hot Chocolate Cheesecake for Cozy Nights
Ingredients
Equipment
Method
- Preheat your oven to 350°F (175°C) and prepare the springform pan.
- Crush Oreo cookies and mix with melted butter and salt to form the crust. Press into the pan and bake for 10 minutes.
- Beat cream cheese until smooth, then add sugar, flour, and hot cocoa packs.
- Incorporate heavy cream and add eggs one at a time until mixed.
- Pour filling into the cooled crust and bake for 15 minutes at 350°F, then lower to 200°F and bake for another 50-55 minutes.
- Turn off the oven and let the cheesecake cool inside for 30 minutes, then open the door slightly for another 15 minutes.
- Refrigerate for at least 6 hours or overnight.
- Prepare the ganache by heating heavy cream, adding chocolate chips, and whisking until smooth.
- Pour the ganache over the chilled cheesecake and garnish it before serving.
Leave a Reply