
As I stood at my kitchen counter, the sweet aroma of vanilla and melted chocolate slowly began to fill the air, instantly transporting me back to my childhood. There’s something wonderfully nostalgic about baking a batch of Classic Chocolate Chip Cookies, and today, I want to share my perfected recipe for chewy chocolate chip cookies that will not only satisfy your cravings but also remind you of cozy family gatherings. This treat is not just a crowd-pleaser, but it’s also incredibly easy to whip up, making it perfect for novice bakers and pros alike. With a delightful contrast of a crispy edge and a soft, gooey center, these cookies are sure to become your go-to comfort food. Ready to grab your mixing bowl and dive into a world of deliciousness? Let’s bake!
Why Are These Cookies So Irresistible?
Nostalgic Aroma: The moment they bake, your kitchen fills with enchanting smells that evoke fond memories of childhood.
Quick and Simple: Very little fuss is needed; beginners and seasoned chefs will find joy in this straightforward recipe.
Endless Customization: Whether you mix in nuts, oatmeal, or different types of chocolate, there’s room for personalization!
Perfectly Balanced Flavor: The harmonious blend of sweet chocolate and rich butter creates a taste that will have everyone reaching for seconds.
Crowd-Pleasing Treat: Serve them warm with a scoop of ice cream or alongside a glass of milk, and watch smiles light up the room. For an alternative sweet treat, consider making Baked Pumpkin Donuts as well!
Classic Chocolate Chip Cookie Ingredients
- For the Dough
- All-Purpose Flour – Provides structure to the cookies; try using whole wheat flour for added fiber.
- Granulated Sugar – Sweetens the mix and helps achieve crispness; swap with coconut sugar for a healthier option.
- Brown Sugar – Adds moisture and depth of flavor, enhancing chewiness; choose dark brown sugar for a richer taste.
- Unsalted Butter – Essential for flavor and a tender texture; use vegan butter for a dairy-free variation.
- Egg – Binds the ingredients together and enriches the dough; a flax egg (1 tbsp ground flaxseed + 2.5 tbsp water) serves as a vegan alternative.
- Vanilla Extract – Intensifies flavor; opt for pure vanilla extract for the best results.
- Baking Soda – Acts as a leavening agent to help the cookies rise properly.
- Salt – Balances sweetness and enhances overall flavor; it can be omitted for low-sodium diets.
- Chocolate Chips – The star ingredient delivering irresistible flavor and texture; experiment with semi-sweet or dark chocolate for variations!
With these classic chocolate chip cookie ingredients, you’re just moments away from baking up a storm that will fill your home with sweetness and warmth!
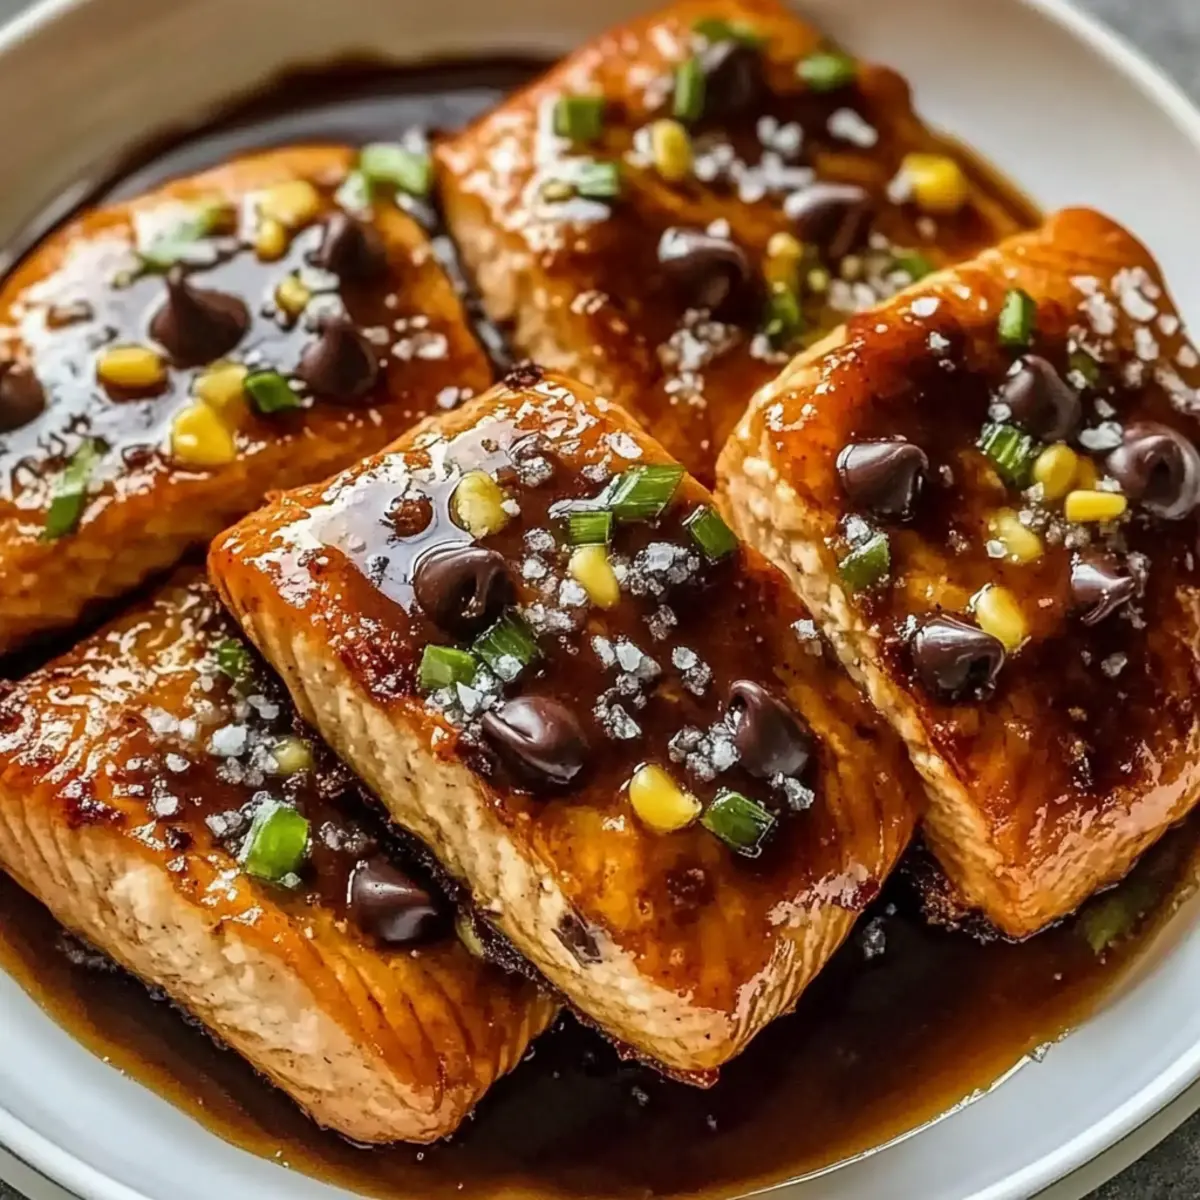
Step‑by‑Step Instructions for Baked Teriyaki Salmon
Step 1: Preheat the Oven
Begin by preheating your oven to 400°F (200°C). This ensures a hot cooking environment, perfectly sealing in the flavors of your baked teriyaki salmon. While the oven warms up, line a baking dish or sheet with parchment paper to prevent the salmon from sticking and to simplify cleanup.
Step 2: Prepare the Marinade
In a mixing bowl, whisk together your teriyaki sauce, minced garlic, and grated ginger until well combined. The aromatic blend of these ingredients will not only enhance the salmon’s flavor but also infuse each bite with a delightful sweetness. Set this marinade aside while you prepare the salmon fillets.
Step 3: Marinate the Salmon
Place the salmon fillets in a shallow dish and pour the teriyaki marinade over them. Ensure each fillet is generously coated, allowing the glaze to soak into the fish. Let the salmon marinate at room temperature for 20-30 minutes. This step elevates the flavor, creating that luscious, savory finish you crave.
Step 4: Arrange the Salmon
After marinating, take the salmon fillets and place them skin-side down on the prepared baking sheet. Ensure they are spaced evenly to allow for even cooking. As the teriyaki salmon bakes, it will caramelize, creating beautiful golden edges that tantalize your taste buds.
Step 5: Bake the Salmon
Slide the baking sheet into your preheated oven and bake the salmon for 12-15 minutes. You’re looking for the fillets to flake easily with a fork and to have a slightly caramelized exterior. This means you have perfectly cooked teriyaki salmon, full of flavor and juiciness!
Step 6: Garnish and Serve
Once baked, remove the salmon from the oven and drizzle any remaining marinade on top for an extra flavor boost. For a fresh touch, garnish with sliced green onions or sesame seeds. Serve the baked teriyaki salmon hot, perhaps alongside steamed rice or vibrant vegetables for a complete meal.

What to Serve with Chewy Chocolate Chip Cookies?
Imagine the joy of pairing warm, chewy cookies with delightful sides that complement their sweetness!
-
Cold Milk: The classic duo! A chilled glass of milk balances the sweetness and enhances the cookies’ flavors, making each bite heavenly.
-
Vanilla Ice Cream: Warm cookies paired with creamy vanilla ice cream create a melt-in-your-mouth experience that’s simply irresistible. The contrast of temperatures is divine.
-
Decadent Hot Chocolate: Indulge in a rich hot chocolate topped with whipped cream. The chocolatey drink adds a cozy touch, creating an ultimate comfort food moment!
-
Fresh Berries: Bright and juicy berries like strawberries or raspberries provide a refreshing tartness that cuts through the sweetness of the cookies. It’s a delightful contrast that keeps things light.
-
Caramel Sauce: Drizzling warm caramel sauce over cookies adds a touch of luxurious sweetness. The gooey texture perfectly blends with the warm, soft cookie center.
-
Nutty Flavored Coffee: An aromatic cup of coffee with hints of hazelnut or almond complements the chocolate in the cookies, elevating the dessert experience to new heights.
-
Spiced Chai Tea: The warm spices in chai tea create a comforting pairing. Its aromatic flavors harmonize beautifully with the sweet and salty notes of the cookies.
-
Chocolate Chip Cookie Sundae: Layer crumbled cookies, a scoop of ice cream, and your favorite toppings for a delicious sundae. This fun and indulgent dessert option is sure to impress!
Baked Teriyaki Salmon Variations
Feel free to play with this recipe, adding your own special touch to make each bite even more delightful!
-
Gluten-Free: Substitute traditional soy sauce with tamari for a gluten-free option. This keeps all that umami flavor intact.
-
Sweet & Spicy: Add a dash of sriracha or red pepper flakes to the teriyaki marinade for a gentle heat that complements the sweetness perfectly. It’ll elevate your meal to a new level of excitement!
-
Citrus Zest: Incorporate some freshly grated lime or orange zest into the marinade for a bright, zesty kick that will leave your taste buds buzzing. This fresh twist brings a delightful zing to the dish.
-
Oven-Broiled Finish: For extra caramelization, broil the salmon for an additional 2-3 minutes after baking. This technique creates that irresistible crispy top, making it a restaurant-quality meal at home.
-
Vegetable Mix: Bake some seasonal vegetables alongside the salmon—like asparagus, bell peppers, or broccoli—tossed in a little olive oil and salt. They will absorb the teriyaki flavors and make for a colorful, nutritious side.
-
Pineapple Addition: Top the salmon with fresh pineapple chunks or slices before baking for a sweeter, tropical flavor profile. The caramelized edges of pineapple combined with salmon are simply divine!
-
Sesame Seeds: Sprinkle toasted sesame seeds over the finished dish for additional crunch and a nutty flavor. It adds a sophisticated touch and pairs wonderfully with the teriyaki glaze.
For another delicious meal idea, you might want to check out my recipe for Baked Pumpkin Donuts—it’s a fall favorite that balances sweetness with satisfying flavors!
Make Ahead Options
These chewy chocolate chip cookies are perfect for meal prep enthusiasts! You can prepare the dough up to 24 hours in advance, simply wrap it tightly in plastic wrap and refrigerate it to maintain freshness and prevent them from drying out. Alternatively, you can scoop the cookie dough balls and freeze them for up to 3 months; just place them in a zip-top freezer bag, ensuring there’s no air inside. When you’re ready to bake, there’s no need to thaw—the cookies can go straight into the oven from frozen, adding a few extra minutes to baking time. This way, you’ll have delicious, homemade cookies ready at a moment’s notice, perfect for busy weeknights!
Storage Tips for Classic Chocolate Chip Cookies
- Room Temperature: Keep your cookies in an airtight container at room temperature for up to 1 week. This maintains their delightful chewiness and flavor.
- Fridge: If you prefer a longer shelf-life, store them in the fridge for up to 2 weeks. Make sure they’re sealed well to avoid drying out.
- Freezer: For extended storage, freeze the cookies in an airtight container or freezer bag for up to 3 months. To thaw, simply leave them at room temperature for a few hours.
- Reheating: Warm up cookies in the microwave for about 10-15 seconds for that freshly-baked feel, which makes them even more irresistible!
Expert Tips for Perfect Chocolate Chip Cookies
-
Chill for Chewiness: Allowing the dough to chill for 30 minutes enhances chewiness, preventing the cookies from spreading too much during baking.
-
Don’t Overbake: For the best texture, take cookies out when the edges are golden but the center looks slightly underbaked. They will continue to set as they cool.
-
Accurate Measurements: Use a kitchen scale for best results, especially when measuring flour and sugar, to ensure consistent cookies every time.
-
Cookie Spacing: Space the dough balls at least two inches apart on the baking sheet. This allows for even baking and prevents them from merging together.
-
Mix-in Variations: Feel free to experiment with additional mix-ins like nuts or oats. Just remember to adjust the amount of chocolate chips accordingly to maintain the perfect balance.
These tips will help you create classic chocolate chip cookies that are irresistibly chewy and delicious!
Classic Chocolate Chip Cookies Recipe FAQs
What ingredients should I use for the best texture?
Absolutely! For the chewiest cookies, make sure to use a combo of granulated and brown sugar. The brown sugar adds moisture, while granulated sugar helps create a nice crisp edge. Additionally, I recommend using unsalted butter for optimal flavor; if you’re looking to make them dairy-free, vegan butter is a fantastic alternative.
How should I store my chocolate chip cookies?
Wonderful question! Store your cookies in an airtight container at room temperature for up to 1 week. If you want to keep them fresh for longer, you can refrigerate them for up to 2 weeks, just ensure they are well-sealed to prevent them from drying out.
Can I freeze chocolate chip cookies, and if so, how?
Yes, you can! It’s super easy. Allow your baked cookies to cool completely, then place them in an airtight container or freezer bag, layering parchment paper between to avoid sticking. They can be frozen for up to 3 months. When you’re ready to enjoy, just leave them out at room temperature for a few hours to thaw, or pop them in the microwave for 10-15 seconds for that fresh-out-of-the-oven warmth.
What should I do if my cookies turn out too flat?
Don’t worry; it happens to the best of us! If your cookies spread too much, a common cause is warm dough. I highly recommend chilling your dough for at least 30 minutes before baking — this helps prevent excessive spreading. Also, check that your baking soda hasn’t expired; fresh leavening agents are key for cookies that rise perfectly!
Are there any dietary considerations I should keep in mind?
Very much so! If you have allergies, remember to check for gluten in your flour and avoid dairy if you are lactose intolerant. For a vegan option, simply substitute the egg with a flax egg (1 tbsp ground flaxseed + 2.5 tbsp water) for binding. Always feel free to make substitutions to fit your dietary needs, and share these cookies with your friends and family!
How do I know when my cookies are done baking?
Perfect question! Cookies are done when the edges start to turn golden brown, but remember, they should look slightly underbaked in the center. They will continue to cook as they cool on the baking sheet, achieving that ideal soft and chewy texture. Trust me; this little tip will make all the difference!

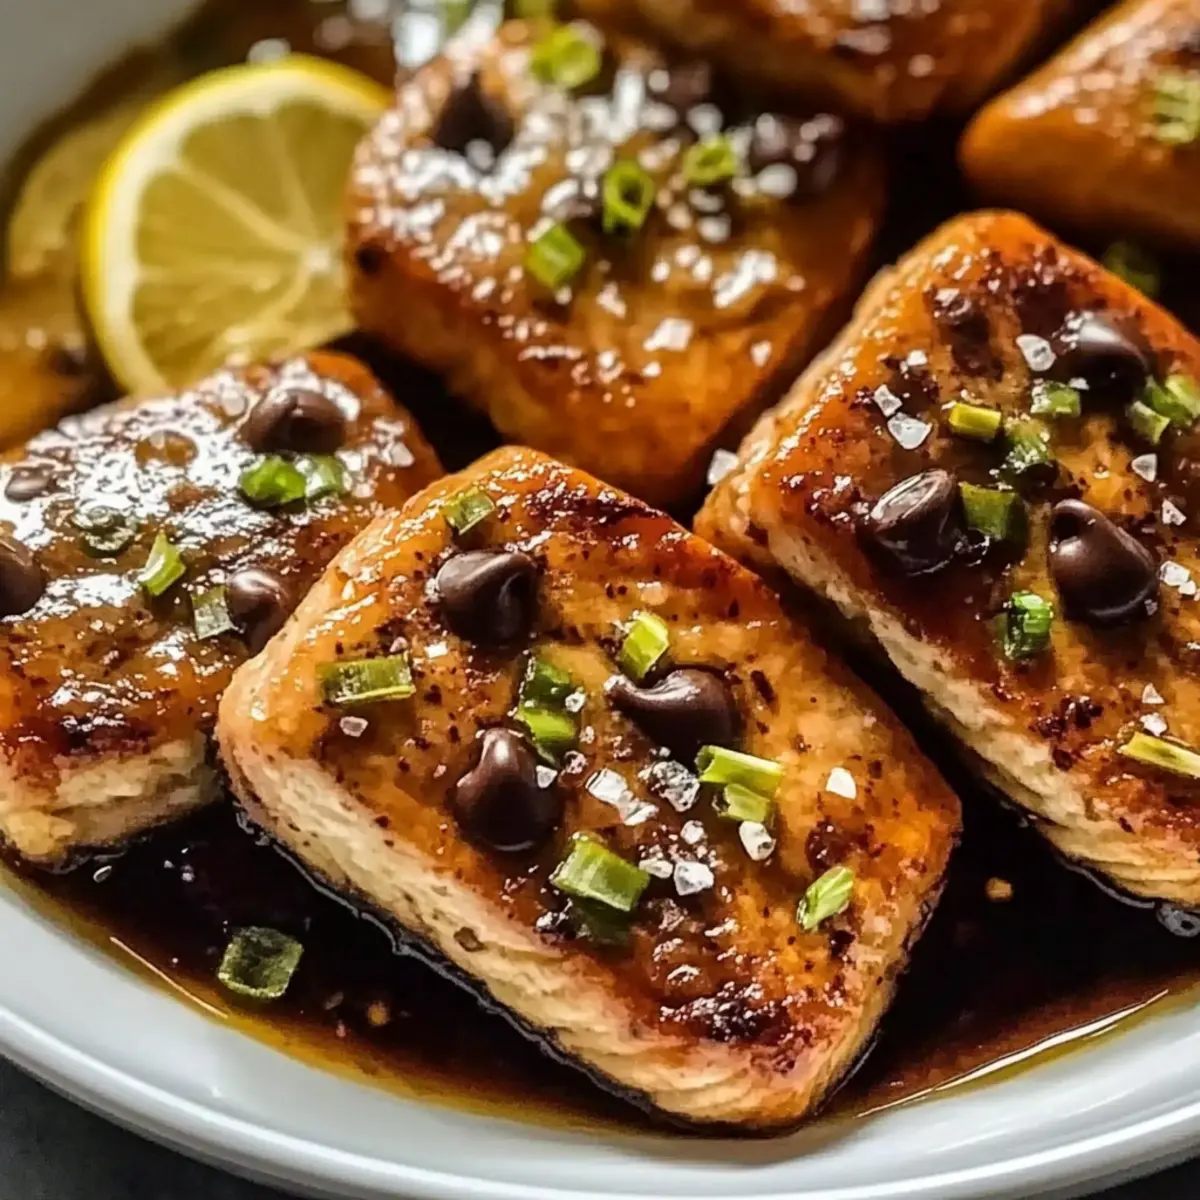
Baked Teriyaki Salmon: A Sweet & Savory Dinner Delight
Ingredients
Equipment
Method
- Preheat your oven to 400°F (200°C) and line a baking dish with parchment paper.
- In a mixing bowl, whisk together teriyaki sauce, minced garlic, and grated ginger.
- Place salmon fillets in a shallow dish and pour marinade over them, letting them marinate for 20-30 minutes.
- Arrange the marinated salmon fillets skin-side down onto the prepared baking sheet.
- Bake for 12-15 minutes until salmon flakes easily with a fork.
- Drizzle remaining marinade on top and garnish with green onions or sesame seeds before serving.
Leave a Reply