
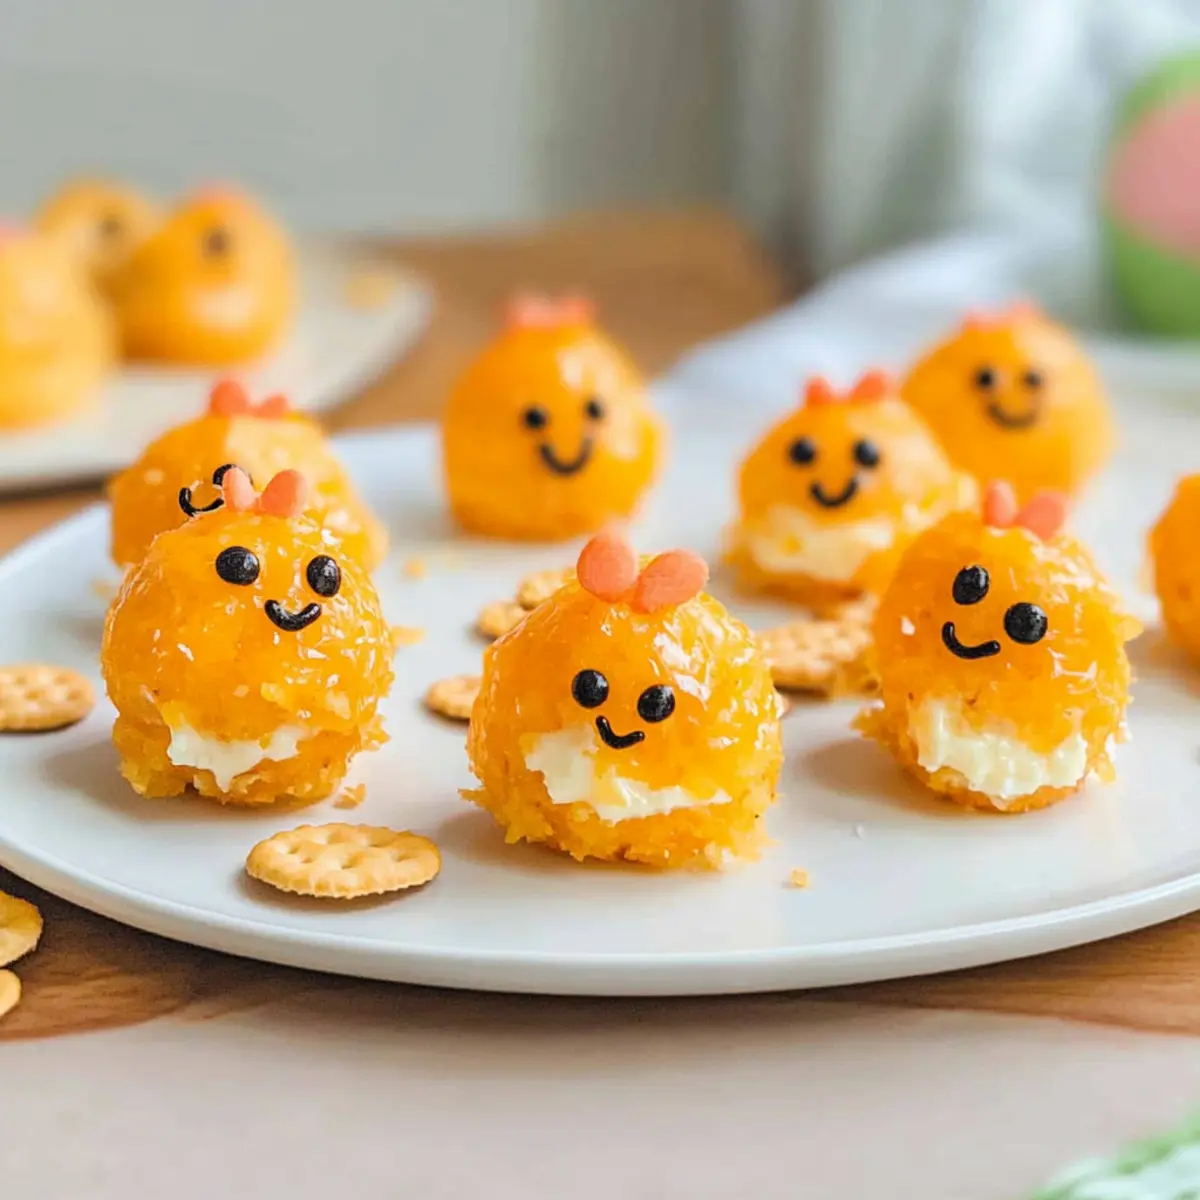
As I stood in the kitchen, the smell of melting cheese filled the air, and I couldn’t help but feel a wave of excitement. These Baby Chick Mini Cheese Balls are the perfect Easter appetizer that will have your guests smiling before they even take a bite. They blend creamy textures with a savory punch, and the best part? You can whip them up in just 20 minutes! Not only are they a crowd-pleaser for adults, but they’re also kid-friendly, customizable, and perfect for any gathering. Imagine the delight on your children’s faces when they spot these whimsical little chicks on the appetizer table. Ready to create a memorable, colorful snack that’s as fun to make as it is to eat? Let’s dive in!
Why You’ll Love Baby Chick Mini Cheese Balls
Adorable Presentation: The fun, chick-shaped design can bring a smile to anyone’s face, making them the perfect addition to your Easter spread.
Effortless Preparation: With only 20 minutes of prep time, you can easily whip these up, leaving more room for enjoying time with family and friends.
Kid-Friendly Fun: Children are sure to love both their taste and their playful appearance; they’ll be asking for seconds!
Customizable Options: Whether you prefer cheddar or want to try different cheeses, each bite can be tailored to your liking. Plus, a gluten-free serving option ensures everyone can enjoy them.
Great for Gatherings: Perfect for Easter brunch or any festive occasion, these mini cheese balls are sure to please a crowd, just like my Cinnamon Cottage Cheese or Salad Bacon Cheese recipes!
With their creamy texture and delightful flair, these cheese balls are a snack that brings joy to every celebration!
Baby Chick Mini Cheese Balls Ingredients
-
For the Cheese Mixture
• Cream Cheese – provides a creamy base for the cheese balls; make sure it’s softened for easy mixing.
• Shredded Cheddar Cheese – adds flavor and texture; sharp cheddar is great for a robust taste, but feel free to choose your favorite.
• Worcestershire Sauce – optional seasoning that gives a savory tang; omit for a milder flavor.
• Garlic Powder – enhances the overall flavor; fresh garlic can elevate it even further.
• Onion Powder – adds a complementary background flavor to the cheese. -
For Decoration
• Carrot – sliced into feet and beaks to create your little chicks; baby carrots work well for convenience.
• Black Peppercorns – serve as the adorable eyes of the chicks; use olives for a milder alternative. -
For Serving
• Crackers – provide a crispy base for the cheese balls; gluten-free options like cucumber slices are perfect for a lighter touch.
These Baby Chick Mini Cheese Balls are sure to bring joy to your Easter gatherings!
Step‑by‑Step Instructions for Baby Chick Mini Cheese Balls
Step 1: Mix the Cheese Base
In a large bowl, beat 8 ounces of softened cream cheese using an electric mixer until it’s smooth and creamy, which should take about 2 minutes. Then, incorporate 1½ cups of shredded cheddar cheese, 1 teaspoon of garlic powder, 1 teaspoon of onion powder, and 1 tablespoon of Worcestershire sauce. Mix until all ingredients are evenly combined, creating a deliciously creamy base for your Baby Chick Mini Cheese Balls.
Step 2: Shape the Cheese Balls
Using a 1-inch cookie scoop, portion out the cheese mixture and roll each scoop into a ball between your palms. Aim for a smooth surface, and make about 20 small balls in total. This step should take around 5-7 minutes. Once formed, place them on a parchment-lined baking sheet. The cheese balls should feel firm yet malleable, ready for their tasty coating.
Step 3: Roll in Shredded Cheese
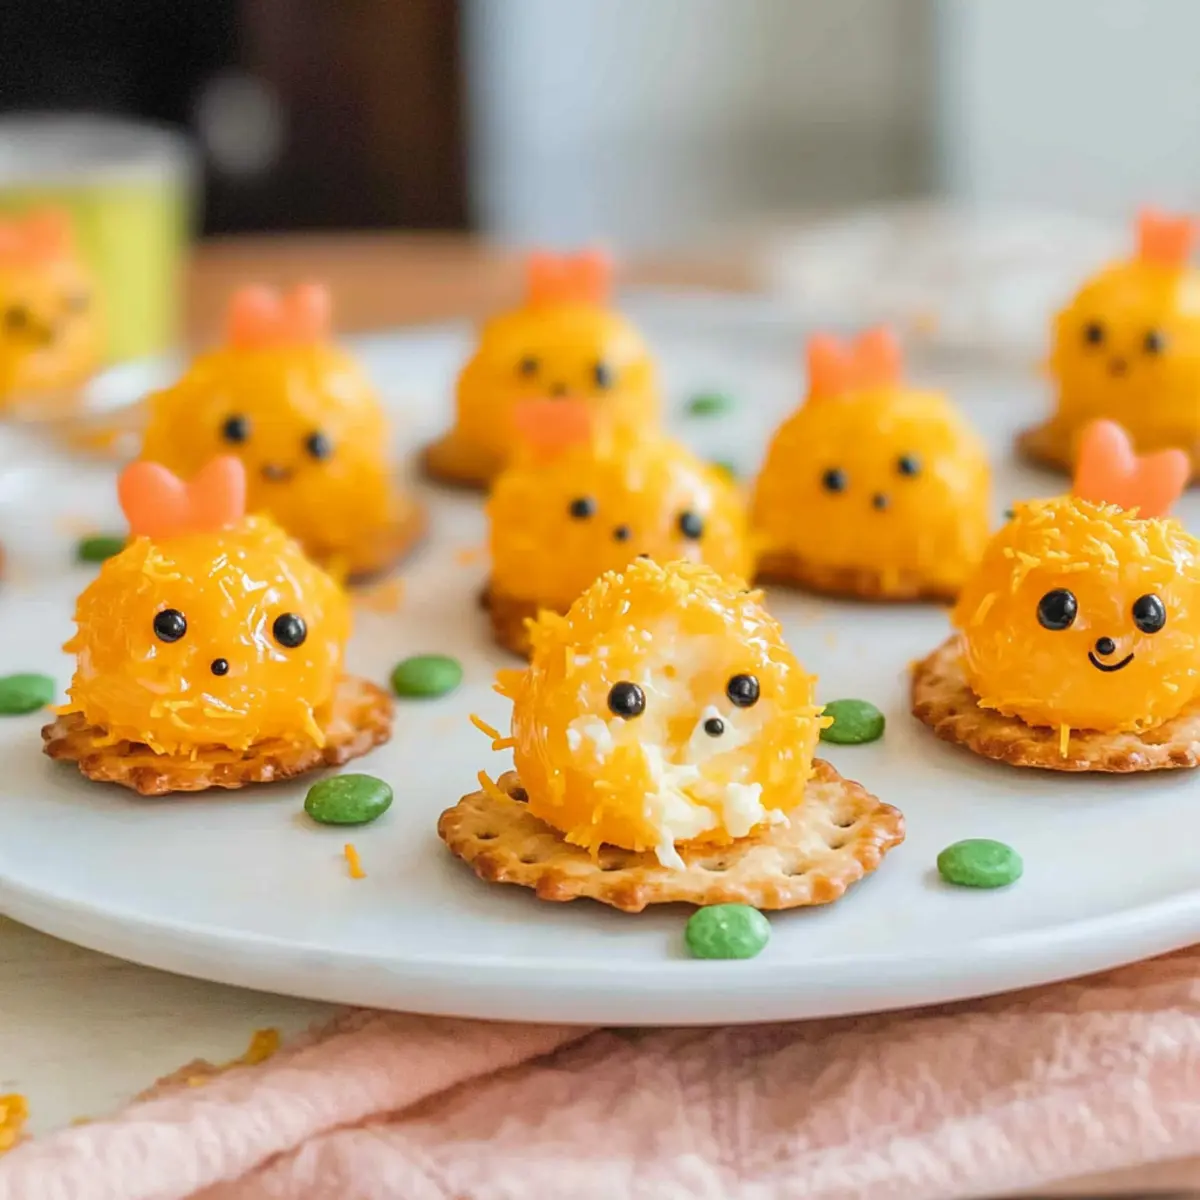
Take the remaining shredded cheddar cheese and pour it onto a plate. Roll each cheese ball in the shredded cheese until fully coated. This adds a delightful texture and flavor. This process will take approximately 5 minutes. Once coated, return the cheese balls gently to the baking sheet, ensuring they maintain their round shape as you work.
Step 4: Prepare the Carrot Decorations
While the cheese balls are resting, slice a carrot into thin rounds to create “feet” for your little chicks. You’ll need two slices per cheese ball, plus some smaller quartered pieces for their beaks. This step should take about 5 minutes. Set aside the carrot pieces ready for assembly, as they will bring your Baby Chick Mini Cheese Balls to life.
Step 5: Assemble the Chick Faces
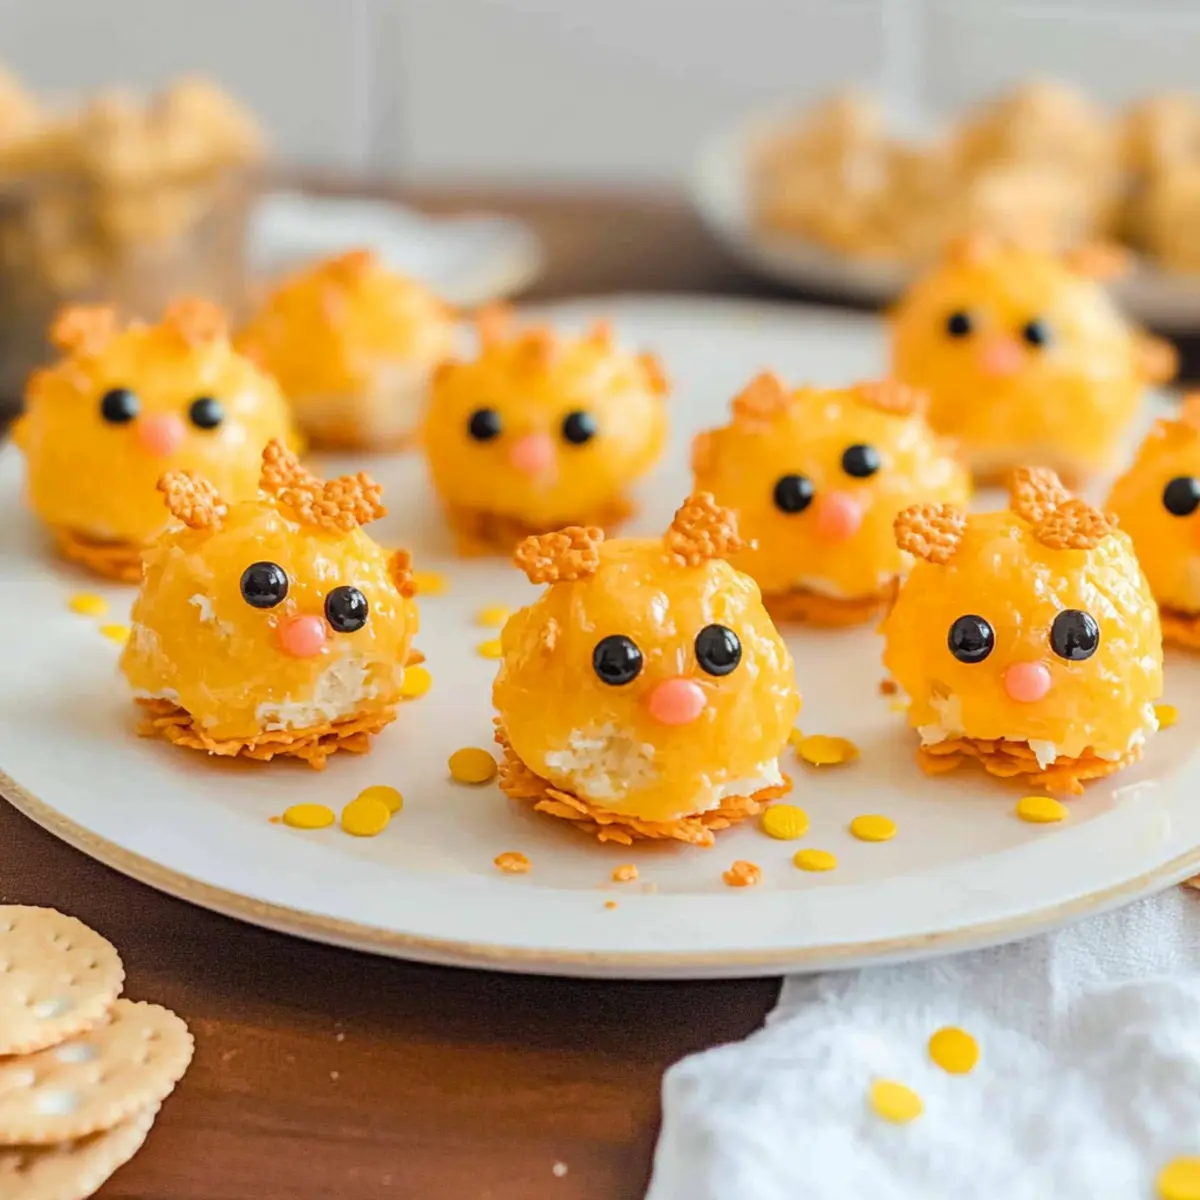
Now it’s time to give your Baby Chick Mini Cheese Balls some personality! Insert two black peppercorns, or olive pieces if preferred, into each cheese ball for the eyes. Position two carrot slices at the base of each ball for the adorable feet and use a quarter slice for the beak. This assembly process will take approximately 10 minutes, transforming your cheese balls into cute little chicks ready to wow guests.
Step 6: Serve or Refrigerate
Serve the assembled Baby Chick Mini Cheese Balls immediately on a platter lined with your favorite crackers, or refrigerate them until serving. If storing, cover the tray with plastic wrap to keep them fresh and prevent the crackers from getting soggy. These delightful treats can be made in advance and are best enjoyed within a few hours to maintain their crispiness. Enjoy sharing this whimsical snack with friends and family!
What to Serve with Baby Chick Mini Cheese Balls
Looking to create a delightful spread that complements your whimsical cheese balls while tantalizing your taste buds?
-
Fresh Veggie Platter: Crisp and colorful veggies like carrots and cherry tomatoes add a bright, refreshing crunch that contrasts beautifully with the creamy cheese balls.
-
Pimento Cheese Sandwiches: These savory bites bring tangy flavors that pair well, creating a delightful mix with the creaminess of the cheese balls. The combination is sure to please both kids and adults.
-
Fruit Skewers: Fresh fruit like strawberries and melon creates a sweet contrast that balances the savory cheese nicely. Their vibrant colors will make your table truly inviting.
-
Savory Crackers: Serve with a variety of textured crackers to complement the Baby Chick Mini Cheese Balls. The added crunch enhances every delightful bite.
-
Mimosas or Sparkling Lemonade: A refreshing drink like sparkling lemonade or a classic mimosa can elevate your gathering, offering a bubbly, cheerful touch that pairs wonderfully with the cheese snack.
-
Mini Quiches: These bite-sized savory pastries are perfect for a festive spread. Their fluffy texture provides a delightful contrast to the creamy cheese balls, making them a savory hit.
-
Chocolate-Covered Strawberries: End your appetizer course with a sweet note. These delightful treats bring a luscious finish perfect for rounding off your festive Easter celebration.
Baby Chick Mini Cheese Balls Variations
Feel free to let your creative side shine as you customize these delightful cheese balls to your taste!
-
Cheese Swap: Try using Swiss or pepper jack cheese for a unique twist in flavor. Each variation brings a new dimension, keeping your Easter spread exciting!
-
Spicy Kick: Mix in a pinch of red pepper flakes or cayenne for added heat. This subtle change turns a mild appetizer into a zesty delight that adults will love.
-
Herb Infusion: Add fresh or dried herbs—like dill, parsley, or chives—for an herby flavor enhancement. Trust me, this will elevate your cheese balls to a whole new level of deliciousness!
-
Nutty Texture: Roll the cheese balls in crushed nuts or panko breadcrumbs instead of just cheese for a satisfying crunch. The contrast in texture will be a pleasant surprise for your guests!
-
Gluten-Free Delight: Serve the cheese balls on cucumber slices instead of crackers for a refreshing, gluten-free option. This not only adds a pop of color but also offers a light and crunchy bite!
-
Kid-Favorite Versions: Use grape tomatoes or olives for the eyes instead of peppercorns. This makes them safer for little ones while keeping the fun intact!
-
Citrus Zest: Add a touch of lemon or lime zest to the cheese mixture for a bright and zesty flavor profile. The citrusy note pairs beautifully with the creaminess of the cheese.
-
Garnish Finishes: Top the cheese balls with sliced olives, cherry tomatoes, or even edible flowers. Not only will they look prettier, but they’ll also add delightful finishing touches that impress your guests!
Imagine how these variations will enhance the delightful whimsy of your Easter gathering, just like my Italian Herbs Cheese adds a burst of flavor to any table!
Make Ahead Options
These Baby Chick Mini Cheese Balls are perfect for meal prep and can save you valuable time on the day of your gathering! You can prepare the cheese mixture and shape the balls up to 24 hours in advance, storing them covered in the refrigerator. Alternatively, you can roll the cheese balls in shredded cheese ahead of time as well; just keep them in an airtight container to maintain their freshness. However, to prevent the crackers from getting soggy, assemble the mini cheese balls on the crackers just before serving. With these prep steps, you’ll have a delightful appetizer ready to impress your guests with minimal effort!
How to Store and Freeze Baby Chick Mini Cheese Balls
Fridge: Store assembled Baby Chick Mini Cheese Balls in an airtight container in the refrigerator for up to 2 days. This keeps them fresh and flavorful for your gathering!
Make-Ahead: You can prepare the cheese mixture and form the balls ahead of time. Store unassembled cheese balls covered with plastic wrap in the fridge for up to 2 days, assembling just before serving to maintain cracker crispness.
Freezer: For longer storage, freeze unassembled Baby Chick Mini Cheese Balls on a baking sheet, then transfer them to an airtight container or freezer bag. They keep well for up to a month!
Reheating: If you plan to serve them warm, thaw in the refrigerator overnight and let them sit at room temperature for 20 minutes before serving to enjoy a deliciously creamy texture.
Expert Tips for Baby Chick Mini Cheese Balls
-
Chill First: If your cheese mixture starts becoming too warm and sticky, chill it for 30 minutes before shaping the Baby Chick Mini Cheese Balls for easier handling.
-
Cheese Substitution: Experiment with different types of cheese, such as pepper jack for heat or cream cheese and herb blends for extra flavor, to customize your cheese balls.
-
Nutty Crunch: For a delightful twist, roll your cheese balls in chopped nuts or panko breadcrumbs instead of just cheese to add a satisfying crunch.
-
Child-Friendly Faces: If serving kids, swap out peppercorns for softer black olives for the eyes to avoid any choking hazard while keeping it fun!
-
Quick Assembly: Prepare the carrot decorations ahead of time to save on assembly time and ensure your Baby Chick Mini Cheese Balls are ready for guests as soon as they arrive.
-
Keep Crackers Crisp: To maintain the crunch of your crackers, serve the cheese balls on a separate platter and allow guests to assemble their bites.
Baby Chick Mini Cheese Balls Recipe FAQs
What type of cheese should I use for Baby Chick Mini Cheese Balls?
Absolutely! I recommend using full-fat cream cheese for a rich and creamy base, while sharp cheddar cheese adds a robust flavor. You can also experiment with different cheeses like Swiss, pepper jack, or even a Mexican blend for varied tastes that suit your family’s preferences.
How should I store Baby Chick Mini Cheese Balls?
To keep your Baby Chick Mini Cheese Balls fresh, store them in an airtight container in the refrigerator for up to 2 days. If you have leftover cheese balls, simply cover them with plastic wrap and keep them unassembled until you’re ready to serve, which helps maintain the crispiness of the crackers.
Can I freeze Baby Chick Mini Cheese Balls?
Very! For freezing, shape your cheese balls and place them on a baking sheet to freeze them individually for about 1-2 hours. Once solid, transfer them to an airtight container or freezer bag, where they can last for up to 3 months. Just remember to thaw them overnight in the refrigerator before serving!
What if my cheese mixture is too warm to shape?
Oh, no worries! If the mixture becomes too warm and sticky, pop it in the refrigerator for about 30 minutes. This will firm it up enough to handle easily, ensuring you can roll out perfectly shaped cheese balls without any hassle.
Are Baby Chick Mini Cheese Balls safe for kids?
Yes, indeed! These cheese balls are kid-friendly, but if you’re concerned about choking hazards, you can replace the black peppercorns used for eyes with softer black olive pieces. This way, you can ensure everyone enjoys these cute little treats safely!
Can I make Baby Chick Mini Cheese Balls ahead of time?
Absolutely! You can prepare the cheese mixture and form the cheese balls in advance. Store them unassembled in the refrigerator for up to 2 days. Just assemble them just before serving to keep the crackers from getting soggy, and enjoy the smiles at your gathering!

Baby Chick Mini Cheese Balls for a Fun Easter Snack
Ingredients
Equipment
Method
- In a large bowl, beat 8 ounces of softened cream cheese until smooth. Incorporate 1½ cups of shredded cheddar cheese, 1 teaspoon of garlic powder, 1 teaspoon of onion powder, and 1 tablespoon of Worcestershire sauce until combined.
- Using a 1-inch cookie scoop, portion the cheese mixture and roll each into a ball, makes about 20 balls. Place them on a parchment-lined baking sheet.
- Roll each cheese ball in the remaining shredded cheese until fully coated.
- Slice a carrot into thin rounds to create 'feet' for each cheese ball, plus smaller quartered pieces for their beaks.
- Insert two black peppercorns into each cheese ball for eyes. Position two carrot slices at the base for feet and use a quarter slice for the beak.
- Serve the assembled cheese balls on a platter lined with crackers or refrigerate until serving.
Leave a Reply