
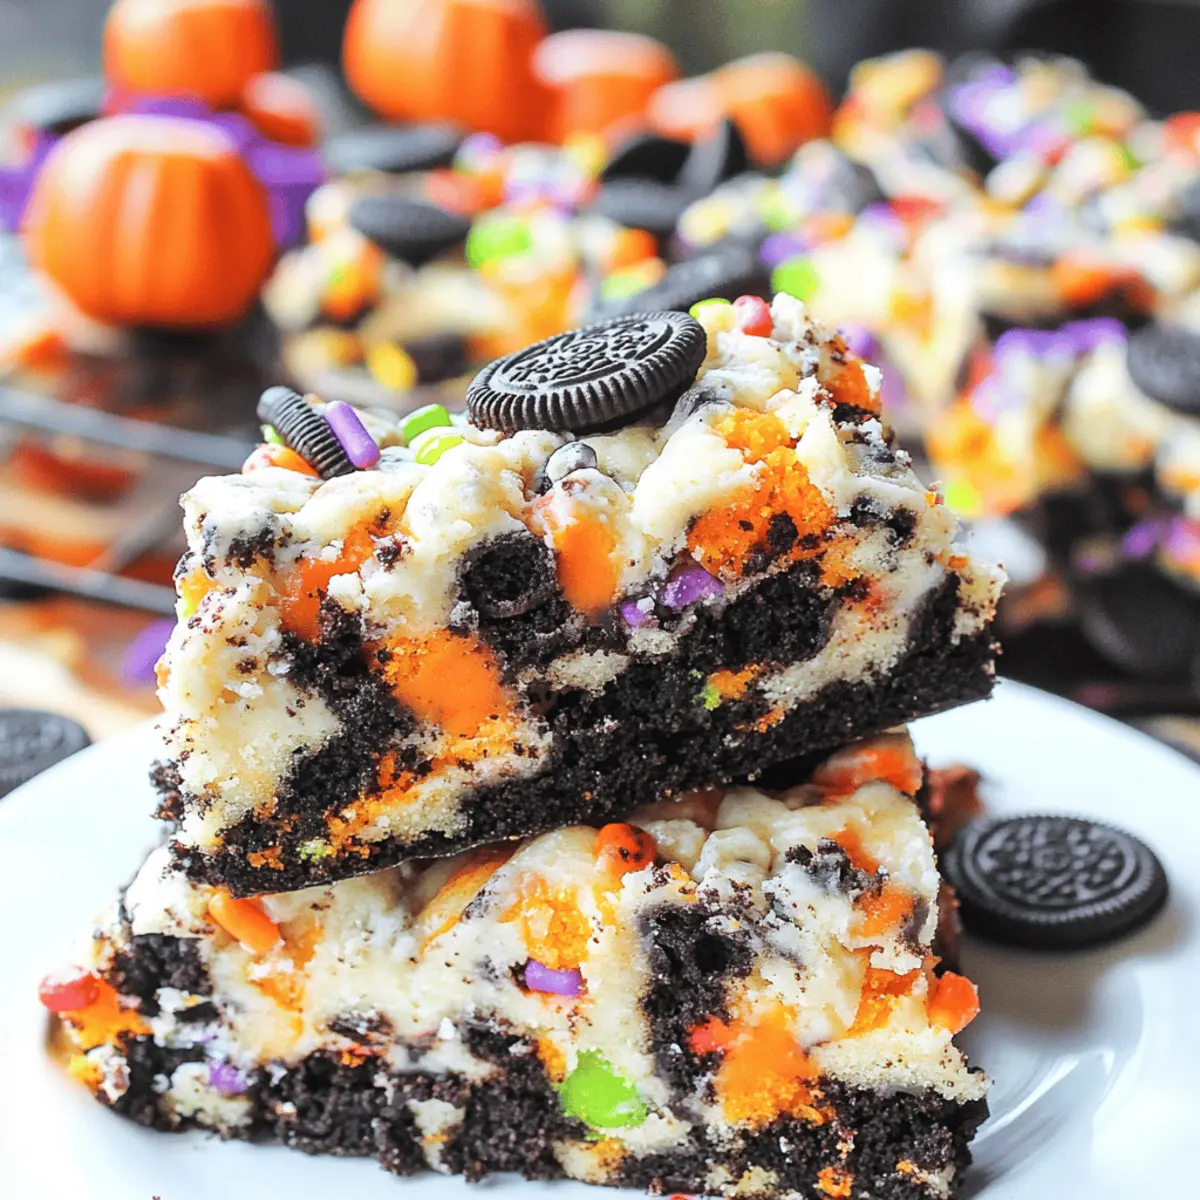
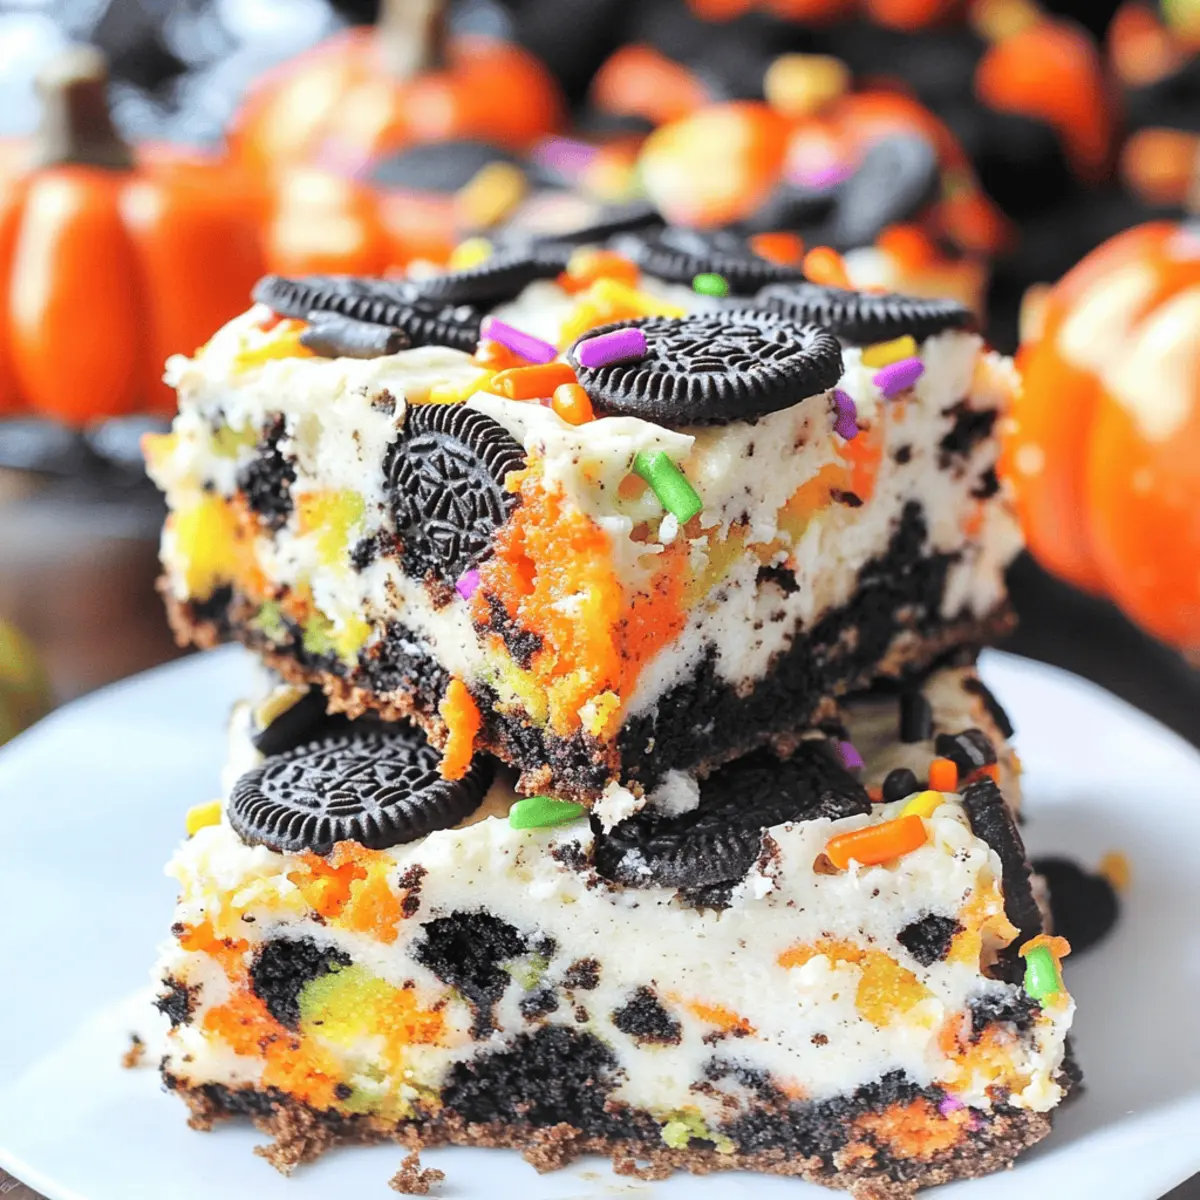
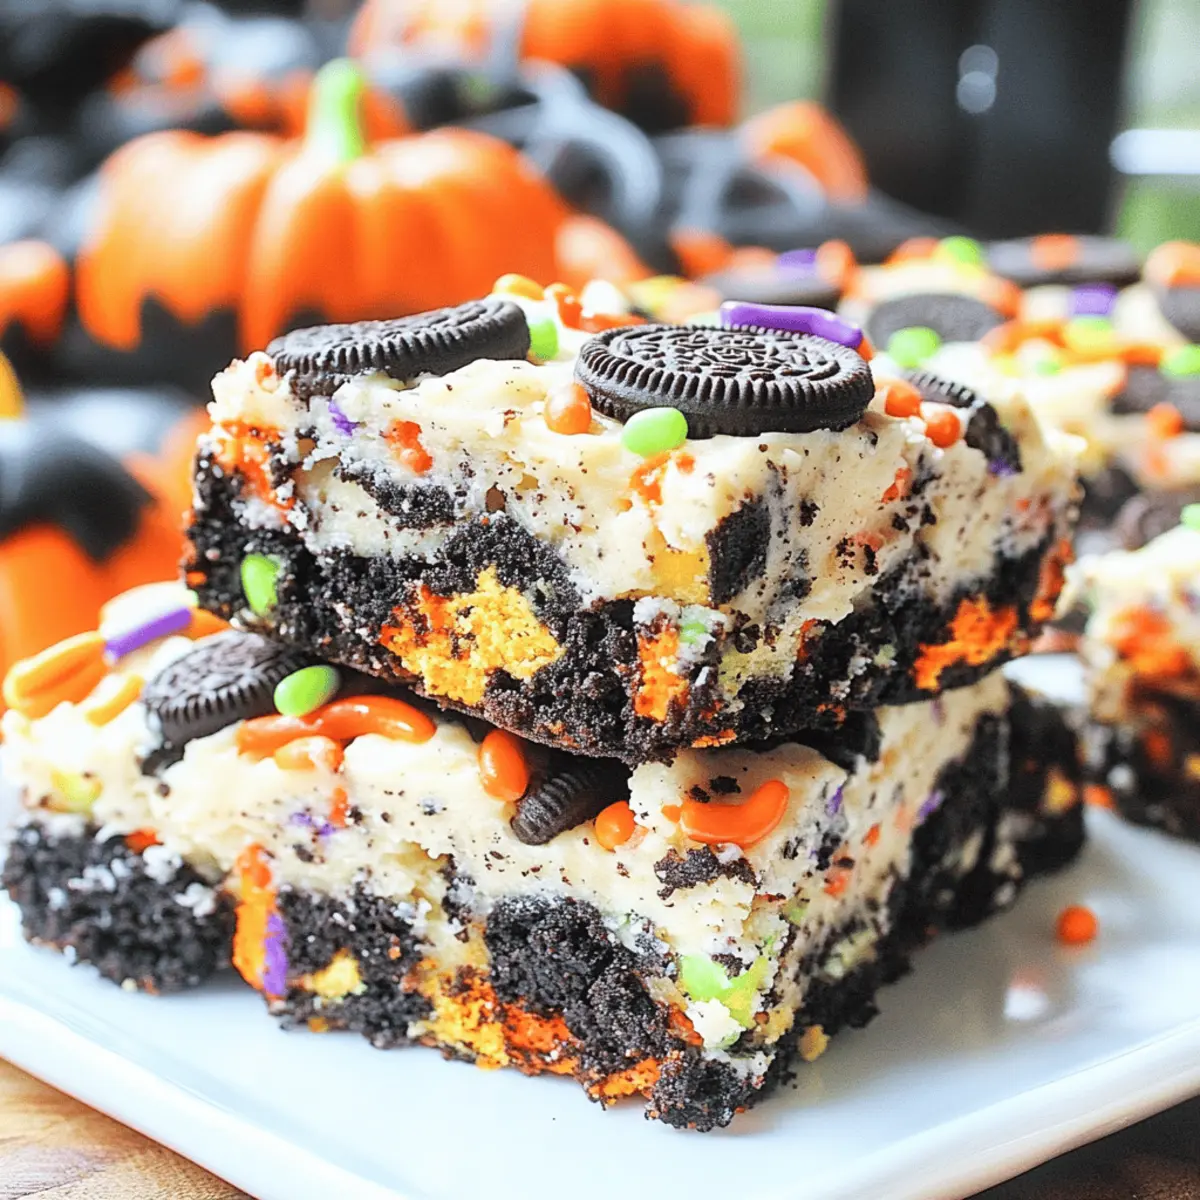
A sprinkle-covered cauldron of excitement awaits as Halloween approaches! These Easy Halloween Oreo Cake Bars are the ultimate festive treat, combining two beloved flavors: rich chocolate cake and crunchy Oreo bits. Perfect for busy schedules, this recipe promises a quick and delightful bake that even novice chefs can master. With minimal effort, you’ll conjure up a whimsical dessert that effortlessly dazzles at any Halloween gathering. Imagine the delight on faces young and old as they bite into these chewy, cookie-studded bars—especially with the colorful sprinkles that add a playful touch for the season. Curious about how to craft these spooktacular treats? Let’s dive into this easy recipe, and you’ll be the star of the Halloween dessert table!
Why Are These Cake Bars So Irresistible?
Convenient and Quick: With minimal prep and bake time, these Easy Halloween Oreo Cake Bars are perfect for busy schedules or last-minute gatherings.
Flavor Fusion: The combination of rich chocolate cake and crunchy Oreos creates a deliciously addictive bite that every dessert lover will appreciate.
Customizable: Easily swap in regular Oreos or add your favorite candy for a unique twist, making these bars versatile for any party theme.
Festive Touch: Vibrant sprinkles add that playful Halloween flair, making your dessert a visual delight that’s sure to impress both kids and adults.
Pair these delightful bars with whipped cream, or explore other festive treats like our Cinnamon Apple Cake for a complete dessert spread!
Easy Halloween Oreo Cake Bars Ingredients
For the Cake
- Halloween Oreos – These provide a rich chocolate flavor and a whimsical look; regular Oreos can be used if needed.
- Cake Mix – The foundation of the bars; choose any flavor to match your festive vibes.
- Milk – Adds moisture to the cake mix; almond milk serves as a great dairy-free substitute.
- Vegetable Oil – Ensures the bars remain moist; consider using coconut oil for a fun twist.
- Eggs – These bind the ingredients together for the perfect texture; flax eggs can replace them for a vegan option.
For the Topping
- Halloween Sprinkles – These add a pop of color and festive charm; you can swap them for any sprinkles you prefer.
- Chopped Halloween Oreos – A final crumbly layer for added crunch and fun!
Step‑by‑Step Instructions for Easy Halloween Oreo Cake Bars
Step 1: Prepare the Pan
Begin by lining a 13 x 9-inch baking pan with parchment paper, allowing for easy removal later. Ensure the paper hangs slightly over the edges for easy lifting. Preheat your oven to 350°F (175°C) during this step so it’s ready to go once your batter is mixed and you’re set to bake the Easy Halloween Oreo Cake Bars.
Step 2: Make the Cake Batter
In a large mixing bowl, combine your cake mix, milk, vegetable oil, and eggs. Use an electric mixer on medium speed for about 2 minutes, or until the mixture is smooth and well-blended. Look for a thick, luscious batter that clings slightly to the beaters, making it ready for the next flavorful additions.
Step 3: Add Sprinkles
Once your batter is smooth, gently fold in a generous portion of Halloween sprinkles. Use a spatula to combine thoroughly without overmixing, which can toughen the batter. The vibrant colors of the sprinkles will add a fun visual element to your Easy Halloween Oreo Cake Bars, making them festive and exciting.
Step 4: Layer Oreos
Carefully chop half of your Halloween Oreos and spread them evenly across the bottom of the prepared baking pan. This first layer will add a delightful crunch hidden within the soft cake. Ensure they’re evenly distributed so every bite of the Easy Halloween Oreo Cake Bars has that irresistible cookie goodness.
Step 5: Add Batter
Next, dollop the thick cake batter over the Oreos. Use a spatula to smooth it out evenly, ensuring the batter covers the Oreos completely. The batter should be thick and spreadable, creating a tempting layer that bakes to perfection and seals in those cookie morsels.
Step 6: Top and Bake
Sprinkle the remaining Halloween Oreos and a pinch more of the colorful sprinkles on top of the batter. Press them down lightly for an added crunch. Bake in your preheated oven for 20-25 minutes. Look for a golden edge, and a toothpick inserted in the center should come out clean to confirm they’re done.
Step 7: Cool and Slice
After baking, remove the pan from the oven and allow the bars to cool completely in the pan on a wire rack. This may take about 30 minutes. Once cool, lift them out using the parchment paper and slice them into delightful squares. Your Easy Halloween Oreo Cake Bars are now ready to be enjoyed!
Easy Halloween Oreo Cake Bars Variations
Feel free to let your creative spirit run wild in the kitchen! With these variations, you can craft a uniquely festive treat perfect for your Halloween gatherings.
-
Dairy-Free: Substitute regular milk with almond or coconut milk to make these bars accessible for lactose-intolerant friends. Everyone deserves a spooky treat!
-
Regular Oreos: Swap Halloween Oreos for classic ones for a less festive but equally delicious version. This allows you to enjoy these bars all year round!
-
Sprinkle Explosion: Add a variety of colorful sprinkles or themed candy to the top for an extra festive touch. A bit of candy corn or gummy worms can bring your dessert to life!
-
Add Chocolate Chips: Mix in a handful of semi-sweet or white chocolate chips for creaminess. This adds an extra layer of indulgence that chocolate lovers will adore.
-
Nutty Delight: Incorporate chopped nuts like pecans or walnuts for a crunchy texture contrast. The nuttiness pairs beautifully with chocolate!
-
Seasonal Cookie Swap: Try using gingerbread cookies instead of Oreos for a holiday twist. Imagine the warm spices mingling beautifully with chocolate—what a treat!
-
Spicy Kick: For those who enjoy a little heat, add a pinch of cayenne pepper to the batter. It won’t overwhelm the flavor but will offer a delightful surprise in every bite.
-
Ice Cream Sandwiches: Slice the cake bars in half and sandwich them with scoops of your favorite ice cream for a delicious twist. Perfect for a Halloween party dessert spread!
As you try out these variations, consider pairing your bars with a scoop of vanilla ice cream or serving them alongside our delightful Oatmeal Crumble Bars for a scrumptious dessert table. Enjoy experimenting!
How to Store and Freeze Easy Halloween Oreo Cake Bars
Room Temperature: Store the bars in an airtight container at room temperature for up to 5 days for the best taste and texture.
Fridge: If you prefer longer freshness, refrigerate the Easy Halloween Oreo Cake Bars for up to a week. Just make sure they are sealed well to prevent dryness.
Freezer: For longer storage, freeze the bars in an airtight container or wrapped tightly in plastic wrap for up to 3 months. Thaw in the fridge overnight before enjoying.
Reheating: If desired, reheat individual bars in the microwave for 10-15 seconds for a warm, gooey treat!
Expert Tips for Easy Halloween Oreo Cake Bars
-
Measure Carefully: Always measure your ingredients accurately to ensure the right texture. Too much cake mix can lead to dry bars.
-
Don’t Overmix: Mix until just combined to maintain a moist and tender texture. Overmixing can toughen the cake batter for your Easy Halloween Oreo Cake Bars.
-
Spray for Easy Spreading: Use nonstick spray on your spatula when spreading the thick batter for smoother application and less sticking.
-
Cool Before Slicing: Allow the bars to cool completely in the pan to set up evenly, making slicing easier and preventing crumbling.
-
Store Properly: Keep your bars in an airtight container at room temperature for up to a week, ensuring they stay fresh and delicious.
Make Ahead Options
These Easy Halloween Oreo Cake Bars are perfect for meal prep enthusiasts! You can prepare the cake mixture up to 24 hours in advance and store it in the refrigerator to save time on busy Halloween days. Simply mix the cake batter and fold in the sprinkles, then cover it tightly with plastic wrap. You can also layer half of the chopped Halloween Oreos in the pan ahead of time. When you’re ready to bake, just add the remaining Oreos and pour the batter over the top, ensuring a lovely crunch. This way, you’ll have a festive dessert ready with minimal effort, just as delicious as if made fresh!
What to Serve with Easy Halloween Oreo Cake Bars
These delightful bars are the ultimate centerpiece for your festive gatherings, sure to leave your guests craving more!
-
Whipped Cream: A dollop of fluffy whipped cream adds a creamy contrast, enhancing the dessert’s moisture and flavor.
-
Vanilla Ice Cream: The perfect cool companion, vanilla ice cream melts beautifully on warm cake bars, creating a decadent treat.
-
Caramel Sauce: Drizzling warm caramel over the bars adds a luscious sweetness that perfectly complements the chocolate and cookie flavors.
-
Spooky Fruit Salad: A medley of seasonal fruits, like oranges and apples, provides a refreshing contrast, balancing the rich cake bars beautifully.
-
Pumpkin Spice Latte: Pair this festive treat with a warm pumpkin spice latte for a cozy touch that captures the essence of the season.
-
Chocolate Milkshake: A thick and creamy milkshake echoes the cookie flavors, making every bite a nostalgic experience reminiscent of childhood treats.
-
Creepy Cupcakes: Balance sweetness with themed cupcakes, such as rich chocolate with eerie decorations, to create an exciting dessert table that thrills the senses.
Easy Halloween Oreo Cake Bars Recipe FAQs
How do I choose the right Oreos?
For the best flavor and visual appeal, I recommend using Halloween-themed Oreos, which have festive designs and a delightful chocolate taste. If you can’t find them, regular Oreos work wonderfully too; just be sure to chop them into bite-sized pieces for even distribution throughout the bars.
How should I store the Easy Halloween Oreo Cake Bars?
You can store these bars at room temperature in an airtight container for up to 5 days. If you prefer longer freshness, place them in the refrigerator for up to a week. Just ensure they are sealed well to prevent any dryness!
Can I freeze Easy Halloween Oreo Cake Bars?
Absolutely! To freeze, wrap the cooled bars tightly in plastic wrap or place them in an airtight container. They can be frozen for up to 3 months. When you’re ready to enjoy, simply thaw them in the fridge overnight. For a warm treat, pop them in the microwave for 10-15 seconds!
What should I do if my cake batter is too thick?
If your batter is thicker than expected, don’t worry! Just add a tablespoon of milk at a time while mixing until you reach a smooth consistency. Remember, a thicker batter helps hold the Oreos in place, so not too much liquid is needed!
Are there any dietary adjustments I can make?
Definitely! For a dairy-free version, substitute regular milk with almond or oat milk. You can also replace the eggs with flax eggs (1 tablespoon of ground flaxseed mixed with 2.5 tablespoons of water equals one egg) for a vegan option. Additionally, a gluten-free cake mix can be used if dietary restrictions are needed.
How long do the bars take to cool?
After baking, let the Easy Halloween Oreo Cake Bars cool completely in the pan on a wire rack for about 30 minutes. This cooling time is essential to help them set properly, making them easier to slice without crumbling apart.

Fun and Festive Easy Halloween Oreo Cake Bars Recipe
Ingredients
Equipment
Method
- Prepare the pan by lining a 13 x 9-inch baking pan with parchment paper and preheat your oven to 350°F (175°C).
- In a large mixing bowl, combine your cake mix, milk, vegetable oil, and eggs. Mix until smooth using an electric mixer for about 2 minutes.
- Gently fold in a generous portion of Halloween sprinkles into your batter.
- Carefully chop half of your Halloween Oreos and spread them across the bottom of the prepared baking pan.
- Dollop the thick cake batter over the Oreos and smooth it out evenly.
- Sprinkle the remaining Halloween Oreos and a pinch more of the colorful sprinkles on top. Press lightly and bake for 20-25 minutes.
- Cool completely in the pan for about 30 minutes before lifting out and slicing into bars.
Leave a Reply