
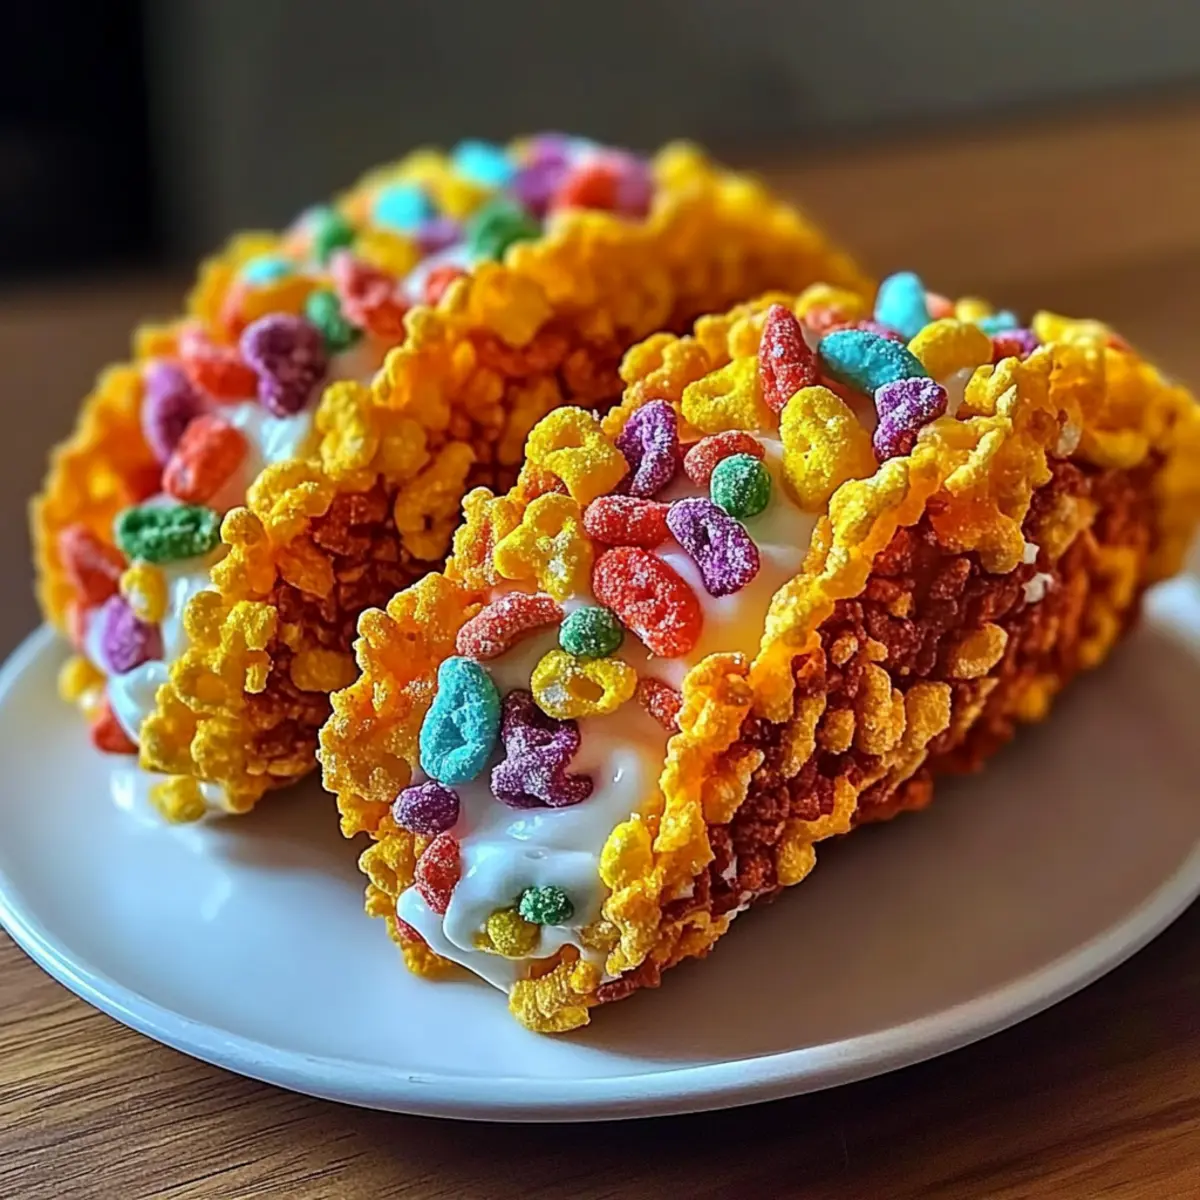
“Have you ever found yourself staring at a box of cereal, wishing it could magically transform into something extraordinary? Well, let me introduce you to the delightful world of Fruity Pebbles Cheesecake Tacos! This fun dessert combines the nostalgic crunch of Fruity Pebbles with a silky cheesecake filling, all wrapped up in a playful taco shape. With its vibrant colors, these tacos are not just a treat for the taste buds but also a feast for the eyes, making them perfect for parties or a cozy family gathering. Plus, they’re incredibly easy to whip up, allowing you to impress your guests without spending hours in the kitchen. Are you ready to dive into this creative twist on dessert? Let’s bring some joyful crunch to your table!”
Why Make Fruity Pebbles Tacos?
Unique and Fun: These Fruity Pebbles Cheesecake Tacos are a playful blend of textures and tastes, perfect for brightening up any gathering.
Colorful Appeal: With their vibrant colors, they are sure to catch everyone’s eye and spark joy at parties or family meals.
Quick and Easy: No advanced baking skills needed—this recipe is perfect for anyone who wants to whip up something delightful without fuss.
Versatile Toppings: Feel free to customize your tacos with your favorite toppings, much like our delicious Apple Snickerdoodles, to cater to every palate.
Perfect for Sharing: These crowd-pleasing tacos are ideal for creating a fun dessert table everyone will enjoy!
Fruity Pebbles Cheesecake Tacos Ingredients
For the Taco Shells
- Fruity Pebbles Cereal – provides a colorful and crunchy taco shell essential for our Fruity Pebbles Cheesecake Tacos.
- Mini Marshmallows – when melted, they create a sticky mixture to bind the cereal together.
- Unsalted Butter – adds richness and assists in melting the marshmallows for a smooth base.
For the Cheesecake Filling
- Cream Cheese – forms the creamy base of the cheesecake, offering rich flavor and texture.
- Powdered Sugar – sweetens the cheesecake filling and balances the tangy cream cheese.
- Vanilla Extract – enhances the flavor profile of the cheesecake filling for added depth.
- Heavy Whipping Cream – whipped to stiff peaks, it lightens the filling and gives it a fluffy texture.
Optional Toppings
- Fresh Fruit – adding fresh fruit offers a delightful burst of flavor and color.
- Chocolate Sauce – drizzling chocolate sauce creates a decadent touch.
- Additional Fruity Pebbles – sprinkle more on top for extra crunch and vibrant color!
Step‑by‑Step Instructions for Fruity Pebbles Cheesecake Tacos
Step 1: Melt Butter and Marshmallows
In a medium saucepan over low heat, melt 3 tablespoons of unsalted butter. Once the butter is melted, add 4 cups of mini marshmallows, stirring constantly until they are completely smooth and glossy, about 5 minutes. This mixture will become the sticky base for your Fruity Pebbles Cheesecake Tacos.
Step 2: Combine with Cereal
Remove the saucepan from heat and quickly fold in 6 cups of Fruity Pebbles cereal. Ensure every piece is evenly coated with the marshmallow mixture, which should appear shiny and sticky. Remember to work swiftly to prevent the mixture from setting too soon, making it harder to shape.
Step 3: Form Taco Shells
Using a greased rolling pin or taco mold, scoop portions of the mixture onto a parchment-lined baking sheet. Shape each scoop into a taco shell, pressing gently for a curved form. Allow the cereal taco shells to cool for about 15 minutes at room temperature until they are set and firm enough to hold their shape.
Step 4: Prepare Cheesecake Filling
In a mixing bowl, beat 8 ounces of softened cream cheese using an electric mixer on medium speed until smooth and creamy, approximately 2 minutes. Gradually add in 1 cup of powdered sugar and 1 teaspoon of vanilla extract, mixing until fully combined and fluffy, ensuring no lumps remain in your creamy filling.
Step 5: Whip Cream
In a separate bowl, whip 1 cup of heavy whipping cream using an electric mixer on high speed until stiff peaks form, which usually takes about 3-5 minutes. Be careful not to over-whip; the cream should hold its shape but remain light and airy, perfect for folding into your cheesecake filling.
Step 6: Fill Taco Shells
Gently fold the whipped cream into the cream cheese mixture until evenly combined, taking care not to deflate the whipped cream. Once mixed, spoon or pipe the luscious cheesecake filling into each cooled Fruity Pebbles taco shell, generously filling them, and creating a delightful surprise for each bite.
Step 7: Chill
Place the filled Fruity Pebbles Cheesecake Tacos in the refrigerator for at least 30 minutes. This chilling time allows the cheesecake filling to firm up and mesh beautifully with the crunchy taco shells, resulting in a delectable dessert that is best enjoyed when served cold.
What to Serve with Fruity Pebbles Cheesecake Tacos
Imagine your guests diving into a vibrant feast of sweetness that pairs perfectly with colorful and delicious accompaniments!
- Vanilla Ice Cream: A scoop of vanilla ice cream adds a creamy touch, perfectly balancing the crunch of the Fruity Pebbles taco shells.
- Fresh Berries: Strawberries, blueberries, or raspberries bring a refreshing burst of flavor and a pop of color, enhancing the dessert experience.
- Chocolate Drizzle: A rich chocolate sauce complements the sweetness of the cheesecake filling, offering a delightful contrast in flavors.
- Whipped Cream Topping: Light and airy whipped cream drizzled on top provides an extra layer of indulgence, making each bite more decadent.
For even more sweetness, consider serving these tacos alongside a fruit platter. The mix of fresh fruits not only adds vibrant colors but also a variety of textures to your dessert table. A bright, fun way to please both kids and adults, they’re sure to be a hit!
- Sparkling Lemonade: This refreshing drink pairs beautifully with the sweet tones of the dessert while adding a zesty sparkle to your gathering.
- Coconut Macaroons: These chewy cookies add a tropical flair, making for a lovely contrast to the cheesecake’s smooth filling.
Fruity Pebbles Cheesecake Tacos Variations
Customize your Fruity Pebbles Cheesecake Tacos for an even more delightful experience that can tickle your taste buds!
-
Fresh Fruit Toppings: Top with sliced strawberries, bananas, or mango for a vibrant, juicy finish. The freshness of the fruit beautifully cuts through the creaminess.
-
Chocolate Drizzle: Add a rich drizzle of chocolate sauce on top to create a perfectly sweet contrast. It’s like adding a little extra decadence without any fuss!
-
Peanut Butter Swirl: Mix in a spoonful of creamy peanut butter into the cheesecake filling for a nutty flavor that pairs harmoniously with the sweetness of the tacos.
-
Flavored Cream Cheese: Swap plain cream cheese for strawberry or banana cream cheese to give your filling a unique twist. This simple change transforms your dessert into something excitingly different!
-
Mini Candy Pieces: Sprinkle some crushed mini candies or chocolate chips in the filling for added texture and surprise bites. Each taco becomes a tiny treasure chest of joy!
-
Spicy Kick: For an adventurous touch, add a dash of cayenne pepper to the cream cheese filling. It will turn your sweet treat into a remarkable journey of flavors that’s sure to impress.
-
Coconut Dream: Mix in shredded coconut flakes to the filling for a tropical twist. Top with toasted coconut for an irresistible crunchy topping!
-
Extra Fruity Pebbles: Crumble more Fruity Pebbles on top right before serving for an added crunch that enhances that nostalgic cereal taste. It’s a fun and colorful touch!
Feel free to experiment with these variations whenever the mood strikes, making your Fruity Pebbles Cheesecake Tacos the star of the show, just as they would be at any festive gathering! And if you’re in the mood for another sweet adventure, check out these flavorful Apple Snickerdoodles or indulge in some colorful Fish Tacos Lime for a delightful twist on dinner!
Storage Tips for Fruity Pebbles Cheesecake Tacos
-
Fridge: Keep assembled tacos covered in the refrigerator for up to 2 days. This helps maintain the filling’s creamy texture while ensuring the taco shells stay fresh.
-
Shells: Store unfilled taco shells in an airtight container at room temperature for up to 5 days. This way, they retain their delightful crunch for your next sweet creation.
-
Reheating: If you prefer a warm dessert, gently warm the empty taco shells in the oven at 350°F for about 5 minutes before filling them. Avoid reheating filled tacos to prevent the cream from melting.
-
Make Ahead: You can prepare taco shells in advance; just fill them shortly before serving to keep everything fresh and tasty. Enjoy your Fruity Pebbles Cheesecake Tacos even after a day of fun!
Make Ahead Options
These Fruity Pebbles Cheesecake Tacos are perfect for meal prep, making your dessert planning effortless! You can prepare the taco shells up to 24 hours in advance; simply follow the steps to create and set them, then store in an airtight container at room temperature to maintain their crispiness. The cheesecake filling can also be made in advance—refrigerate it for up to 3 days in a sealed container. When you’re ready to serve, just fill the taco shells with the chilled cheesecake mixture and let them sit in the fridge for about 30 minutes to set. This way, you’ll have a colorful and fun dessert that is just as delicious and ready to impress with minimal last-minute effort!
Expert Tips for Fruity Pebbles Cheesecake Tacos
-
Work Quickly: When handling the cereal mixture, be swift to assemble the taco shells before they harden. The marshmallow sets fast, so time is key!
-
Gentle Folding: Always fold the whipped cream into the cream cheese mixture lightly. This maintains the airy texture that makes your cheesecake filling so delightful.
-
Chill Time Matters: Don’t skip the chilling step! Refrigerating the filled tacos allows the flavors to meld and the filling to set, ensuring every bite is perfection.
-
Try Different Fillings: Feel free to experiment with flavored cream cheese for your cheesecake filling. Adding options like strawberry or chocolate will create unique variations of your Fruity Pebbles Cheesecake Tacos.
-
Fresh Toppings: Consider topping your tacos with bright, fresh fruits or a drizzle of chocolate sauce to enhance visual appeal and add layers of flavor.
Fruity Pebbles Cheesecake Tacos Recipe FAQs
How do I select the right Fruity Pebbles for the best taco shell?
Absolutely! When choosing Fruity Pebbles, look for a box that’s vibrant with no signs of staleness or broken pieces. Freshness is key for a delightful crunch, so check the expiration date on the box and avoid any packages that are dusty or damaged.
What is the best way to store leftover Fruity Pebbles Cheesecake Tacos?
To keep your assembled tacos fresh, store them in the refrigerator, covered with plastic wrap or in an airtight container, for up to 2 days. This will preserve the creamy filling while preventing the taco shells from getting soggy. If you’re not planning to eat them within that timeframe, consider storing the taco shells separately for longer freshness.
Can I freeze Fruity Pebbles Cheesecake Tacos?
Yes, you can freeze the taco shells! To do this, prepare the shells and let them cool completely. Then, place them in a single layer on a baking sheet and freeze until solid. Transfer the frozen shells to an airtight container or freezer bag, where they can be stored for up to 3 months. However, avoid freezing the filled tacos, as the texture of the cream cheese filling will not hold up well once thawed.
What should I do if my marshmallow mixture is too hard to mold into taco shells?
No worries, this happens sometimes! If the mixture sets too quickly, you can return it to low heat for a minute or two, stirring continuously until it softens up again. Just be sure to work quickly when folding in the Fruity Pebbles to prevent it from hardening again. If you find it too hard, you can also use a bit of cooking spray on your hands to mold them more easily.
Are there any dietary considerations I need to be aware of with this recipe?
Certainly! If you’re preparing these Fruity Pebbles Cheesecake Tacos for someone with allergies, keep in mind that they contain dairy (in both cream cheese and whipped cream) and gluten (in the cereal). For a gluten-free alternative, choose a gluten-free cereal that has a similar texture. Also, always check for any other allergens present in the toppings you choose for added versatility.
Fruity Pebbles Cheesecake Tacos: A Colorful Dessert Adventure
Ingredients
Equipment
Method
- In a medium saucepan over low heat, melt 3 tablespoons of unsalted butter. Once melted, add 4 cups of mini marshmallows, stirring constantly until smooth and glossy, about 5 minutes.
- Remove the saucepan from heat and fold in 6 cups of Fruity Pebbles cereal, ensuring each piece is coated with the marshmallow mixture.
- Using a greased rolling pin or taco mold, scoop portions of the mixture onto a parchment-lined baking sheet and shape into taco shells. Cool for about 15 minutes.
- In a mixing bowl, beat 8 ounces of softened cream cheese until smooth. Gradually add 1 cup of powdered sugar and 1 teaspoon of vanilla extract, mixing until fluffy.
- In a separate bowl, whip 1 cup of heavy whipping cream until stiff peaks form, about 3-5 minutes. Be careful not to over-whip.
- Gently fold the whipped cream into the cream cheese mixture until combined. Spoon or pipe the cheesecake filling into each taco shell.
- Place the filled tacos in the refrigerator for at least 30 minutes to allow the filling to firm up.
Leave a Reply