
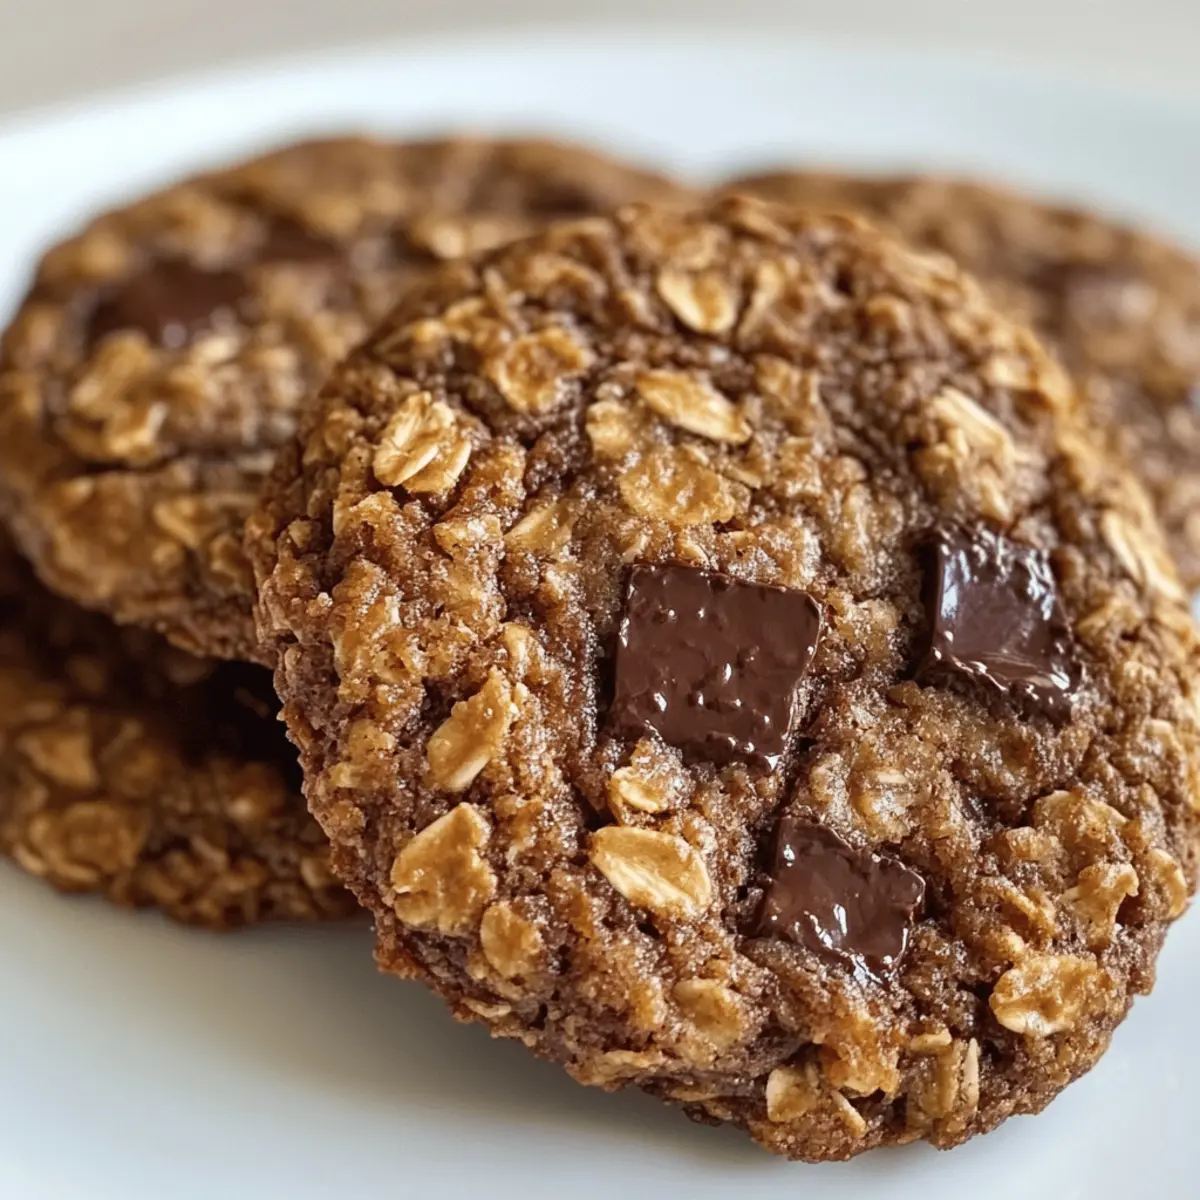
As I sifted through my pantry the other day, I stumbled upon an abundance of oats and a half-empty bag of chocolate chips—an unexpected treasure trove that sparked a delightful idea! Enter my 4-Ingredient Gluten-Free Chocolate Oat Cookies, a super-simple recipe crafted for those moments when you crave something sweet but don’t want to spend hours in the kitchen. These chewy cookies, sweetened with your choice of honey or maple syrup, are not just gluten-free; they also come together in mere minutes, making them a perfect treat for busy afternoons. Plus, with only four ingredients, you can feel good about serving these delicious bites to family and friends. Ready to whip up a batch? Let’s dive in!
Why Are These Cookies a Must-Try?
Simplicity is key; with just four ingredients, you’ll find this recipe incredibly easy to whip up, even on a busy day. Rich flavor from the nut butter and chocolate chips makes these cookies downright irresistible. Versatility shines through as you can customize them with different sweeteners or mix-ins like dried fruits or nuts. Perfect for sharing, they’re bound to impress family and friends during gatherings. If you’re looking for other delicious options, don’t miss my Apple Cinnamon Cottage or Cinnamon Apple Cake recipes for more tasty inspiration!
Chocolate Oat Cookies Ingredients
• Dive into the delightful world of Chocolate Oat Cookies with this simple ingredient list that promises a heavenly treat.
For the Cookie Base
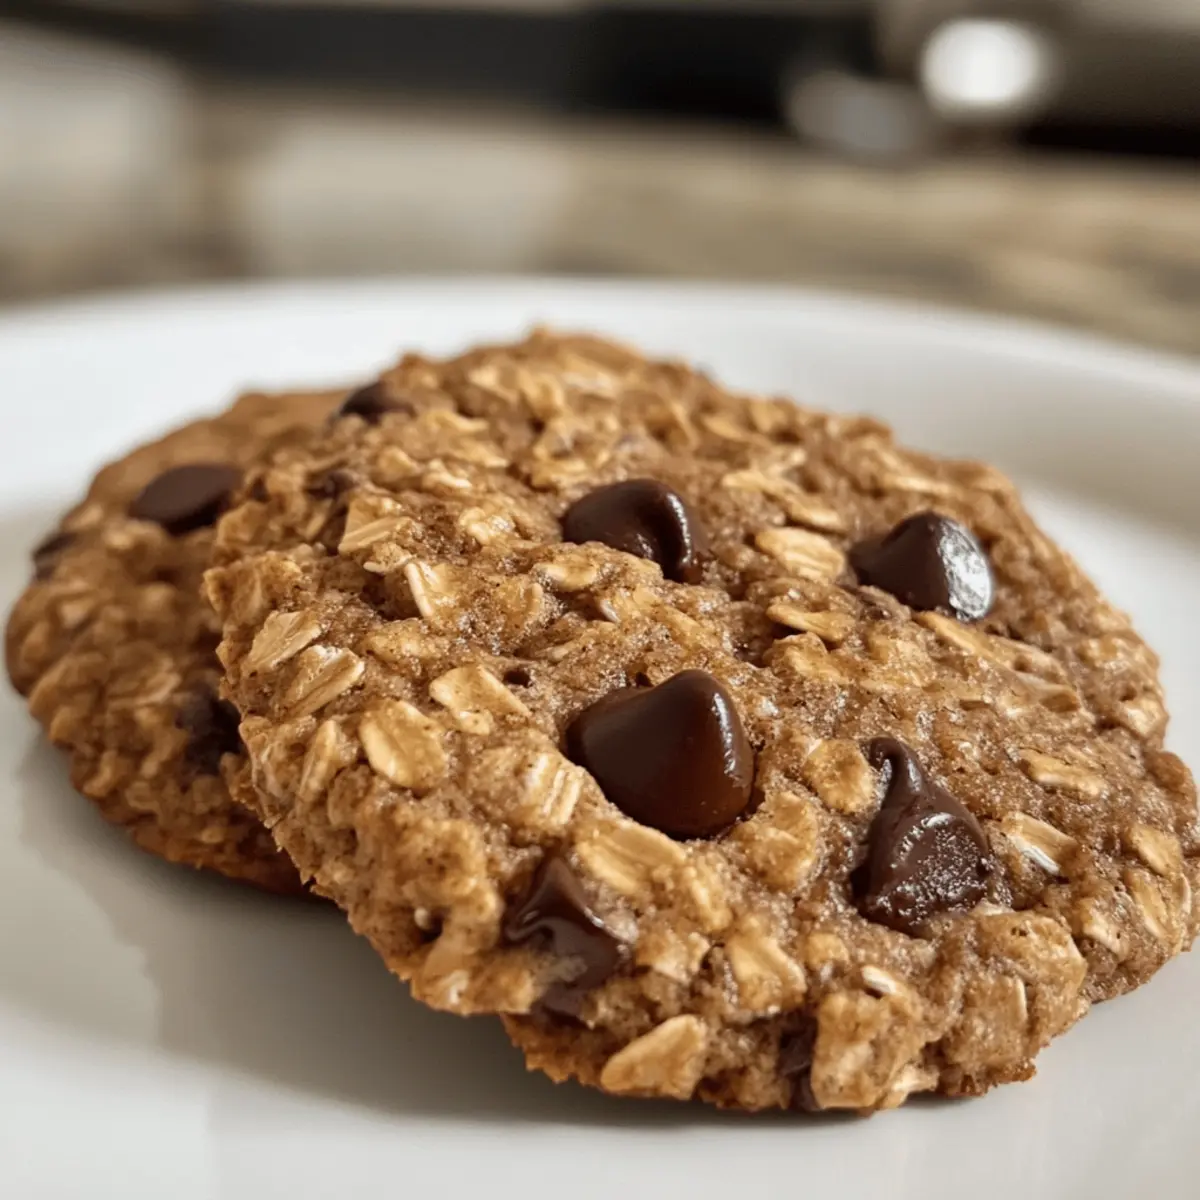
- Oats – Rolled oats provide a heartier texture and structure to the cookies.
- Nut Butter – Peanut butter or almond butter adds moisture and richness; feel free to experiment with your favorite.
- Sweetener – Honey or maple syrup is perfect for sweetness and binding the mixture; adjust to your taste preference.
- Chocolate Chips – Semi-sweet or dark chocolate chips add irresistible bursts of chocolate flavor; dairy-free options are available!
Add your personal touch to these delicious cookies and enjoy a quick baking adventure!
Step‑by‑Step Instructions for 4-Ingredient Gluten-Free Chocolate Oat Cookies
Step 1: Preheat the Oven
Begin by preheating your oven to 350°F (175°C). While that warms up, take a baking sheet and line it with parchment paper to prevent the cookies from sticking. This will prepare the perfect surface for baking your delightful Chocolate Oat Cookies, ensuring they come out crispy on the edges but chewy inside.
Step 2: Mix the Base Ingredients
In a large mixing bowl, combine your rolled oats, nut butter, and sweetener (honey or maple syrup). Using a sturdy spatula or spoon, stir the mixture until well combined; it should form a thick, malleable dough. Take a moment to enjoy how the ingredients start to blend, creating a lovely foundation for your cookies that will soon come to life.
Step 3: Fold in the Chocolate Chips
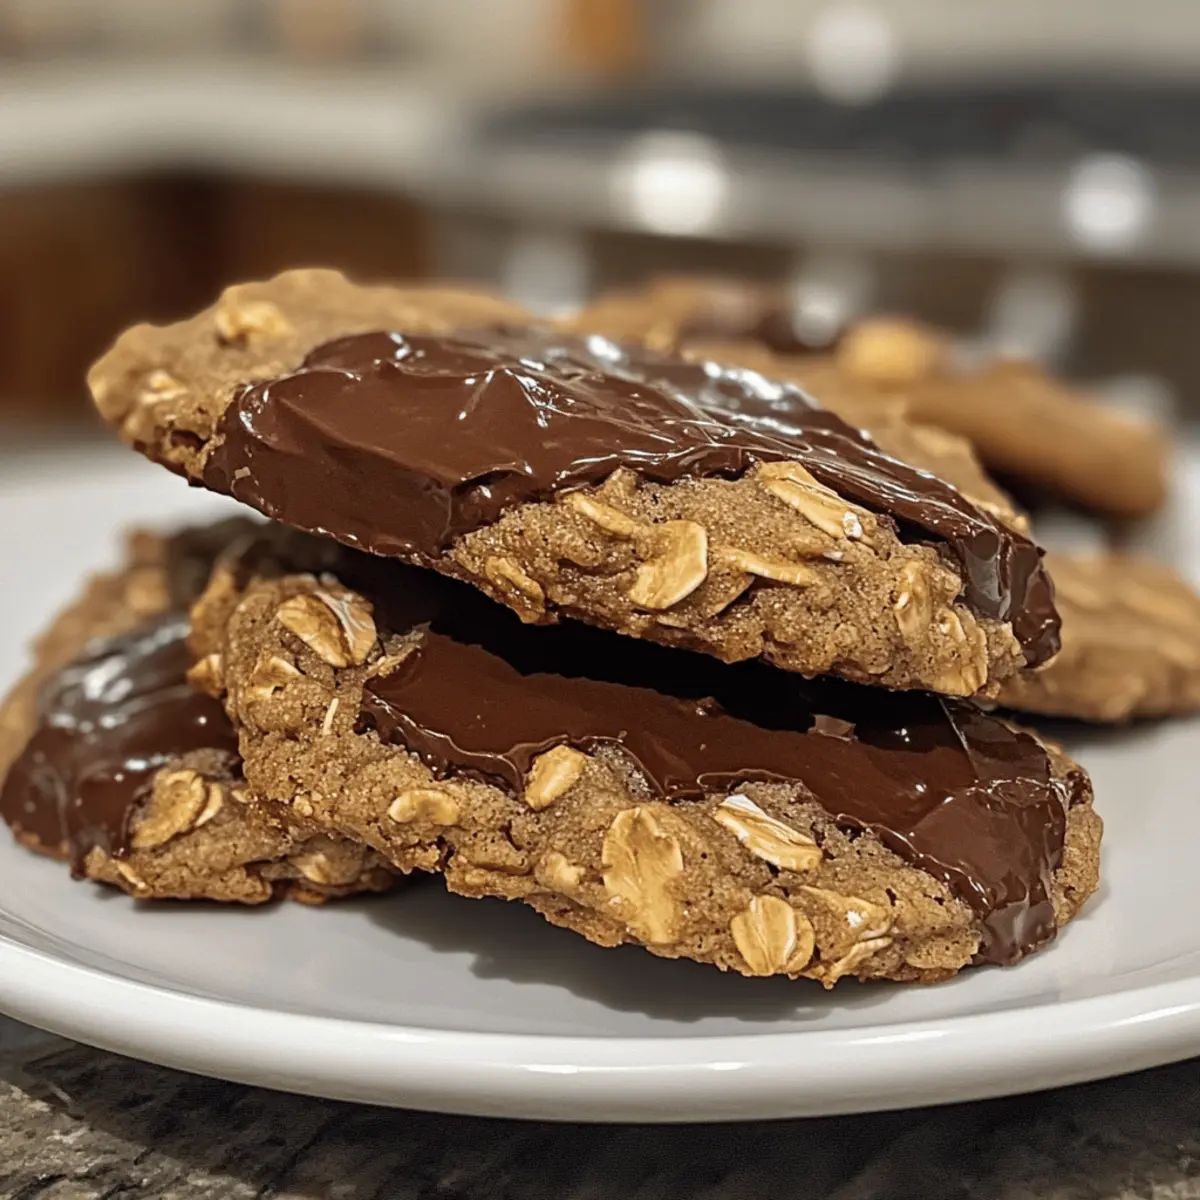
Gently fold in your chocolate chips, being careful not to overmix. Ensure each scoop of chocolate is evenly distributed throughout the dough for those delightful bursts of chocolate flavor in every bite. This step transforms your cookie base into the rich and indulgent Chocolate Oat Cookies you and your family will savor.
Step 4: Scoop the Cookies
Using a tablespoon, scoop out portions of your cookie dough and place them on the prepared baking sheet, spacing them about two inches apart. Flatten each portion slightly with the back of the spoon; this helps them spread during baking, achieving the perfect shape and texture. Your oven is now ready for these deliciously simple cookies!
Step 5: Bake to Perfection
Place the baking sheet in the preheated oven and bake the cookies for 10-12 minutes. Keep an eye on them as they bake; they should turn golden brown around the edges while still looking slightly soft in the center. This is the moment when your kitchen fills with the warm, inviting aroma of Chocolate Oat Cookies.
Step 6: Cool and Enjoy
Once baked, remove the cookies from the oven and allow them to cool on the baking sheet for about 5 minutes. This crucial step lets them firm up slightly before transferring them to a wire rack to cool completely. As they cool, your anticipation will grow for these chewy, gluten-free treats that are perfect for sharing with loved ones.
Chocolate Oat Cookies Variations
Feel free to explore these delightful twists on your Chocolate Oat Cookies for an even more personalized treat!
-
Coconut Twist:
Swap half the oats with shredded coconut for a chewy, tropical flavor. This adds a subtle sweetness and a subtle tropical vibe that will transport your taste buds. -
Nutty Crunch:
Add chopped nuts like walnuts or pecans for a satisfying crunch and added nutrition. These additions will lend a delightful texture and enhance the overall taste experience of your cookies. -
Fruity Surprise:
Mix in dried fruits such as cranberries or raisins for a hint of natural sweetness. The fruity burst pairs beautifully with the chocolate chips, creating a balanced, chewy bite. -
Spiced Delight:
Sprinkle in a teaspoon of cinnamon or pumpkin spice for an earthy warmth. This seasoning enriches the cookie flavor, ushering you straight into cozy autumn vibes. -
Chocoholic’s Dream:
Use mini chocolate chips or chocolate chunks instead of regular chips for even more chocolaty goodness. The extra chocolate pockets add a richer chocolate experience with every bite. -
Bean Boost:
Experiment by adding a tablespoon of cocoa powder for a deeper chocolate flavor. This is perfect for chocolate lovers and enhances the overall richness of the cookies. -
Salted Caramel Essence:
Drizzle a bit of caramel sauce over the cooled cookies and sprinkle sea salt on top. This sweet and salty combination elevates the cookie to gourmet status and is sure to impress! -
Chewy Oat Bars:
Press the cookie dough into a greased baking dish instead of scooping it out. Bake for 15-20 minutes for chewy oat bars that are great for lunches or snacks. Slice them up and enjoy the chewiness!
For more tasty inspirations, consider trying my Apple Cinnamon Cottage or the delightful Apple Snickerdoodles Deliciously recipes!
What to Serve with 4-Ingredient Gluten-Free Chocolate Oat Cookies
Warm cookies can create the coziest atmosphere, especially when paired with complementary flavors and textures.
-
Creamy Milk: A classic pairing that balances the richness of the cookies. Whether you choose dairy or non-dairy, the smoothness enhances the chocolate experience.
-
Fruit Salad: Fresh fruits like bananas, berries, or a mix of citrus add a refreshing pop of flavor. Their natural sweetness helps to brighten up the dessert table.
-
Nutty Granola: The crunch of granola brings an appealing texture contrast to the chewy cookies. It makes a delightful snack when crumbled atop or served alongside.
-
Hot Coffee or Tea: A warm beverage deepens the indulgence, creating a comforting moment. Coffee can offer a slightly bitter contrast, while tea provides soothing warmth.
-
Dairy-Free Ice Cream: For those who love a decadent dessert, a scoop of your favorite non-dairy ice cream adds creaminess and a satisfying chill.
-
Chocolate Dipping Sauce: Enhance the rich chocolate flavor by dipping the cookies into a warm chocolate sauce. It adds an irresistible velvety finish that chocolate lovers will adore!
-
Coconut Whipped Cream: A dollop of light and airy coconut whipped cream perfectly complements the chewy texture of the cookies, giving them an island-inspired twist.
-
Mini Fruit Tart: Delight your guests with a mini fruit tart alongside the cookies. The smooth custard and fresh fruit garnish provide a lovely contrast to the chocolate flavors.
Expert Tips for Baking Chocolate Oat Cookies
-
Nut Butter Consistency: Ensure your nut butter is well-mixed before measuring. This helps achieve a smooth, cohesive dough for your chocolate oat cookies.
-
Watch the Bake Time: Avoid overbaking! The cookies should remain soft in the center for optimal chewy texture; golden edges are your cue to take them out.
-
Toasting Oats: For a deeper flavor, consider briefly toasting the oats in the oven before mixing. This adds a nutty essence to your delicious cookies.
-
Baking Sheet Prep: Don’t skip lining your baking sheet with parchment paper. This prevents sticking and ensures your chocolate oat cookies retain their shape.
-
Customizations Galore: Feel free to add your favorite mix-ins—nuts, dried fruits, or coconut! This creates a delightful twist to the classic chocolate oat cookie experience.
Storage Tips for Chocolate Oat Cookies
Room Temperature: Store cookies in an airtight container at room temperature for up to 7 days. This keeps them fresh and chewy for enjoying anytime.
Fridge: For even longer preservation, you can store cookies in the fridge for up to 2 weeks. Just make sure they’re in an airtight container to prevent them from absorbing other flavors.
Freezer: Freeze cookies for up to 3 months. Layer them between pieces of parchment paper in an airtight container to avoid sticking.
Reheating: To enjoy a warm cookie experience, reheat them in the microwave for 10-15 seconds or pop them in the oven at 350°F (175°C) for a few minutes until warmed through.
Make Ahead Options
These 4-Ingredient Gluten-Free Chocolate Oat Cookies are perfect for meal prep enthusiasts! You can prepare the cookie dough up to 24 hours in advance; simply mix together the oats, nut butter, sweetener, and chocolate chips, then store it in an airtight container in the refrigerator. This helps maintain the dough’s freshness and prevents the oats from absorbing too much moisture. When you’re ready to bake, scoop the dough portions onto a baking sheet directly from the fridge, flatten slightly, and bake as directed. This way, you’ll have fresh, delicious cookies ready with minimal effort, making your busy weeknights a little sweeter!
Chocolate Oat Cookies Recipe FAQs
What type of oats should I use for these cookies?
I recommend using rolled oats because they provide a heartier texture and chewiness, which truly enhances the cookie experience. Quick oats can work, too, but they yield a softer cookie. If you prefer a more textured bite in your cookies, stick with rolled oats!
How should I store leftover cookies?
Absolutely! Store your chocolate oat cookies in an airtight container at room temperature for up to 7 days to keep them fresh and chewy. If you want them to last even longer, pop them in the refrigerator, where they’ll stay good for up to 2 weeks—just ensure they’re sealed tightly to prevent absorbing any other flavors.
Can I freeze these cookies? If so, how?
Yes! You can freeze your chocolate oat cookies for up to 3 months. To do this, layer the cookies between sheets of parchment paper in an airtight container. This will prevent them from sticking together. When you’re ready to enjoy, simply thaw them in the fridge overnight, or reheat them directly from the freezer.
What if my cookie dough is too dry or crumbly?
If your dough feels dry or crumbly, don’t worry! This might happen if the nut butter isn’t mixed well or if there’s not enough sweetener. To fix this, add a teaspoon of warm water or more nut butter and mix until the dough is cohesive and malleable. You want it to hold together nicely without being overly sticky.
Are these cookies suitable for people with nut allergies?
If someone in your household has a nut allergy, you can substitute the nut butter with sunflower seed butter or a similar alternative. Just make sure to check for any cross-contamination to ensure a safe treat. Enjoying gluten-free cookies doesn’t have to come with any worries!
Can these cookies be made vegan?
Indeed! To make your chocolate oat cookies vegan, simply swap honey for maple syrup or agave nectar as your sweetener. With this substitution, you’ll have a delicious, vegan-friendly treat that everyone can enjoy!

Decadent Caramel Apple Cheesecake Bars You Can't Resist
Ingredients
Equipment
Method
- Preheat your oven to 350°F (175°C) and line a baking sheet with parchment paper.
- In a large mixing bowl, combine the rolled oats, nut butter, and sweetener until well combined.
- Gently fold in the chocolate chips, being careful not to overmix.
- Scoop out portions of cookie dough and place them on the prepared baking sheet, flattening them slightly.
- Bake for 10-12 minutes until golden brown around the edges.
- Allow to cool on the baking sheet for about 5 minutes before transferring to a wire rack.
Leave a Reply