
As I stood in my kitchen, the scent of melting cheese began to fill the air, instantly transporting me to cozy evenings of comfort food bliss. Enter the Hawaiian Roll Grilled Cheese, a sweet and cheesy twist on the classic sandwich that combines the soft, buttery flavor of Hawaiian rolls with gooey, melted cheese. This delightful recipe is a true crowd-pleaser, making it a fantastic option for quick meals when life gets hectic. Not only is it incredibly easy to whip up, but it also offers endless customization options, allowing you to experiment with different cheeses or even add exciting toppings like avocado or crispy bacon. Who could resist that? Embrace your inner cheese lover and let’s dive into this delicious dish that promises to satisfy your cravings and liven up your next snack time! Are you ready to tantalize your taste buds?

Why is Hawaiian Roll Grilled Cheese a Must-Try?
Irresistible Flavor: The unique sweetness of Hawaiian rolls combined with melty cheese creates an indulgent treat that’s hard to resist. Endless Customization: Whether you prefer sharp cheddar or spicy pepper jack, this dish allows for creative liberties, making it suitable for all taste buds. Quick and Easy: Perfect for busy weeknights, you can whip this up in no time! Crowd-Pleaser: Great for family dinners or movie nights, it brings everyone together for a cozy bite. Pair it with a light salad like this Salad Bacon Cheese for a complete meal. You’ll love how comforting this recipe is!
Hawaiian Roll Grilled Cheese Ingredients
For the Sandwich
• Hawaiian Rolls – The sweet, fluffy base that elevates this sandwich to new heights. Substitution: You can swap these for brioche or sourdough for unique flavors.
• Cheese – Choose your favorite for that gooey goodness; options like cheddar or pepper jack add a delightful kick. Note: At least one melty cheese is essential for the perfect texture!
• Butter – This is vital for frying, helping to create a delightfully crispy, golden crust. Tip: Generously butter the insides for maximum flavor and texture.
Optional Toppings
• Avocado – Adds creaminess and a dose of healthy fats, making your grilled cheese even more indulgent.
• Crispy Bacon – For that savory crunch that pairs beautifully with the sweetness of the rolls.
• Caramelized Onions – They bring a rich, sweet flavor that complements the cheese perfectly.
Now that you’ve got your ingredients ready, it’s time to craft this dreamy Hawaiian Roll Grilled Cheese! Your taste buds will thank you for this deliciously comforting experience.
Step‑by‑Step Instructions for Hawaiian Roll Grilled Cheese
Step 1: Prepare the Skillet
Heat a non-stick skillet over medium heat, ensuring it’s hot enough to achieve that perfect golden crust for your Hawaiian Roll Grilled Cheese. Allow the skillet to warm for about 3-5 minutes before adding any ingredients. This initial step sets the stage for a crispy exterior while maintaining a gooey interior.
Step 2: Butter the Rolls
Generously butter the insides of each Hawaiian roll using softened butter to ensure an even coat. This will create a delightful, crispy texture once grilled, enhancing the overall flavor experience. Make sure to spread the butter evenly, covering every nook and cranny to get that irresistible taste in each bite.
Step 3: Assemble Sandwiches
Place the bottom half of each buttered Hawaiian roll in the preheated skillet. Layer your choice of cheese generously on top—consider a mix for extra flavor—then place the other half of the roll on top. Gently press down to ensure the cheese melts evenly and the sandwich holds together while grilling.
Step 4: Grill Side One
Cook the assembled Hawaiian Roll Grilled Cheese for about 3-4 minutes, or until the bottom half is golden brown and crispy. You’ll know it’s ready when you hear a satisfying crunch as you press slightly on the sandwich. This time allows the cheese to begin melting beautifully underneath.
Step 5: Grill Side Two
Carefully flip the sandwich to grill the second side, cooking for another 3-4 minutes. Listen for that same delightful crunch as it browns. If the cheese needs a little extra assistance melting, you can cover the skillet briefly with a lid. This method ensures a gooey, delicious filling.
Step 6: Serve
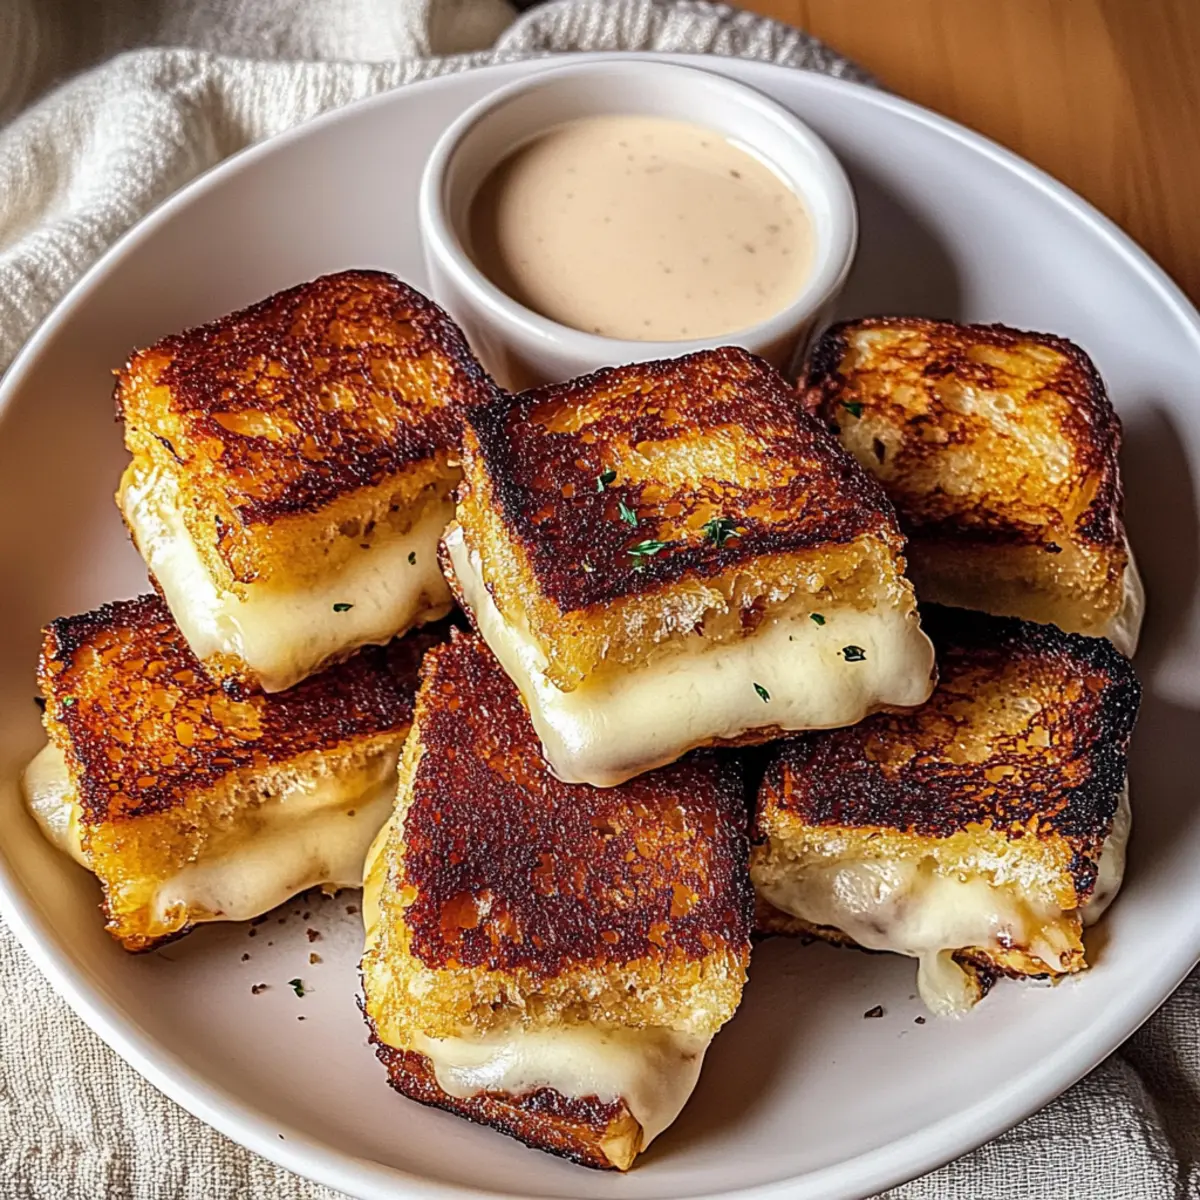
After both sides are a beautiful golden brown, remove the sandwich from the skillet and let it cool for about a minute. Slice it in half to reveal the melty goodness inside, and serve your Hawaiian Roll Grilled Cheese hot. This cozy treat is perfect for sharing or indulging on your own!
Make Ahead Options
These Hawaiian Roll Grilled Cheese sandwiches are a lifesaver for meal prep aficionados! You can assemble the sandwiches up to 24 hours in advance by buttering the rolls, layering on the cheese, and securing them together. Cover the assembled sandwiches with plastic wrap or place them in an airtight container to keep them fresh. When you’re ready to enjoy, simply heat a skillet over medium heat, place the sandwiches in, and grill them until golden brown and crispy (about 3-4 minutes per side). This method ensures the cheese remains deliciously melty and the rolls stay fluffy, making for a charmingly effective meal on those busy weeknights!
Expert Tips for Hawaiian Roll Grilled Cheese
- Control the Heat: Keep your skillet on medium-low to avoid burning the bread while achieving that perfect crispy crust.
- Choose the Right Cheese: Always use at least one melty cheese for the best texture. Cheddar and pepper jack work wonderfully!
- Generous Buttering: Don’t skimp on the butter—generously butter the inside of the rolls for maximum flavor and crunch.
- Press and Flip: Gently press down on the sandwich while grilling and flip it once golden brown for an ideal crust on your Hawaiian Roll Grilled Cheese.
- Add Fun Toppings: Consider extras like caramelized onions or crispy bacon for a flavor twist that will elevate your grilled cheese experience.
How to Store and Freeze Hawaiian Roll Grilled Cheese
Fridge: Keep any leftovers in an airtight container for up to 2 days. This helps maintain the sandwich’s delicious taste and prevents it from drying out.
Freezer: For longer storage, wrap the grilled cheese tightly in plastic wrap and store in a freezer-safe bag for up to 2 months. Reheat straight from the freezer for a quick snack!
Reheating: To restore the melty goodness, reheat the sandwich in a skillet over low heat for about 5-7 minutes, flipping halfway through. This will revive that crispy crust and gooey center.
Room Temperature: If you plan to enjoy them within a few hours, you can leave the sandwiches at room temperature. However, for optimal taste, refrigerate after 2 hours.
Hawaiian Roll Grilled Cheese Variations
Discover the endless possibilities to customize your Hawaiian Roll Grilled Cheese for a unique flavor experience that all your loved ones will enjoy!
-
Dairy-Free: Use vegan butter and plant-based cheese for a creamy, guilt-free version that still satisfies those cravings.
-
Spicy Kick: Swap in pepper jack cheese for a spicy twist. Add jalapeños inside for an extra layer of heat!
-
Sweet and Savory: Try adding sliced figs or a drizzle of honey alongside your cheese. This balance will dance brilliantly on your taste buds.
-
Herb Infusion: Mix in fresh herbs like basil or chives with your cheese for a fresh, aromatic flavor that elevates the dish.
-
Texture Boost: Add a layer of crunchy panko breadcrumbs on the outside before grilling for a delightful crunch.
-
Savory & Creamy: Introduce a creamy spread like garlic aioli or pesto on the inside of the rolls to enhance richness and flavor.
-
Alternative Rolls: Try using sourdough or ciabatta bread for a chewier texture and unique flavor profile. Each bite will be delightfully different!
-
Loaded Grilled Cheese: Top the sandwich with crispy bacon, caramelized onions, or sliced avocado to add richness and a lovely contrast to the sweet rolls.
Feel free to experiment! Every variation creates a new adventure in the world of comfort food. If you’re feeling inspired, you might want to add a touch of freshness with a light salad like this delightful Salad Bacon Cheese on the side. Enjoy the journey of flavor!
What to Serve with Hawaiian Roll Grilled Cheese?
Pair your comforting sandwich with delightful sides that enhance its sweet and cheesy goodness.
-
Tomato Soup: The classic pairing that brings warmth and acidity, perfectly cutting through the richness of the cheese.
-
Light Garden Salad: A refreshing mix of greens adds crunch and a burst of freshness, balancing the dish’s indulgence.
-
Sweet Potato Fries: Crispy and slightly sweet, these fries introduce a delightful contrast that’s both fun and satisfying. For a fun twist, consider dipping them in aioli.
-
Pickles: The tangy crunch of pickles offers a zesty complement, enhancing each bite with brightness.
-
Fruit Salad: A colorful array of fresh fruit can lighten the palate, making it a delightful side for this decadent sandwich.
-
Sparkling Water: Stay refreshed with a bubbly drink that cleanses your palate between each cheesy, buttery bite, elevating the experience.
-
Chocolate Chip Cookies: For dessert, these chewy treats provide a comforting sweetness, rounding out your meal with nostalgic indulgence.
-
Roasted Vegetables: Seasonal, roasted veggies add a savory element and a myriad of textures to your meal, creating a well-rounded dining experience.

Hawaiian Roll Grilled Cheese Recipe FAQs
What type of Hawaiian rolls should I use?
You can use traditional Hawaiian rolls for their sweetness and fluffiness, but feel free to swap them out for brioche or sourdough if you’re looking for different flavor profiles. Both alternatives bring their unique characteristics to this delightful grilled cheese.
How should I store leftovers from the Hawaiian Roll Grilled Cheese?
Store any leftovers in an airtight container in the fridge for up to 2 days. This method helps keep the bread from drying out while maintaining its delicious flavor. Just remember to reheat them slowly in a skillet for the best results!
Can I freeze Hawaiian Roll Grilled Cheese sandwiches?
Absolutely! To freeze, wrap the grilled cheese sandwiches tightly in plastic wrap and then place them in a freezer-safe bag. They can be stored in the freezer for up to 2 months. When you’re ready to eat, reheat straight from the freezer in a skillet over low heat for about 5-7 minutes, flipping halfway through to get that perfect crispy finish.
What if my grilled cheese isn’t melting properly?
If you find that your cheese isn’t melting as it should, try covering the skillet momentarily with a lid. This traps heat and steams the cheese gently, encouraging it to melt beautifully. Also, make sure you’re using at least one type of melty cheese, such as cheddar or pepper jack, for the best gooey texture.
Are there any dietary considerations for the Hawaiian Roll Grilled Cheese?
Yes, this dish can be made vegetarian-friendly by simply skipping any added meats like bacon or opting for plant-based cheese options. Always check for any specific cheese allergies, as some varieties may contain lactose or other allergens. Additionally, if you’re making this for a gathering, you could consider offering multiple cheeses to accommodate different taste preferences!
How long can I leave the Hawaiian Roll Grilled Cheese at room temperature?
If planning to enjoy the sandwiches within a few hours, they can stay at room temperature. However, for safety and taste, it’s best to refrigerate leftovers after 2 hours to prevent any spoilage, ensuring that every bite remains as delicious as possible.

Hawaiian Roll Grilled Cheese: Sweet, Gooey Comfort Awaits
Ingredients
Equipment
Method
- Prepare the skillet by heating a non-stick skillet over medium heat for 3-5 minutes.
- Generously butter the insides of each Hawaiian roll.
- Assemble sandwiches by placing the bottom half of each roll in the skillet, adding cheese, and pressing down.
- Grill side one for 3-4 minutes until golden brown and crispy.
- Flip and grill the second side for another 3-4 minutes until brown and the cheese is melty.
- Serve hot after cooling for about a minute, and slice in half.
Leave a Reply