
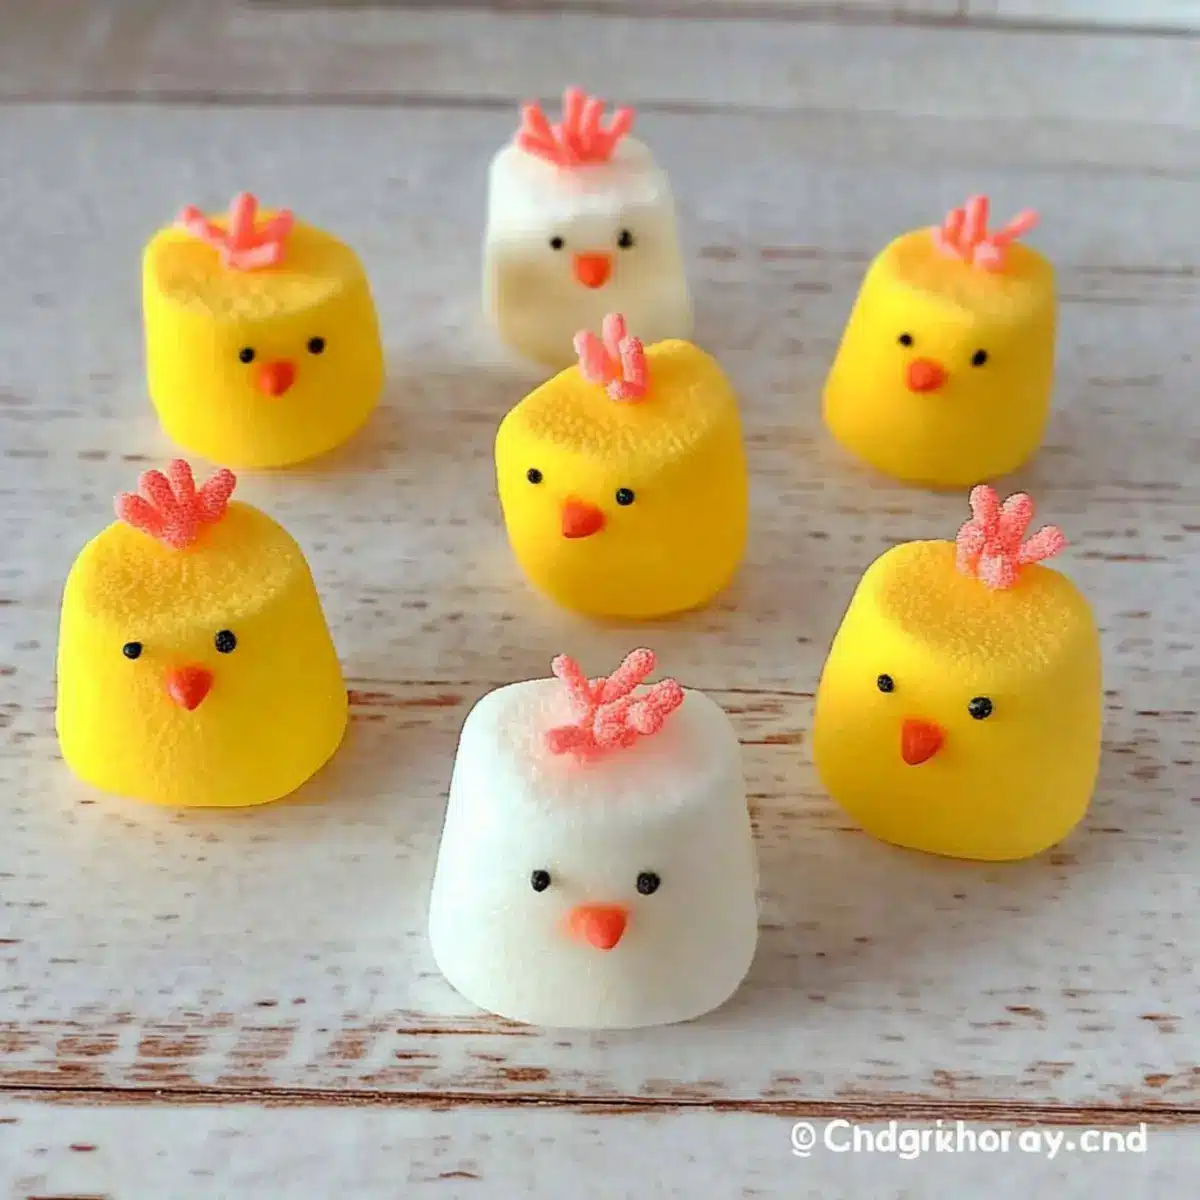
Spring has officially sprung, and what better way to celebrate than with a batch of adorable Cute Marshmallow Chicks? These charming treats are not only a sweet addition to your Easter festivities but also an engaging, kid-friendly project that will ignite smiles all around. With just a few simple ingredients, you’ll create delightful marshmallow figures that bring a whimsical touch to your dessert table. Beyond their playful appearance, they offer versatility—think of them as fun cupcake toppers or vibrant marshmallow pops! Plus, they’re a fantastic way to bond with family and friends, creating more than just dessert; you’re crafting joyful memories. Are you ready to hop into some sweet creativity? Let’s get started!
Why are these Marshmallow Chicks special?
Simplicity is key: With just a few basic ingredients, anyone can whip up these delightful treats without fuss.
Kid-Friendly Fun: Perfect for a family activity, kids will love getting creative with sprinkles and assembling their own marshmallow chicks.
Versatility shines through: Use them as cupcake toppers, festive dessert table decorations, or even as colorful treats on a stick!
Burst of Flavor: The combination of fluffy marshmallows and sweet candy melts creates a delightful taste that’s hard to resist.
Memorable Experience: Beyond just making a sweet treat, you’ll be creating joyful memories with loved ones as you assemble these cuties together.
So grab your ingredients and check out our expert tips for a smooth and fun baking experience!
Cute Marshmallow Chicks Ingredients
• Get ready to gather what you need for these Cute Marshmallow Chicks that will bring joy to your celebrations!
For the Chicks
- Marshmallows – The main ingredient that gives these treats their soft, fluffy texture; use large or regular-sized ones for better coating.
- Yellow Candy Melts – Provides the vibrant color to create cheerful chicks; you can substitute with white chocolate mixed with yellow food coloring if preferred.
For Decoration
- Sprinkles – These add lively texture and visual appeal to your chicks; try using edible glitter for a sparkly twist or candies for a burst of color.
- Lollipop Sticks – Essential for making marshmallow pops; skip if you’re just using them as toppers on cupcakes.
With these ingredients, you’re all set to create some adorable and delightful Cute Marshmallow Chicks for your Easter celebrations!
Step‑by‑Step Instructions for Cute Marshmallow Chicks
Step 1: Melt the Candy Melts
Begin by melting the yellow candy melts, using a microwave-safe bowl or a double boiler. Heat in short bursts of 30 seconds in the microwave, stirring each time until the melts are completely smooth and glossy. This should take about 1-2 minutes total in the microwave. Make sure not to overheat as this can cause the melts to seize.
Step 2: Dip the Marshmallows
Once the yellow candy melts are smooth, take each marshmallow and dip it into the melted candy. Ensure that one side is fully coated with the vibrant candy mixture for the best appearance. Use a fork or skewer to help lift and handle the marshmallows to avoid messy hands. Allow any excess coating to drip off before moving to the next step.
Step 3: Set on Parchment Paper
After coating, carefully place your marshmallows onto a sheet of parchment paper. This will prevent them from sticking as they set. Arrange them with space in between to allow for easy decorating. Let them sit for about 5-10 minutes to cool and harden, ensuring the candy coating becomes firm to the touch.
Step 4: Add Chick Features
Before the candy coating fully hardens, it’s time to get creative! While the coating is still slightly tacky, sprinkle colorful sprinkles onto each marshmallow to imitate the eyes and other chick features. Use black sprinkles or chocolate chips for added personality, aiming to give each of your Cute Marshmallow Chicks its unique look!
Step 5: Insert Lollipop Sticks
If you’re creating marshmallow pops, gently insert lollipop sticks into the bottom of the coated marshmallows before the coating hardens. You can use a toothpick to create a small hole if needed, ensuring a secure hold. Allow the marshmallows to continue cooling completely, setting them upright in a glass or container to maintain their shape during this step.
Step 6: Let Them Cool Completely
Give your marshmallow chicks at least 30 minutes to sit at room temperature until the candy coating is fully set and hard. This step is crucial to ensure that the candy shell is crisp and your Cute Marshmallow Chicks maintain their adorable shape. Once cooled, they’re ready to be served or used as delightful decorations!
What to Serve with Adorable Marshmallow Chicks?
Spring celebrations call for delightful complements to your colorful marshmallow creations, adding texture and flavor to your dessert spread.
-
Fruit Salad: Fresh and vibrant, a mix of fruits will balance the sweetness of the marshmallow chicks, providing a refreshing bite.
-
Mini Cupcakes: Light and fluffy cupcakes can be topped with a simple buttercream frosting, serving as the perfect base for your adorable treats to sit on.
-
Chocolate Dipped Strawberries: Juicy and indulgent, these berries add a rich contrast to the sweetness of the marshmallows, making for a delightful pairing.
-
Rainbow Jello Cups: These colorful jello cups can mimic the festive aesthetic of your marshmallow chicks, delivering fun layers of flavor and a delightful wobble!
-
Lemonade Spritzers: A crisp, bubbly drink that works beautifully with the sweet treats, refreshing everyone while putting a zing in the air.
-
Carrot Cake Bites: Infuse your gathering with Easter spirit by serving these bites, combining rich spices and cream cheese flavor to perfectly contrast with your marshmallow critters.
-
Peanut Butter Cookies: Chewy and nutty, these cookies provide a heartiness that balances out the lightness of the marshmallow chicks, ensuring a satisfying experience.
-
Vanilla Ice Cream: Creamy and cool, a scoop of ice cream can provide a smooth texture that combines beautifully with the crunchy candy coating of your chicks.
-
Sparkling Water with Mint: A light and refreshing drink to keep things festive and invigorating, brightening the atmosphere while complementing the sweetness of the desserts.
Make Ahead Options
These adorable Cute Marshmallow Chicks are perfect for meal prep, making your Easter celebrations a breeze! You can prepare the marshmallows by dipping them in the yellow candy melts and adding sprinkles up to 24 hours in advance. Just ensure to let them cool completely before storing them in an airtight container at room temperature to keep their delightful texture. When it’s time to serve, if making marshmallow pops, simply insert lollipop sticks into your prepped chicks before the big reveal. This way, you’ll have charming, festive treats ready to impress, leaving you more time to enjoy the festivities with your loved ones!
How to Store and Freeze Cute Marshmallow Chicks
Airtight Container: Store your Cute Marshmallow Chicks in an airtight container at room temperature for up to one week to maintain their freshness and softness.
Fridge: If you’re in a warmer climate, consider refrigerating them for up to 5 days. Just make sure they are well-wrapped to prevent them from drying out.
Freezer: For longer storage, freeze them in a single layer on a baking sheet, then transfer to an airtight container for up to 3 months. Thaw at room temperature before serving.
Reheating: These marshmallow treats are best enjoyed at room temperature, so avoid reheating, as it could compromise their delightful texture.
Expert Tips for Cute Marshmallow Chicks
-
Melt Wisely: Always melt yellow candy melts in short intervals to prevent overheating and seizing. Stir frequently for a smooth result.
-
Coating Technique: Dip marshmallows slowly to ensure full coverage. Using a fork helps manage the dip without making a mess.
-
Sprinkle Creativity: Let the coating remain slightly tacky before adding sprinkles. This ensures they stick better and enhance your Cute Marshmallow Chicks’ appearance.
-
Lollipop Stick Insertion: Use a toothpick to create a hole if the marshmallows are too dense. This makes inserting lollipop sticks much easier and secure.
-
Cool Thoroughly: Allow marshmallows to cool completely before serving to ensure the coating is nice and crisp, enhancing the final product’s texture.
Cute Marshmallow Chicks Variations & Substitutions
Feel free to let your creativity shine as you personalize these adorable treats with fun alternatives!
- Dairy-Free: Use dark chocolate or dairy-free candy melts to create cute chicks suitable for lactose-intolerant friends.
- Colorful Chicks: Swap yellow candy melts for pastel shades to create a rainbow of marshmallow chicks that will brighten any dessert table.
- Cupcake Toppers: Use half-dipped marshmallows as whimsical cupcake toppers, adding extra sprinkles for a perfect party finish.
- Chocolate-Dipped: Instead of candy melts, melt semi-sweet or white chocolate for a rich and decadent twist on the classic.
- Marshmallow Roosters: Adjust the colors, using red and orange melts, and decorate with different sprinkles for a playful twist on the traditional chicks.
- Swirls of Flavor: Mix in flavored extracts to the melted chocolate, like vanilla or almond, for a subtle flavor twist that elevates your Chick experience!
- Edible Glitter: Add some sparkle by dusting edible glitter on the chick features, creating an eye-catching dessert that catches the light beautifully.
- Spicy Twist: Experiment with cayenne or chili powder mixed into the melted candy for a surprising sweet and spicy sensation that will have everyone guessing!
Ready for more festive fun? Check out how to elevate your baking with our tips on storing these treats to keep them fresh and delightful!
Cute Marshmallow Chicks Recipe FAQs
What type of marshmallows should I use?
You can use either large or regular-sized marshmallows for these Cute Marshmallow Chicks. The size will influence how well they hold the candy coating, but both will achieve a delightful result!
How should I store the marshmallow chicks?
Store your Cute Marshmallow Chicks in an airtight container at room temperature for up to one week. This keeps them soft and prevents them from drying out. If you live in a warm environment, consider putting them in the fridge for up to 5 days, but ensure they’re well-wrapped to maintain freshness.
Can I freeze the marshmallow chicks?
Absolutely! To freeze, start by laying the coated marshmallows on a baking sheet in a single layer. Once set, transfer them to an airtight container and freeze for up to 3 months. When you’re ready to serve, simply thaw them at room temperature. This way, you can enjoy them at a later date without losing their delightful texture!
What if my candy melts are clumping or seizing?
If your candy melts start to clump or seize, it could be because they were overheated. It’s best to melt them in short intervals, stirring frequently. If they do seize, try adding a teaspoon of vegetable oil to the candy melts and stir until they become smooth again. If all else fails, consider starting with a new batch!
Can I customize the decorations for the marshmallow chicks?
Very! Feel free to get creative with decorations! You can use edible glitter, different colored sprinkles, or even small candy eyes for a fun twist. Mix up the colors of the candy melts to create a whole rainbow of Cute Marshmallow Chicks or make themed variations like roosters for a festive spread!
Are these marshmallows safe for kids with allergies?
While marshmallows are generally safe, always check the ingredient list for allergies, particularly if using different brands or colored coatings. If your child has specific dietary restrictions, consider using allergen-free candy melts or ensure all decorations are safe for their consumption. Always prioritize their health and safety!

Cute Marshmallow Chicks: A Sweet Delight for Easter Fun
Ingredients
Equipment
Method
- Melt the yellow candy melts in a microwave-safe bowl or a double boiler, stirring frequently until smooth.
- Dip each marshmallow into the melted candy, ensuring one side is fully coated.
- Place marshmallows onto parchment paper to cool for 5-10 minutes.
- Before the coating fully hardens, add colorful sprinkles to imitate chick features.
- If making pops, insert lollipop sticks into the bottom of the marshmallows before coating hardens.
- Let marshmallows cool completely for at least 30 minutes before serving.
Leave a Reply