
As I flipped through my collection of cherished family recipes, I stumbled upon a hidden gem that had me instantly dreaming of sunny days and festive gatherings. These Bright & Chewy Springtime Crinkle Cookies are not just an easy dessert to whip up; they’re an invitation to celebrate the season with their delightful pastel hues and melt-in-your-mouth texture. Whipping together this simple recipe means you’ll have a perfect treat for Easter brunch or just a cheerful afternoon pick-me-up. Plus, they’re quick to make and guaranteed to impress your friends and family! So, are you ready to bring a splash of color and joy to your baking adventures? Let’s dive into the sweet world of Springtime Crinkle Cookies!
Why Are Springtime Crinkle Cookies Amazing?
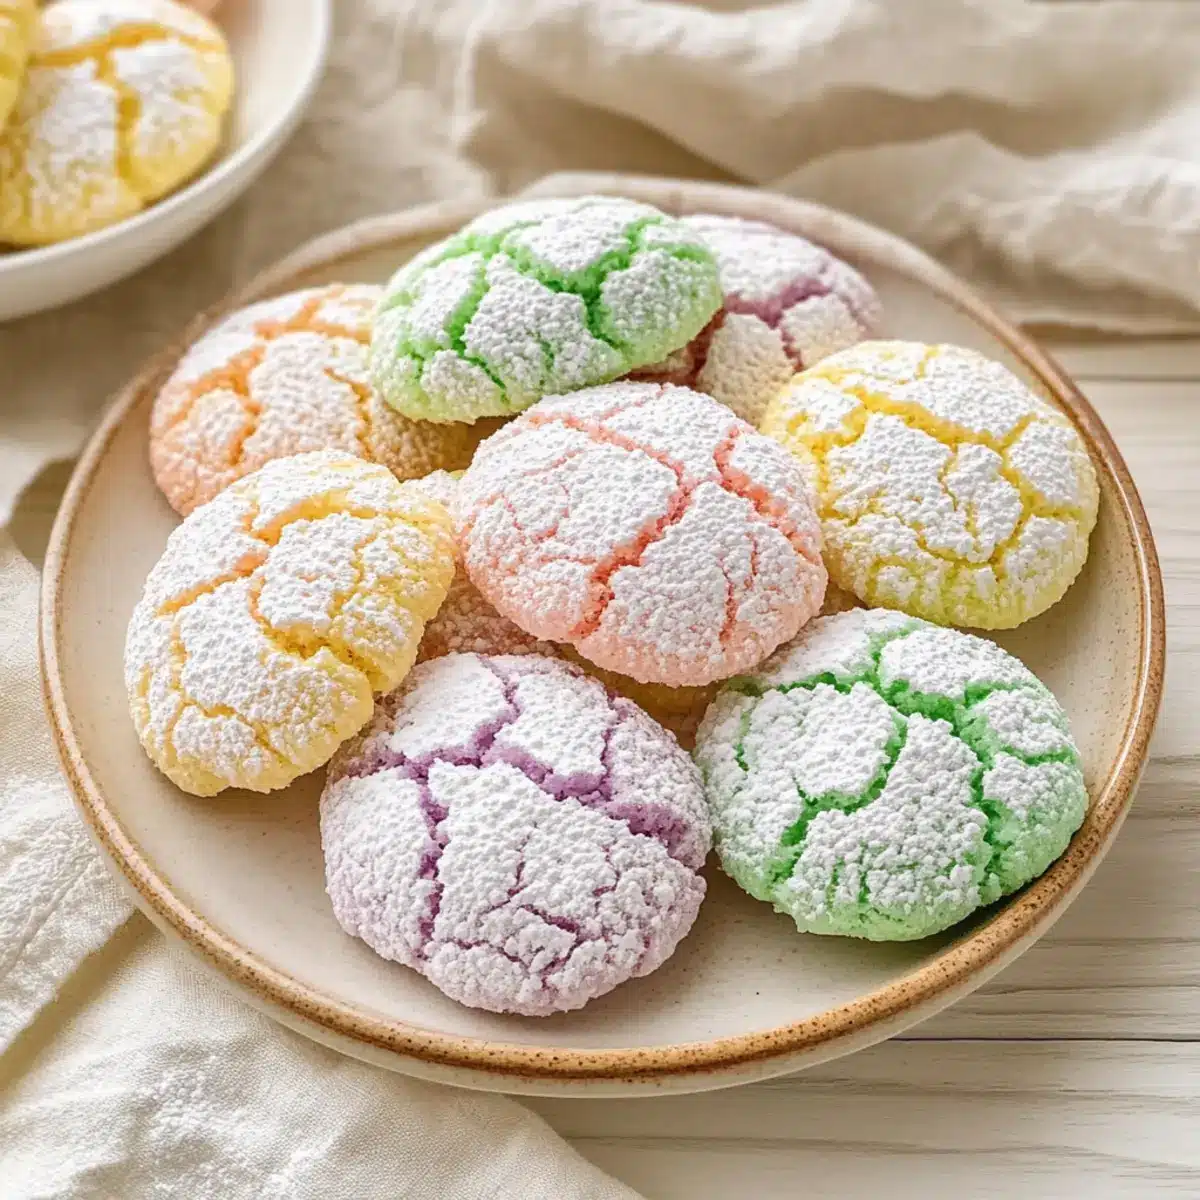
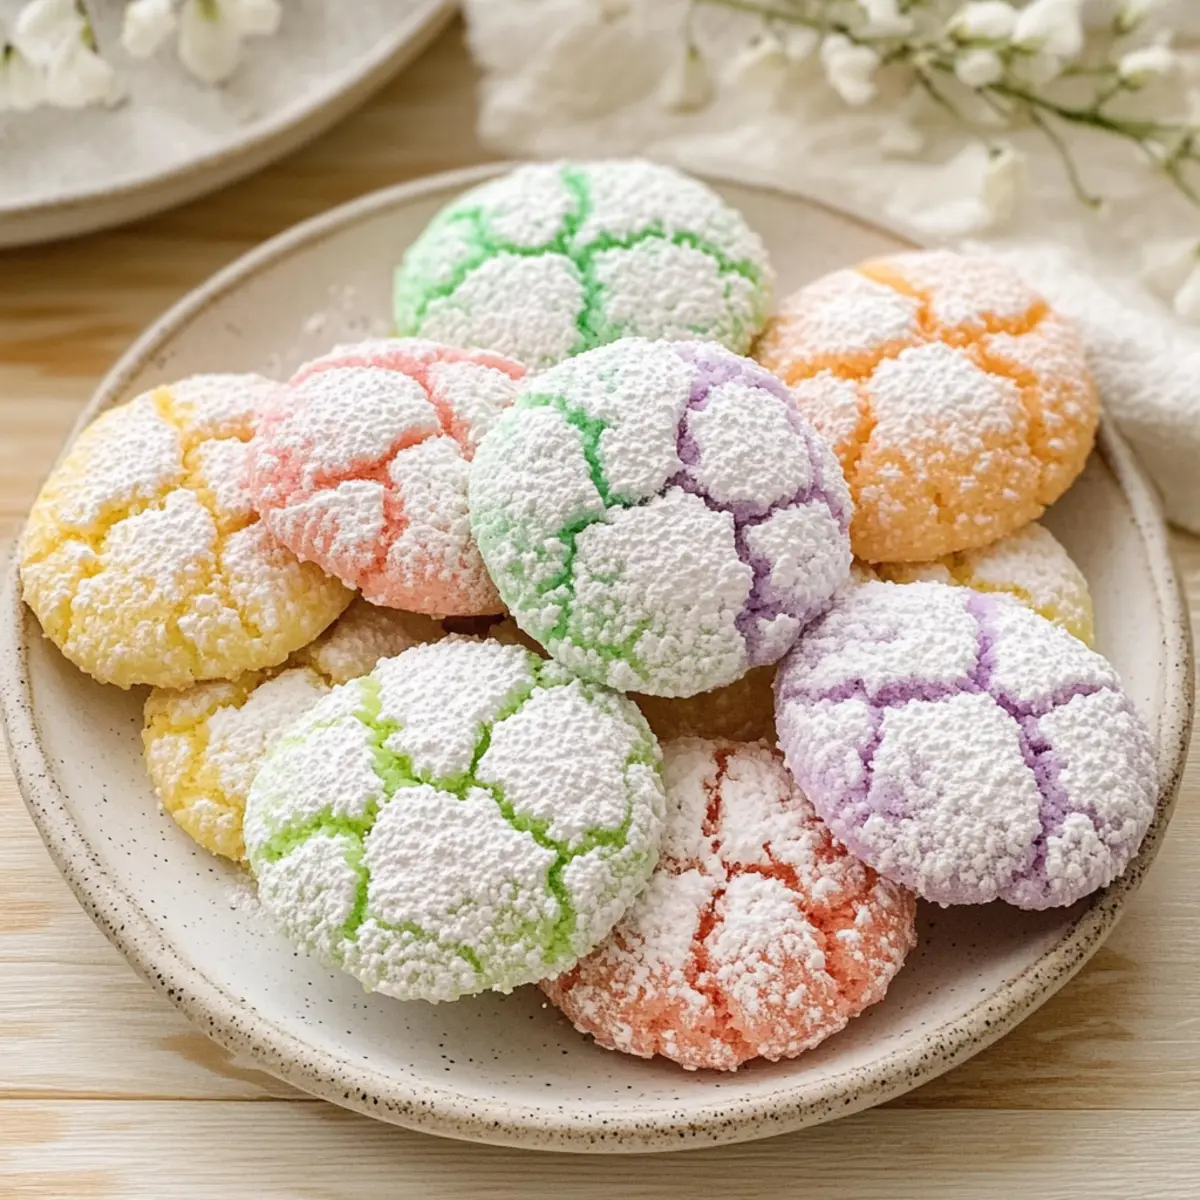
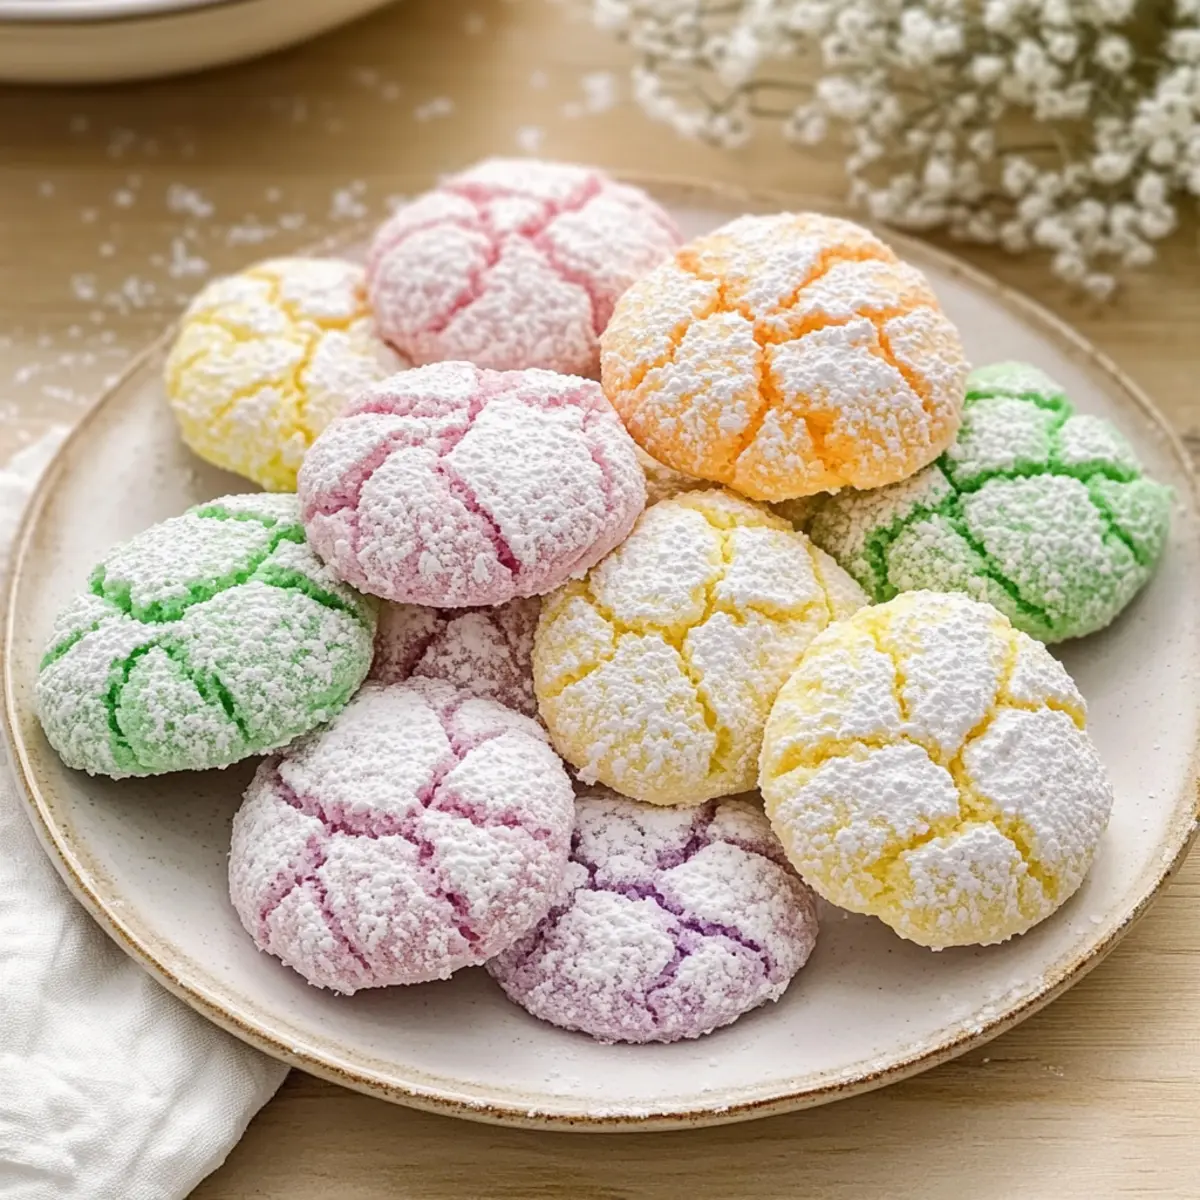
Cheerful Colors: These cookies boast charming pastel shades that bring a vibrant touch to any gathering, making them perfect for celebrations or just brightening up your day.
Easy to Make: With minimal steps and ingredients, even novice bakers can whip these up in no time, ensuring a stress-free baking experience.
Delightful Texture: Enjoy a perfect balance of chewy centers and crisp edges, creating a cookie that simply melts in your mouth.
Versatile Treat: Whether for Easter brunch or casual afternoon snacks, these cookies fit any occasion, appealing to friends and family alike!
Make Ahead: Prep the dough ahead of time and store it in the fridge to save time on busy days; just roll and bake when you’re ready! Don’t forget to explore other easy dessert ideas like Chewy Pumpkin Cookies or Chocolate Oat Cookies to satisfy your sweet cravings.
Springtime Crinkle Cookies Ingredients
For the Cookie Dough
• All-Purpose Flour – Provides structure; use gluten-free flour for a gluten-free version.
• Baking Powder – Leavening agent for rise; ensure it’s fresh for maximum lift.
• Salt – Enhances overall flavor balance; essential for contrasting sweetness.
• Unsalted Butter – Adds richness and moisture; substitute with coconut oil for a dairy-free option.
• Granulated Sugar – Sweetens the cookies and aids in texture; replace with a granulated sugar alternative for reduced sweetness.
• Large Eggs – Binds ingredients for a moist and fluffy texture; for an egg-free option, use flaxseed meal or applesauce.
• Vanilla Extract – Imparts aroma and flavor; substitute with extra almond extract if desired.
• Almond Extract (optional) – Adds a nutty hint; omit for nut-free cookies.
For the Coating and Color
• Powdered Sugar – Coats the dough balls for a signature crinkle look; essential for visual appeal.
• Gel Food Coloring in Pastel Shades – Provides vibrant color without thinning the dough; a must for your Springtime Crinkle Cookies!
Step‑by‑Step Instructions for Springtime Crinkle Cookies
Step 1: Preheat the Oven
Begin by preheating your oven to 350°F (175°C). While the oven warms up, line a baking sheet with parchment paper to prepare it for your delightful Springtime Crinkle Cookies. Make sure the parchment is flat to prevent the cookies from sticking, allowing for even baking and easy cleanup later on.
Step 2: Whisk Dry Ingredients
In a medium bowl, whisk together 2 cups of all-purpose flour, 2 teaspoons of baking powder, and ½ teaspoon of salt until well combined. This step ensures that the leavening agent is evenly distributed throughout the flour, which is crucial for the perfect rise in your Springtime Crinkle Cookies. Set this mixture aside as you move on to the next steps.
Step 3: Cream Butter and Sugar
In a large bowl, cream together ½ cup of softened unsalted butter and 1 cup of granulated sugar using an electric mixer on medium speed until the mixture is light and fluffy, which should take about 2-3 minutes. This aeration process incorporates air into the butter, creating the tender texture your cookies will have, so don’t rush it!
Step 4: Incorporate Eggs and Extracts
Next, add in 2 large eggs, one at a time, beating well after each addition to ensure they are fully incorporated. Follow this with 1 teaspoon of vanilla extract and ½ teaspoon of almond extract, mixing until combined. The rich aromas of the extracts will enhance the overall flavor profile of your Springtime Crinkle Cookies, making them irresistible.
Step 5: Combine Wet and Dry Ingredients
Gradually add the dry ingredient mixture into the wet ingredients, stirring gently until a thick dough forms. The dough will be stiff, but that’s exactly what you want for making perfectly shaped cookies. If you notice any flour remnants, use a spatula to fold it in until just combined, ensuring you don’t overmix.
Step 6: Add Color and Chill
Divide the dough into portions and mix in pastel gel food coloring until the desired shade is achieved, ensuring vibrant, cheerful colors for your cookies. Once colored, chill the dough in the refrigerator for at least 30 minutes. Chilling helps firm up the dough, making it much easier to roll and shape.
Step 7: Shape and Sugar Coat
After chilling, preheat your oven again if necessary. Roll tablespoon-sized balls of dough in powdered sugar until completely coated, ensuring there’s ample sugar on the outside. Arrange these sugar-coated dough balls about 2 inches apart on your prepared baking sheet. This spacing allows for adequate spread while they bake into delightful crinkle cookies.
Step 8: Bake to Perfection
Bake the cookies in the preheated oven for 10–12 minutes. You want the edges to be set and the tops to crack slightly, creating that signature crinkle effect. When they’re done, they should be slightly underbaked in the center for that chewy texture. Keep a close eye on them to avoid overbaking!
Step 9: Cool and Enjoy
Once baked, allow the cookies to cool on the baking sheet for 5 minutes before transferring them to a wire rack to cool completely. This resting time helps them finish setting up while allowing you to enjoy the delicious aroma. Once fully cooled, your Springtime Crinkle Cookies are ready to be savored!
Springtime Crinkle Cookies Variations
Feel free to get creative with these delightful cookies and add your personal twist to the recipe!
-
Gluten-Free: Use a gluten-free flour blend instead of all-purpose flour to accommodate dietary needs while keeping the chewy texture.
-
Dairy-Free: Swap out the unsalted butter for coconut oil or a plant-based butter alternative to enjoy a dairy-free version that still delights.
-
Low-Sugar: Replace granulated sugar with a natural sweetener like monk fruit or erythritol for a lower-calorie treat without sacrificing sweetness.
-
Chocolate Chip Delight: Fold in mini chocolate chips or colorful sprinkles into the dough before chilling to add texture and unexpected bursts of flavor.
-
Citrus Twist: Incorporate the zest of lemon or orange into the dough for a bright, refreshing flavor that pairs beautifully with the vanilla and almond extracts.
-
Nutty Variation: If you love nuts, mix in chopped pecans or walnuts for a delightful crunch in each bite – just be sure to adjust the almond extract accordingly if you have nut allergies.
-
Spicy Kick: Add a dash of cinnamon or ginger to the dough for a warm spice that contrasts beautifully with the sweetness, perfect for festive gatherings.
-
Decorative Glaze: After baking, drizzle a simple powdered sugar glaze mixed with a splash of lemon juice over the cooled cookies for an extra touch of sweetness and aesthetic appeal.
For more fun baking ideas, be sure to check out these recipes: Chewy Pumpkin Cookies for that autumn twist, or explore the delightful flavors of Chocolate Oat Cookies to satisfy your sweet tooth!
What to Serve with Springtime Crinkle Cookies
Brighten up your gatherings with delightful side dishes and drinks that complement the soft, chewy indulgence of your Springtime Crinkle Cookies.
- Refreshing Lemonade: This zesty beverage balances the sweetness of the cookies with its tartness, making each bite even more enjoyable.
- Vanilla Ice Cream: A scoop of creamy vanilla ice cream pairs perfectly with the chewy texture, creating a comforting dessert duo. Try serving the cookies warm for a delightful contrast!
- Fruit Salad: A mix of seasonal fruits brings a fresh crunch and vibrant colors, enhancing the joyful presentation of your cookies. The fruity flavors lighten the overall experience.
- Chocolate Dipped Strawberries: The richness of chocolate-covered strawberries contrasts beautifully with the pastel cookies, adding a touch of elegance to your dessert table.
- Sweet Tea: A classic southern beverage, its subtle sweetness complements the cookie’s buttery flavor while providing a refreshing sip to cleanse your palate.
- Cheesecake Bites: Mini cheesecake bites offer a creamy and indulgent counterpart to the light Springtime Crinkle Cookies, perfect for when you want a little extra sweetness!
How to Store and Freeze Springtime Crinkle Cookies
Room Temperature: Keep cookies in an airtight container at room temperature for up to 5 days to maintain their freshness and chewy texture.
Fridge: If you prefer a firmer cookie, store them in the refrigerator for up to a week. Just remember to bring them to room temperature before enjoying!
Freezer: For longer storage, freeze the cookies in a single layer on a baking sheet, then transfer to a freezer-safe bag or container for up to 3 months.
Reheating: To enjoy your frozen Springtime Crinkle Cookies, thaw them in the fridge overnight, then reheat in a preheated oven at 350°F (175°C) for 3-5 minutes to restore their delightful texture.
Make Ahead Options
These Springtime Crinkle Cookies are perfect for busy home cooks looking to save time! You can prepare the cookie dough up to 24 hours in advance by mixing all the ingredients and then chilling the dough in the refrigerator. This not only makes the dough easier to handle but also enhances the flavors. Additionally, you can roll the dough into balls and coat them in powdered sugar, then place them on a baking sheet lined with parchment paper to freeze for up to 3 days. When you’re ready to bake, simply preheat the oven and bake from frozen, adding a couple of extra minutes to the baking time. By prepping ahead, you’ll have delicious, freshly baked Springtime Crinkle Cookies with minimal last-minute effort!
Expert Tips for Springtime Crinkle Cookies
• Use High-Quality Ingredients: Fresh ingredients lead to better flavor. Check that your baking powder is active for that perfect rise in your Springtime Crinkle Cookies.
• Don’t Skip Chilling: Chilling the dough is key! It prevents cookies from spreading too much, ensuring you get that delightful chewy texture.
• Coat Generously: Roll the dough balls in powdered sugar until well-coated. This will create the iconic crinkle appearance while adding a sweet crunch.
• Watch the Baking Time: For chewy centers, remove cookies from the oven while they are slightly underbaked. They will continue to set as they cool on the baking sheet.
• Experiment with Colors: Feel free to mix different pastel shades for a fun, festive look. Your Springtime Crinkle Cookies can be as vibrant as your imagination!

Springtime Crinkle Cookies Recipe FAQs
What type of flour works best for Springtime Crinkle Cookies?
Absolutely! All-purpose flour provides the ideal structure for these cookies, but you can easily swap it for gluten-free flour to accommodate dietary needs. Just be sure to use a gluten-free blend designed for baking to ensure your Springtime Crinkle Cookies maintain a chewy texture.
How do I store leftover Springtime Crinkle Cookies?
You can store your cookies in an airtight container at room temperature for up to 5 days to keep them soft and chewy. If you prefer a firmer texture, feel free to refrigerate them for about a week. Just remember to take them out and let them come to room temperature before indulging!
Can I freeze Springtime Crinkle Cookies?
Definitely! To freeze your cookies, arrange them in a single layer on a baking sheet and freeze until solid. Then, transfer them to a freezer-safe bag or container for up to 3 months. When you’re ready to enjoy, simply thaw them overnight in the fridge, and for a warm treat, pop them in a preheated oven at 350°F (175°C) for 3-5 minutes.
What can I do if my cookies spread too much while baking?
Very often, excessive spreading happens due to warm dough or insufficient chilling time. To troubleshoot, ensure your dough is properly chilled for at least 30 minutes before shaping. If you find they still spread, consider adding a little extra flour to the dough next time; a tablespoon at a time until the desired consistency is reached will help prevent that.
Can I use different colors of gel food coloring for my cookies?
Absolutely! The more the merrier when it comes to colors. You can mix various pastel shades to create unique looks for your Springtime Crinkle Cookies. Just remember that a little goes a long way with gel food coloring, so start with small amounts and adjust until you reach your desired brightness.
Are there any allergen concerns with this recipe?
Yes, if you have nut allergies, simply omit the almond extract. Also, for dairy-free needs, feel free to substitute unsalted butter with coconut oil or margarine. Always double-check ingredient labels to ensure there are no hidden allergens that could cause concern for you or your loved ones.
Delicious Springtime Crinkle Cookies for Sweet Moments
Ingredients
Equipment
Method
- Preheat your oven to 350°F (175°C) and line a baking sheet with parchment paper.
- Whisk together the flour, baking powder, and salt in a medium bowl until well combined.
- Cream together the softened butter and granulated sugar until light and fluffy, about 2-3 minutes.
- Incorporate eggs one at a time, then mix in vanilla and almond extract until combined.
- Gradually add the dry ingredients to the wet ingredients, stirring gently until a thick dough forms.
- Mix in pastel gel food coloring until desired shade is achieved, then chill the dough for at least 30 minutes.
- Roll tablespoon-sized balls of dough in powdered sugar until coated and arrange on baking sheet 2 inches apart.
- Bake for 10-12 minutes until edges are set and tops crack slightly. They should be slightly underbaked in the center.
- Cool on baking sheet for 5 minutes before transferring to a wire rack to cool completely.
Leave a Reply